Sub Components (9 min)
Completion requirements
01 Getting Started
This lesson shows you how to create subcomponents in a Power Table. We will demonstrate how to create table subcomponents to drill down to the related child records of the triggered parent record and add an iframe as a subcomponent to the power table to display or update data in Salesforce.
02 Project Setup
Our project has a power table with the following attributes:
- Account as Salesforce source.
- The following Conditions:
- Industry is not empty
- Annual Revenue is not empty
- One column that shows the Account Name.
- We have Debug Mode enabled.
03 Add a Subcomponent Table
The subcomponent is used to drill down to the related child records of the triggered parent record.
1. Select the power table and click the Gear icon to open the Settings screen.
2. Click the Edit mapping button.
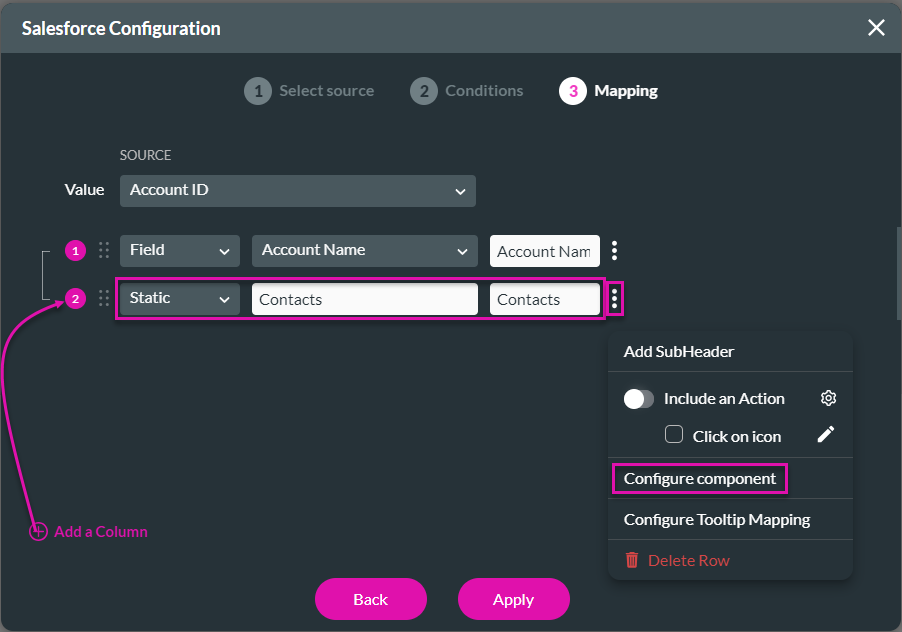
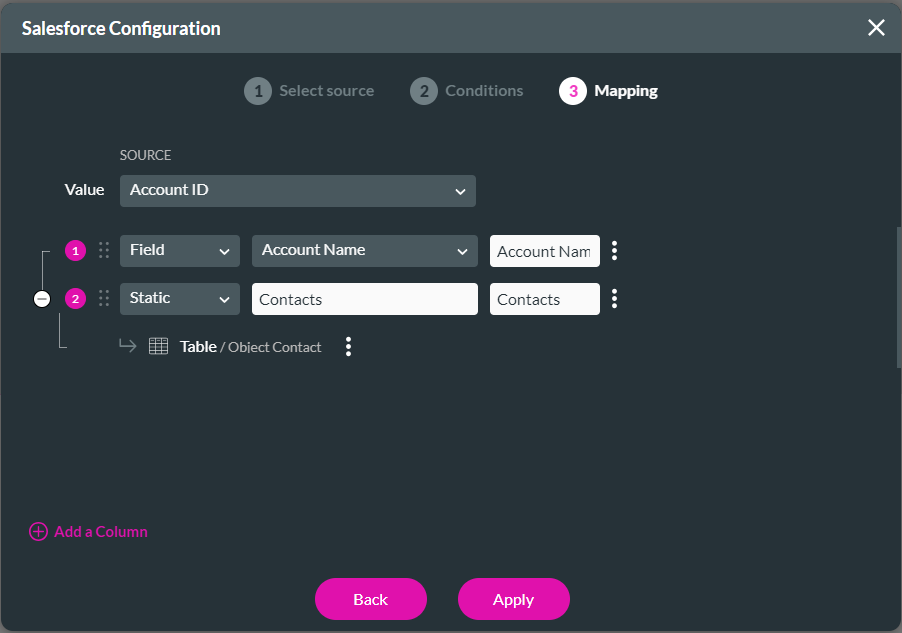
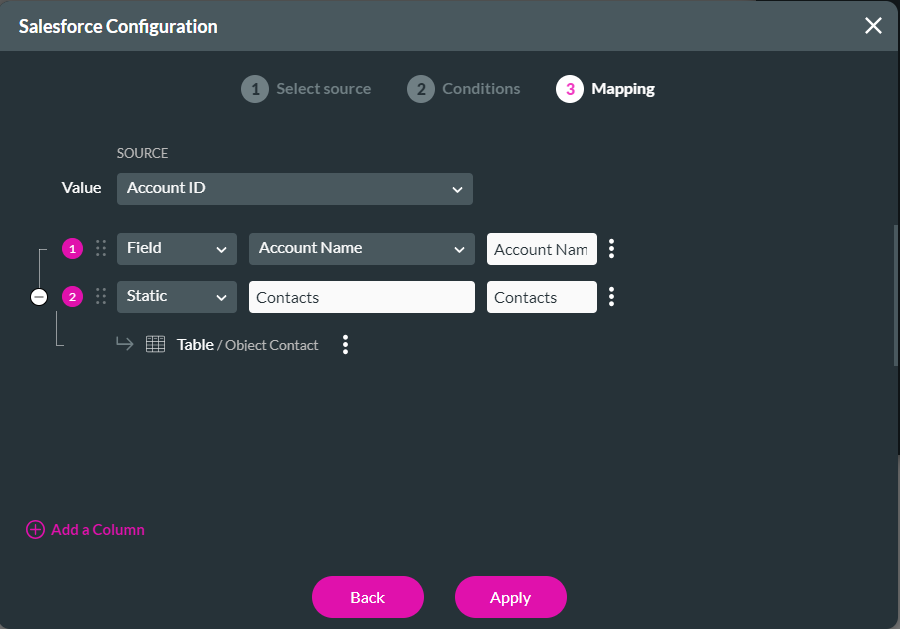
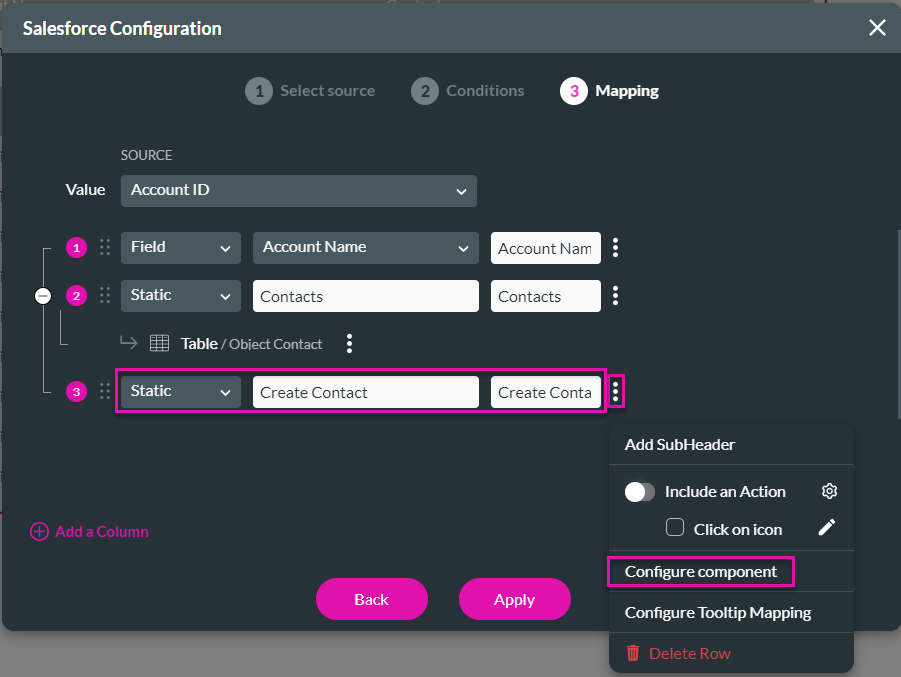
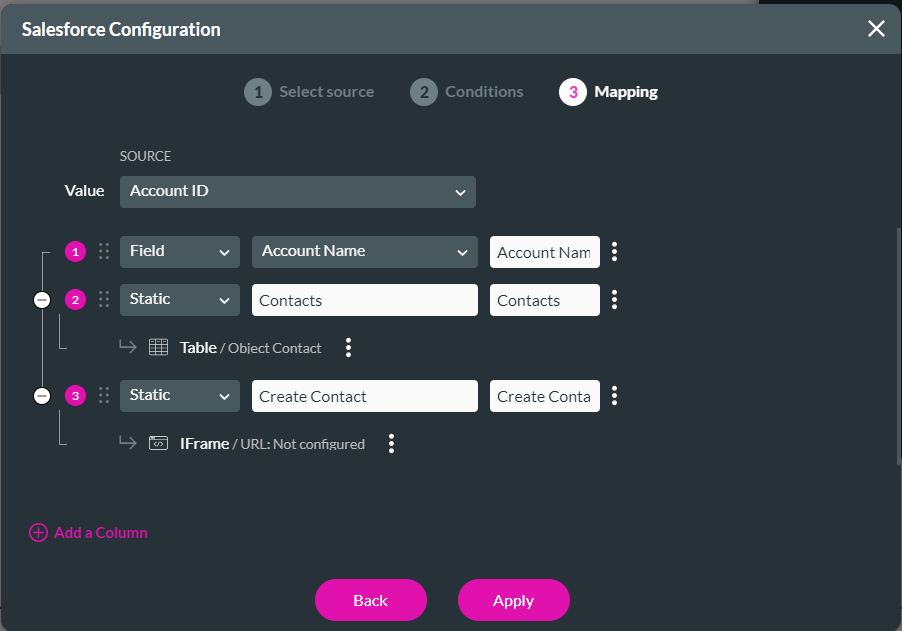
3. You can add the subcomponent to any existing table column; in our example, we added a new column. Click the Add a Column option and select Static from the drop-down list.
4. Add “Contact” in the fields.
5. Take note that the Value is Account ID. We reference this in the condition below.
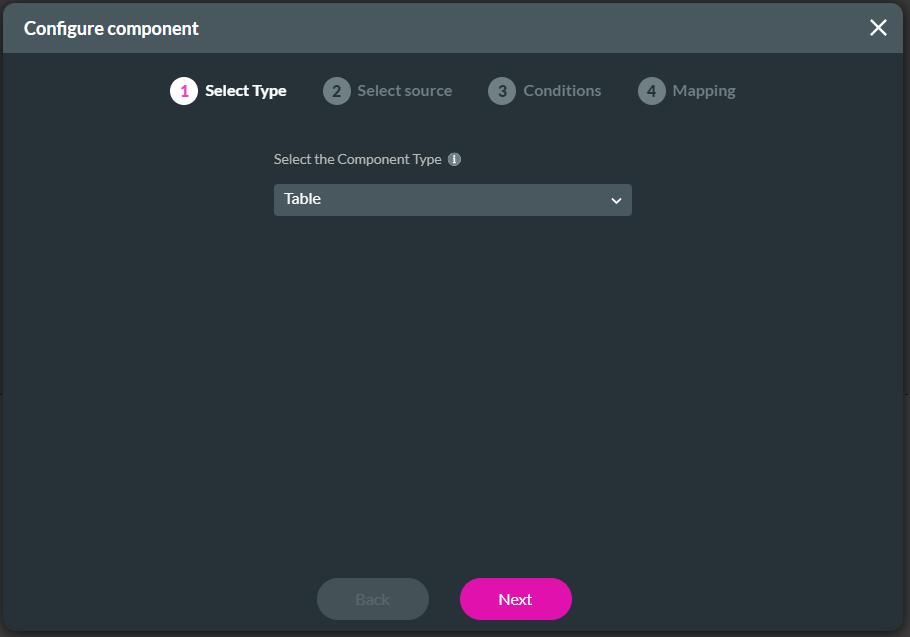
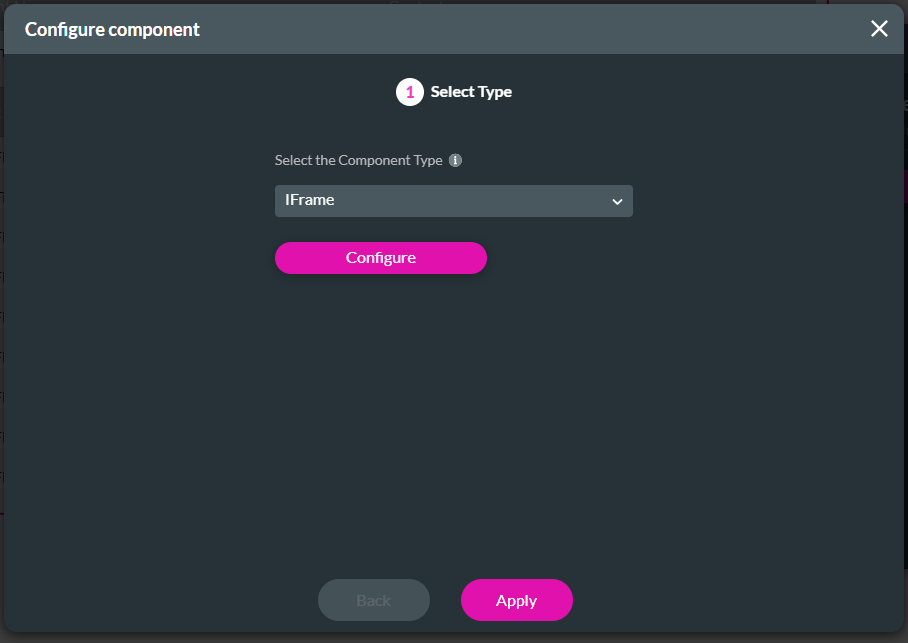
6. Click the Kebab icon and click the Configure component option. The Configure component screen opens.
7. Click the Next button, as we are using the default component type option “Table.”
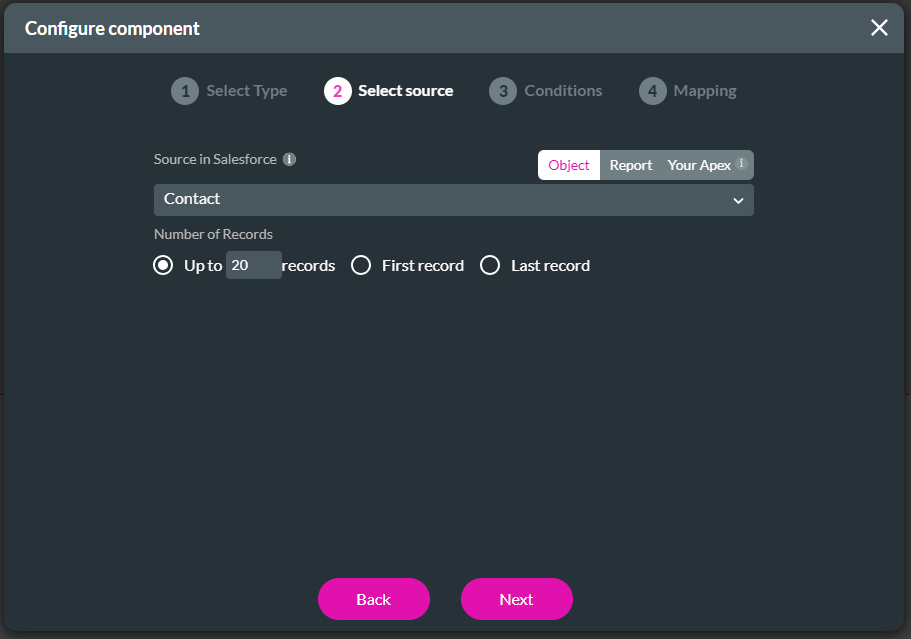
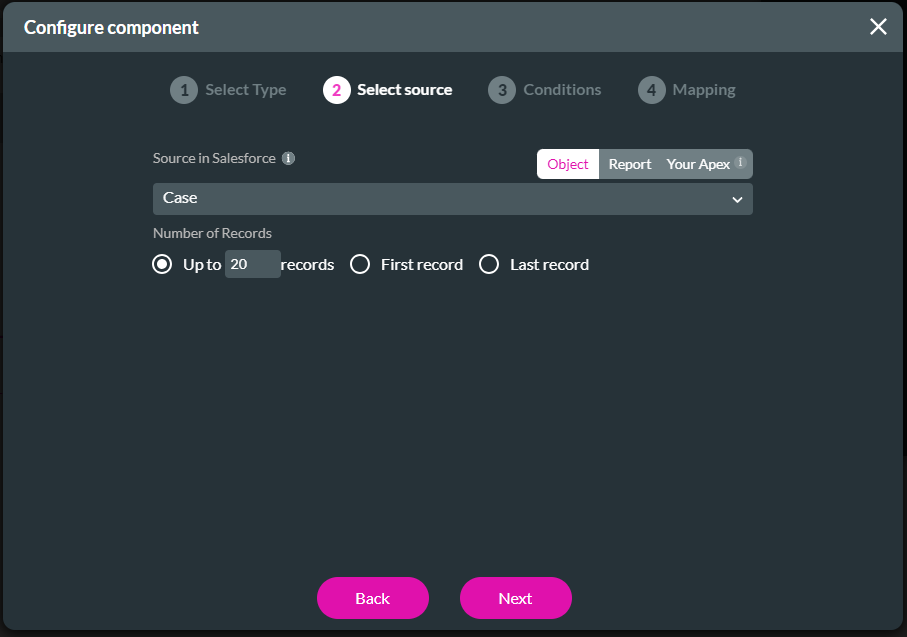
8. Use the drop-down list to select the source in Salesforce. We chose the contacts to view the contacts linked to the account.
9. Click the Next button.
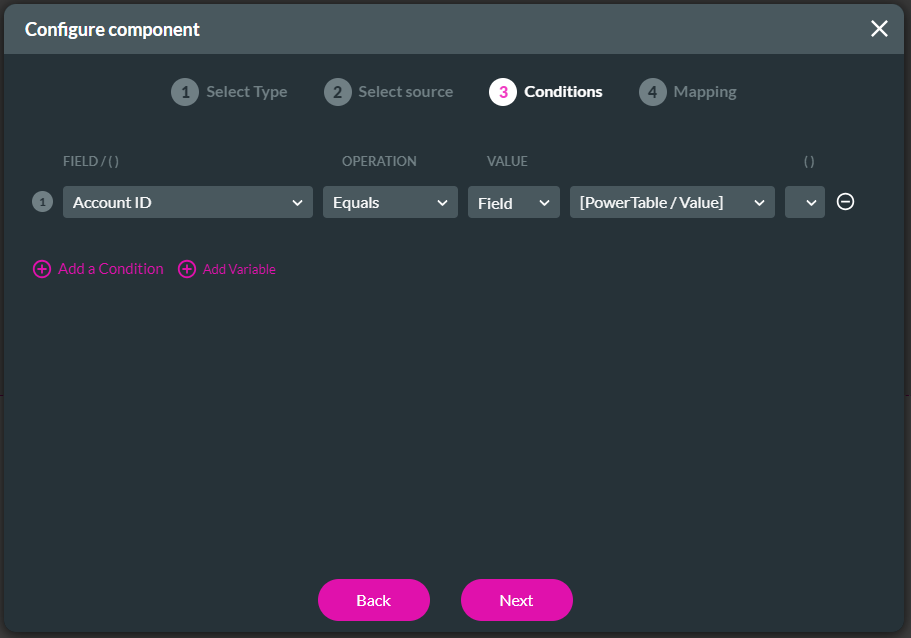
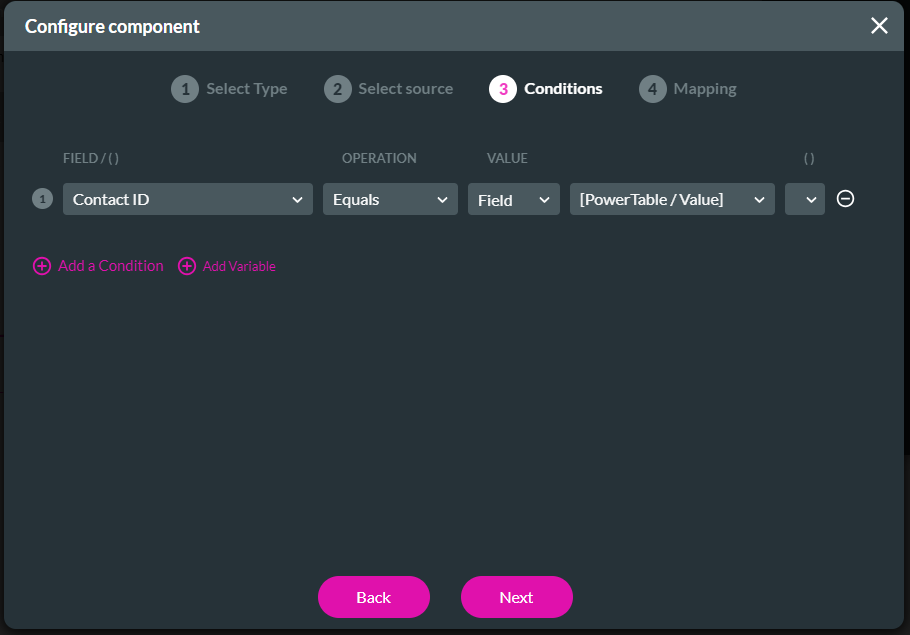
10. Click the Next button, as the condition has been added by default.
Account ID Equals Field Power Table/Value
The account ID linked to the contact must be the same as the value in the power table for the information to be displayed in the subcomponent table.
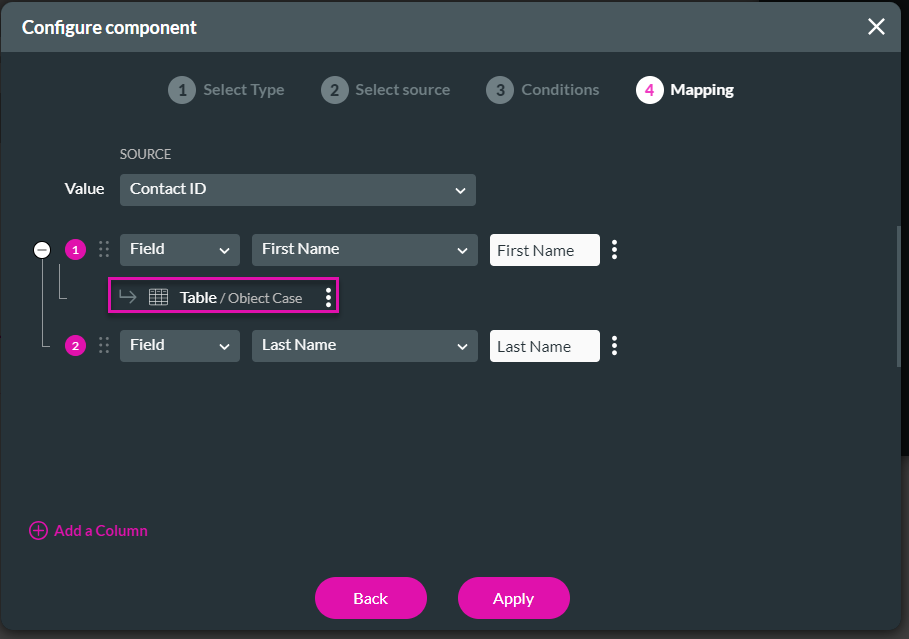
11. Click the Add a Column option to add two columns.
12. Use the drop-down list to add the First Name and Last Name.
13. Click the Apply button. The Table/Object Contact is added.

14. Click the Apply button.
15. Save and preview the project.
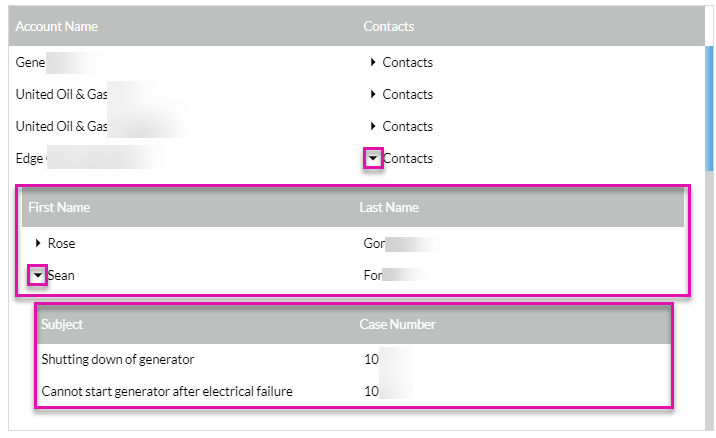
16. Click the right caret. The right caret changes to a down arrow, and the subcomponent table opens.
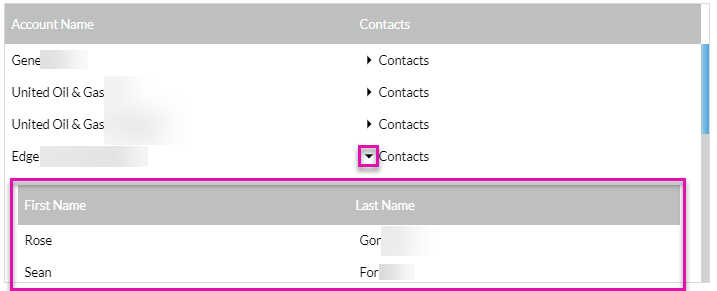
You can view the contact linked to any account in this way.
1. Select the power table and click the Gear icon to open the Settings screen.
2. Click the Edit mapping button.
3. You can add the subcomponent to any existing table column; in our example, we added a new column. Click the Add a Column option and select Static from the drop-down list.
4. Add “Contact” in the fields.
5. Take note that the Value is Account ID. We reference this in the condition below.
6. Click the Kebab icon and click the Configure component option. The Configure component screen opens.
7. Click the Next button, as we are using the default component type option “Table.”
8. Use the drop-down list to select the source in Salesforce. We chose the contacts to view the contacts linked to the account.
9. Click the Next button.
10. Click the Next button, as the condition has been added by default.
Account ID Equals Field Power Table/Value
The account ID linked to the contact must be the same as the value in the power table for the information to be displayed in the subcomponent table.
11. Click the Add a Column option to add two columns.
12. Use the drop-down list to add the First Name and Last Name.
13. Click the Apply button. The Table/Object Contact is added.
14. Click the Apply button.
15. Save and preview the project.
16. Click the right caret. The right caret changes to a down arrow, and the subcomponent table opens.
You can view the contact linked to any account in this way.
04 Add a Second Subcomponent Table
You can show another level of data.
1. Select the power table and click the Gear icon to open the Settings screen.
2. Click the Edit mapping button.
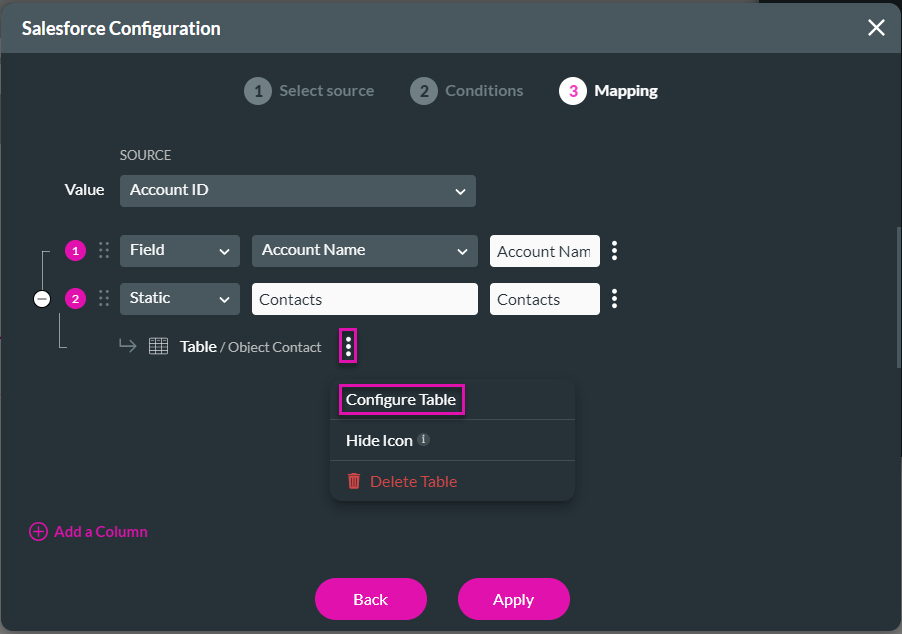
3. Click the Kebab icon next to the subcomponent table and click the Configure Table option.
4. Click the Next button on the Configure component - Select Type screen.
5. Click the Next button on the Configure component - Select Source screen.
6. Click the Next button on the Configure component - Condition screen.
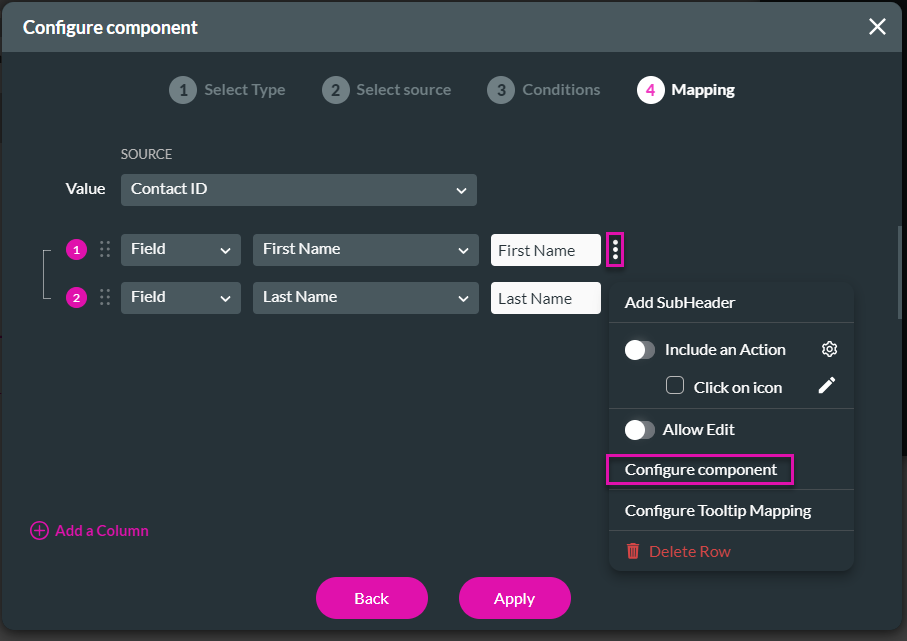
7. Click the Kebab icon of the First Name field and click the Configure component option. The Configure component screen opens.
8. Click the Next button on the Configure component - Select Type Table.
9. Use the dropdown list to select the source. We selected “Case.”
10. Click the Next button.
11. Click the Next button, as the condition has been added by default.
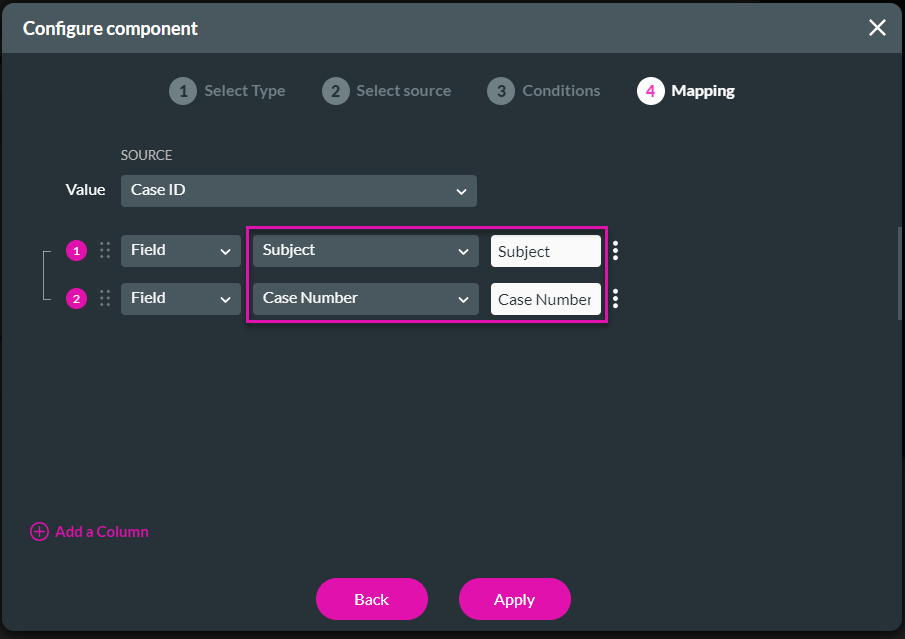
12. Click the Add a Column option to add two columns.
13. Use the dropdown list to add the Subject and Case Number.
14. Click the Apply button. The Table/Object Case is added.
15. Click the Apply button.
16. Click the Apply button.
17. Save and preview the project.
18. Click the right caret next to Contacts. The right caret changes to a down arrow, and the subcomponent table opens.
19. Click the right caret next to a first name. The right caret changes to a down arrow, and the subcomponent table opens.
20. Drag the power table bigger on the Titan Web builder to display more information.
21. Select the power table and click the Gear icon to open the Settings screen.
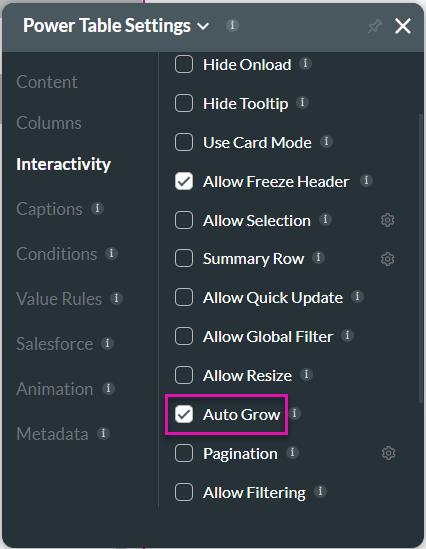
22. Under interactivity, scroll down and click the Auto Grow checkbox. The power table will resize according to the data being displayed.
1. Select the power table and click the Gear icon to open the Settings screen.
2. Click the Edit mapping button.
3. Click the Kebab icon next to the subcomponent table and click the Configure Table option.
4. Click the Next button on the Configure component - Select Type screen.
5. Click the Next button on the Configure component - Select Source screen.
6. Click the Next button on the Configure component - Condition screen.
7. Click the Kebab icon of the First Name field and click the Configure component option. The Configure component screen opens.
8. Click the Next button on the Configure component - Select Type Table.
9. Use the dropdown list to select the source. We selected “Case.”
10. Click the Next button.
11. Click the Next button, as the condition has been added by default.
- Contact ID Equals Value Power Table/Value
12. Click the Add a Column option to add two columns.
13. Use the dropdown list to add the Subject and Case Number.
14. Click the Apply button. The Table/Object Case is added.
15. Click the Apply button.
16. Click the Apply button.
17. Save and preview the project.
18. Click the right caret next to Contacts. The right caret changes to a down arrow, and the subcomponent table opens.
19. Click the right caret next to a first name. The right caret changes to a down arrow, and the subcomponent table opens.
20. Drag the power table bigger on the Titan Web builder to display more information.
21. Select the power table and click the Gear icon to open the Settings screen.
22. Under interactivity, scroll down and click the Auto Grow checkbox. The power table will resize according to the data being displayed.
05 Add an iFrame
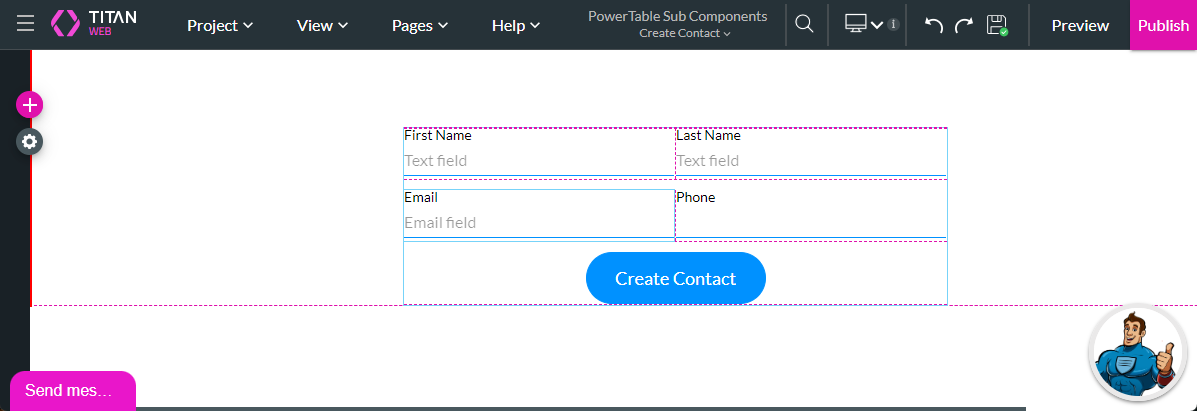
We added a Create Contact page to the project, which includes a form, some input fields, and a button.
There is a Create Contact Salesforce integration action on the button with the following mapping:
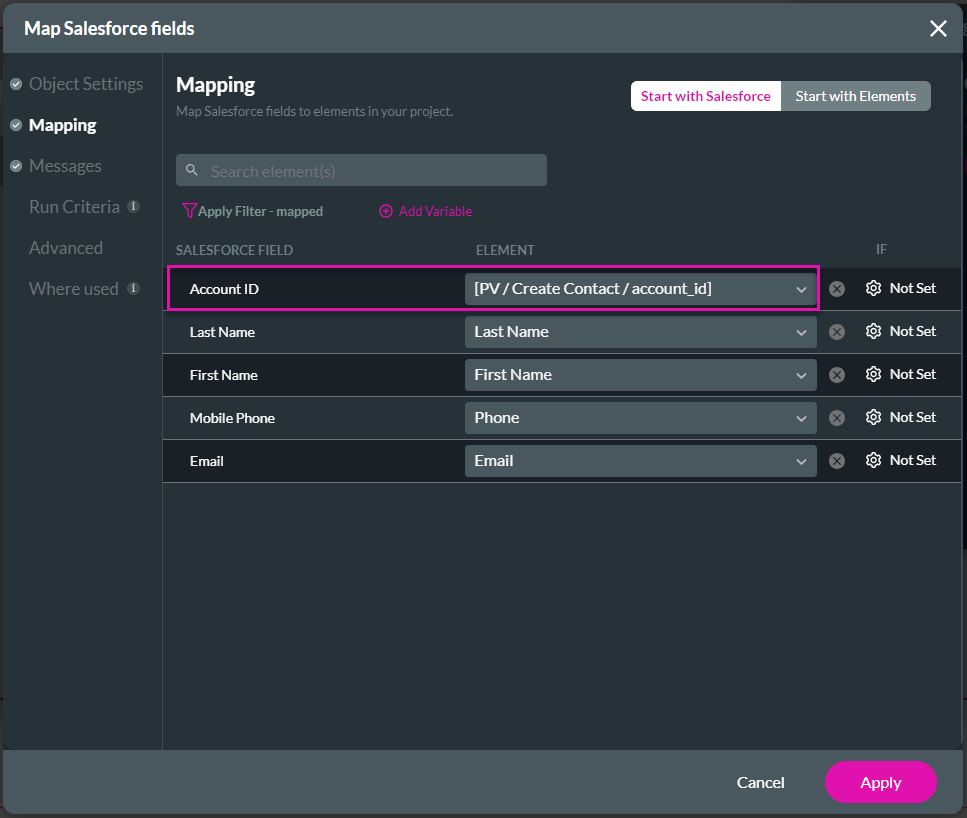
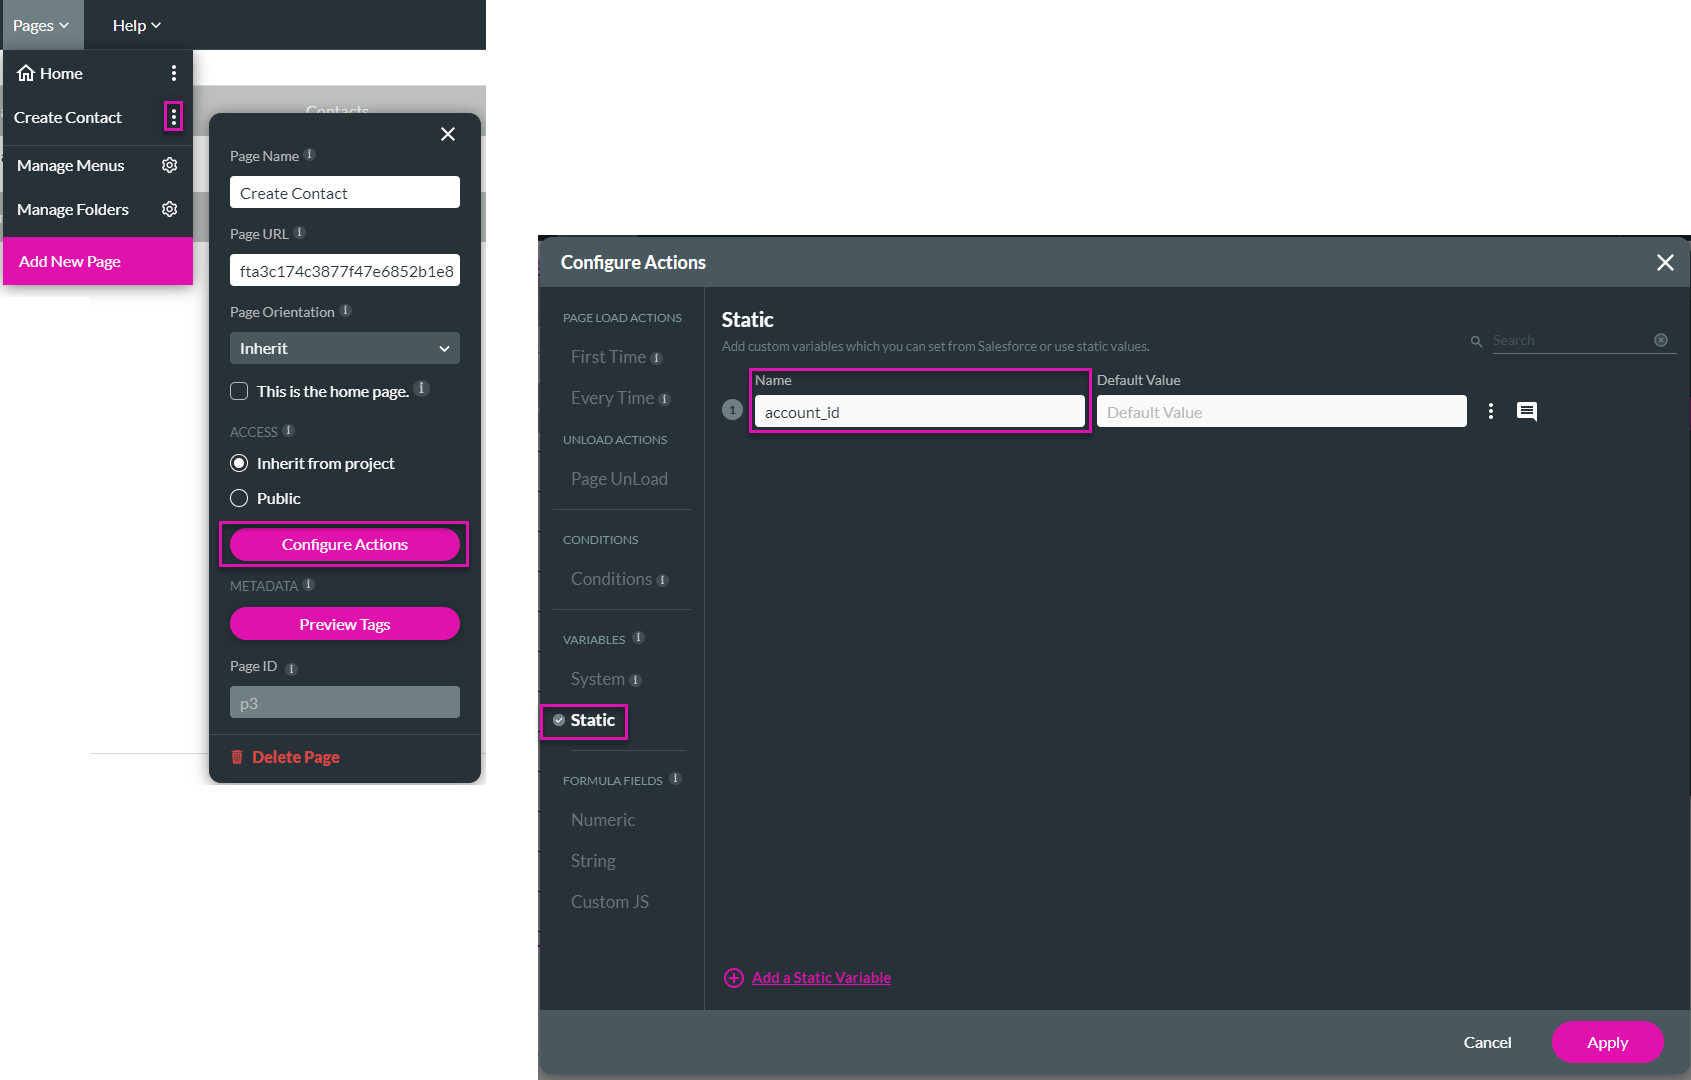
We added a static variable to the Create Contact page by clicking the Configure Actions button. In Titan, a page cannot access the data on other pages. The account ID on the Home page will be passed to this variable on the Create Contact page. The variable will populate the Account ID in the push mapping (see the Account ID mapping done above).
We will link the iframe to this page of the project.
1. Select the power table and click the Gear icon to open the Settings screen.
2. Click the Edit mapping button.
3. Click the Add a Column option and select Static from the drop-down list.
4. Add “Create Contact” in the fields.
5. Click the Kebab icon and click the Configure component option. The Configure component screen opens.
6. Use the drop-down list and select the iframe option.
7. Click the Configure button.
8. Click the Internal option and select the Create Contact page from the drop-down list.
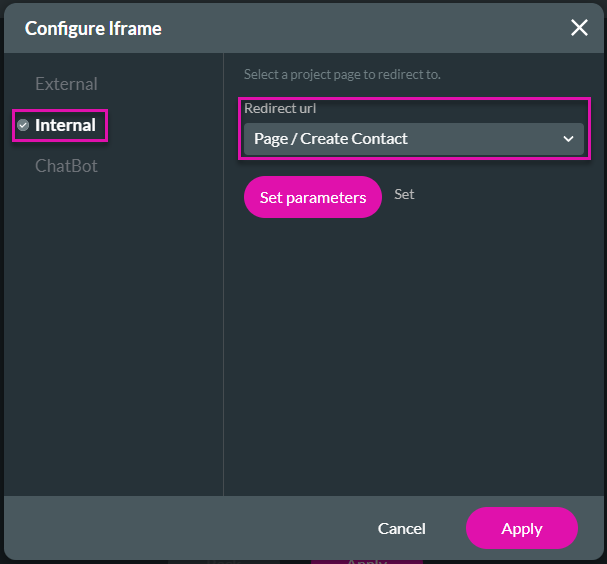
9. Click the Set parameters button.
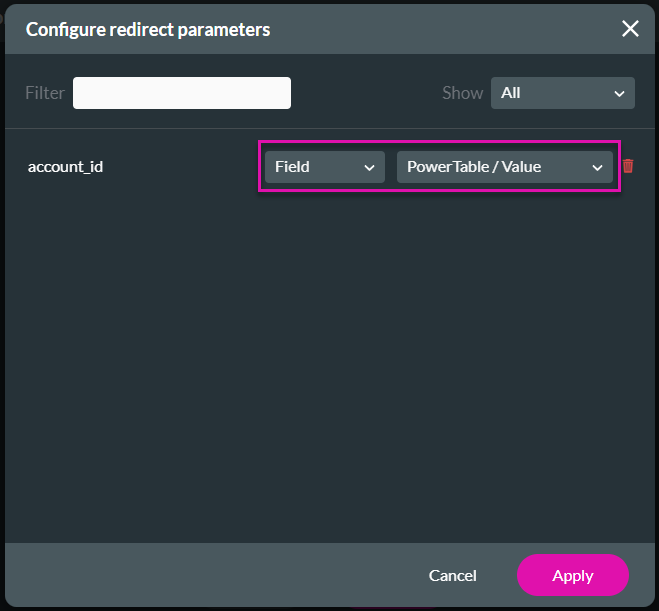
10. Use the drop-down lists to select “Field” and “Power Table/Value.”
11. Click the Apply button.
12. Click the Apply button on the Configure iframe screen.
13. Click the Apply button on the Configure component screen.
14. Click the Apply button.
15. Select the power table and click the Styling icon.
16. Click the iframe option and expand the Size option.
17. Type a number in the Height field. The width will auto-resize.

18. Save and preview the project.
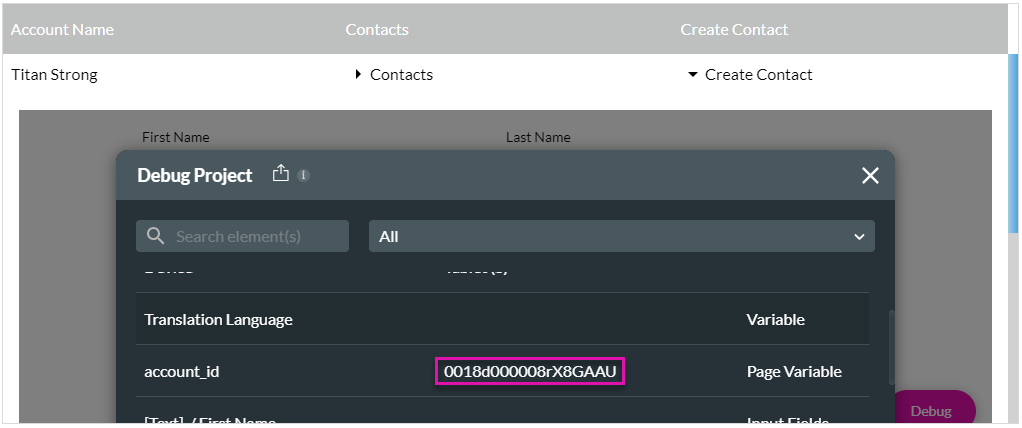
19. Click the right caret next to the Create Contact option. The right caret changes to a down arrow, and the iframe opens.
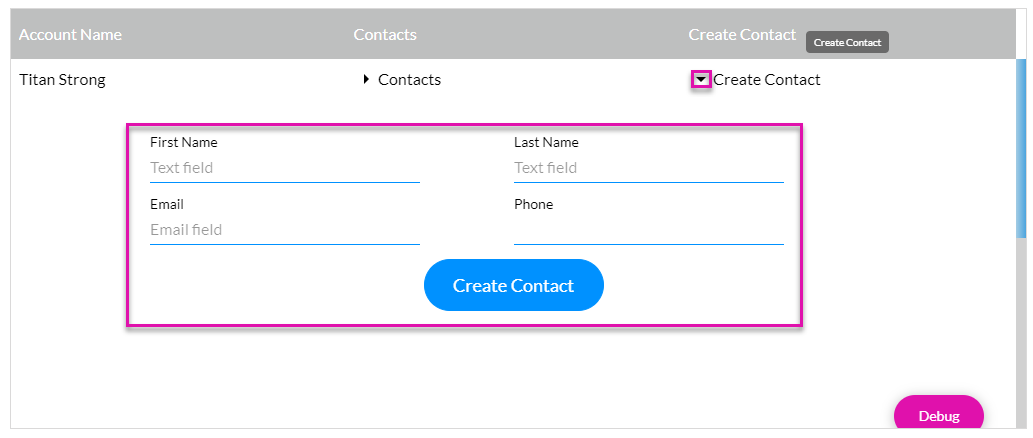
20. Click the Debug button. You will see the past account ID. This is the account where the new contact will be created.
21. Add the details for the contact and click the Create Contact button.
22. Refresh the web page. The newly added contact is displayed.
There is a Create Contact Salesforce integration action on the button with the following mapping:
We added a static variable to the Create Contact page by clicking the Configure Actions button. In Titan, a page cannot access the data on other pages. The account ID on the Home page will be passed to this variable on the Create Contact page. The variable will populate the Account ID in the push mapping (see the Account ID mapping done above).
We will link the iframe to this page of the project.
1. Select the power table and click the Gear icon to open the Settings screen.
2. Click the Edit mapping button.
3. Click the Add a Column option and select Static from the drop-down list.
4. Add “Create Contact” in the fields.
5. Click the Kebab icon and click the Configure component option. The Configure component screen opens.
6. Use the drop-down list and select the iframe option.
7. Click the Configure button.
8. Click the Internal option and select the Create Contact page from the drop-down list.
9. Click the Set parameters button.
10. Use the drop-down lists to select “Field” and “Power Table/Value.”
11. Click the Apply button.
12. Click the Apply button on the Configure iframe screen.
13. Click the Apply button on the Configure component screen.
14. Click the Apply button.
15. Select the power table and click the Styling icon.
16. Click the iframe option and expand the Size option.
17. Type a number in the Height field. The width will auto-resize.
18. Save and preview the project.
19. Click the right caret next to the Create Contact option. The right caret changes to a down arrow, and the iframe opens.
20. Click the Debug button. You will see the past account ID. This is the account where the new contact will be created.
21. Add the details for the contact and click the Create Contact button.
22. Refresh the web page. The newly added contact is displayed.