Push Data (9 min)
Completion requirements
01 Getting Started
This tutorial covers how to push data from your power table to Salesforce, including:
- Updating all table values.
- Updating selected records on the table.
- Pushing selected table values to a new Salesforce object.
02 Updating All Table Values
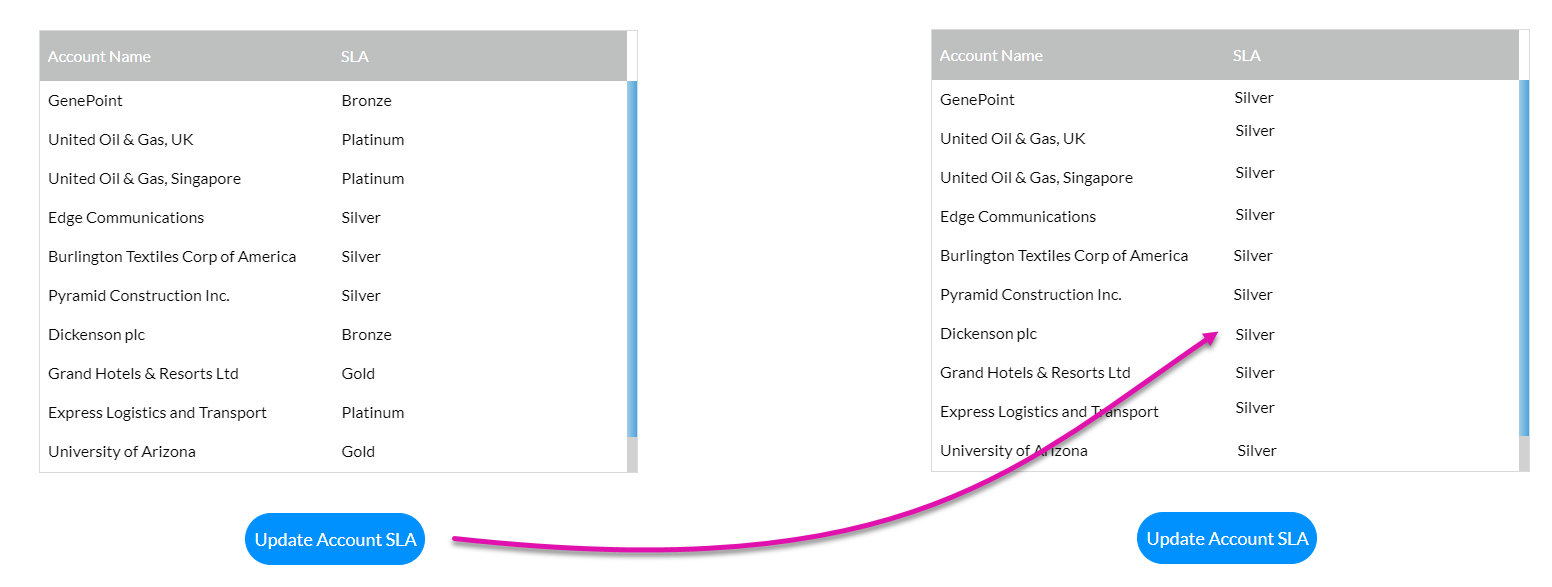
For this example, the table configuration consists of the account names and the SLA. All SLA values will be updated with the click of a button.

First, create a Salesforce push.
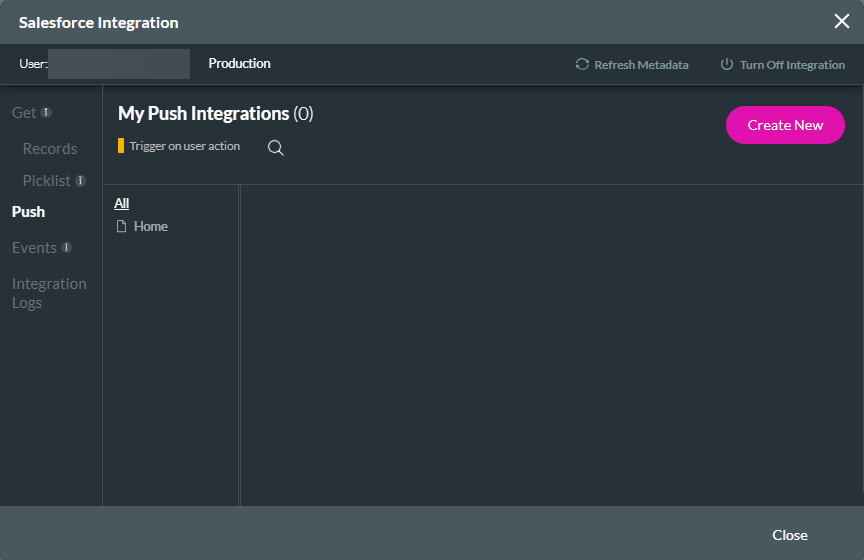
1. Navigate to the Project Settings Menu and click the Salesforce tab. The Salesforce Integration screen opens.
2. Select the Push tab and click Create New. The Map Salesforce Fields window opens.
3. In the Object Settings tab, use the dropdowns to select the Object in Salesforce and the Action, such as "Update the Account."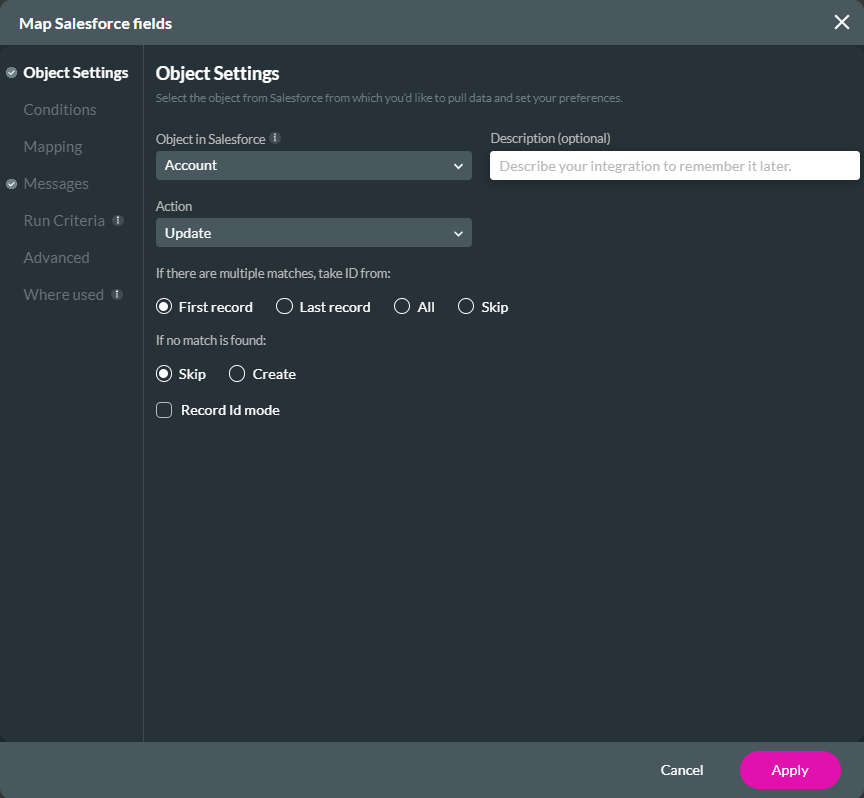
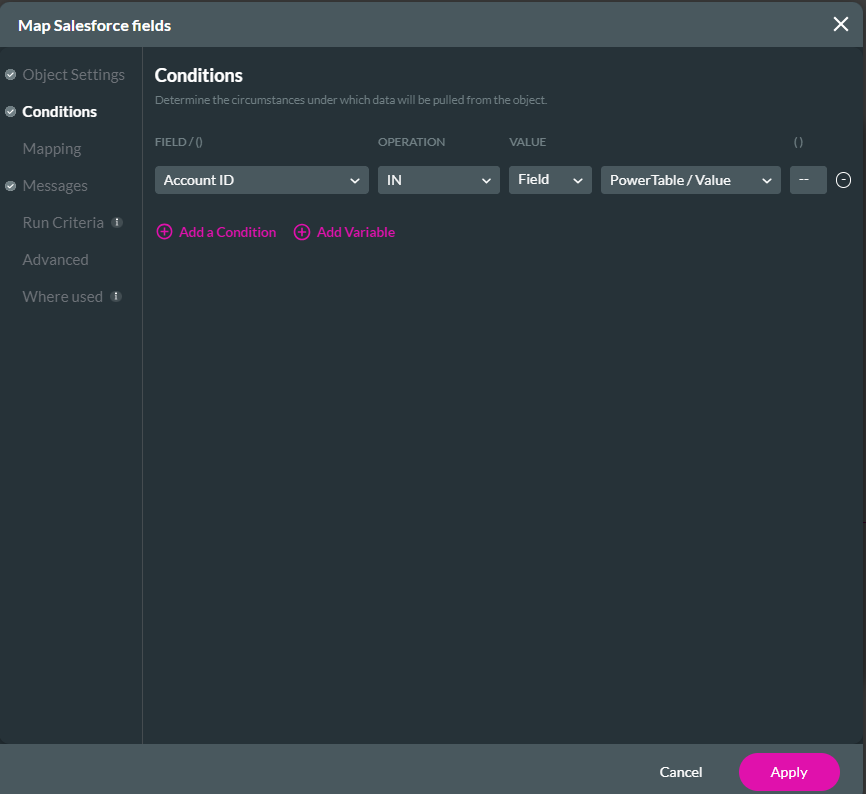
4. Select the Conditions tab and configure the push conditions with the dropdowns. For example, the Account ID must be in the Power Table Values.
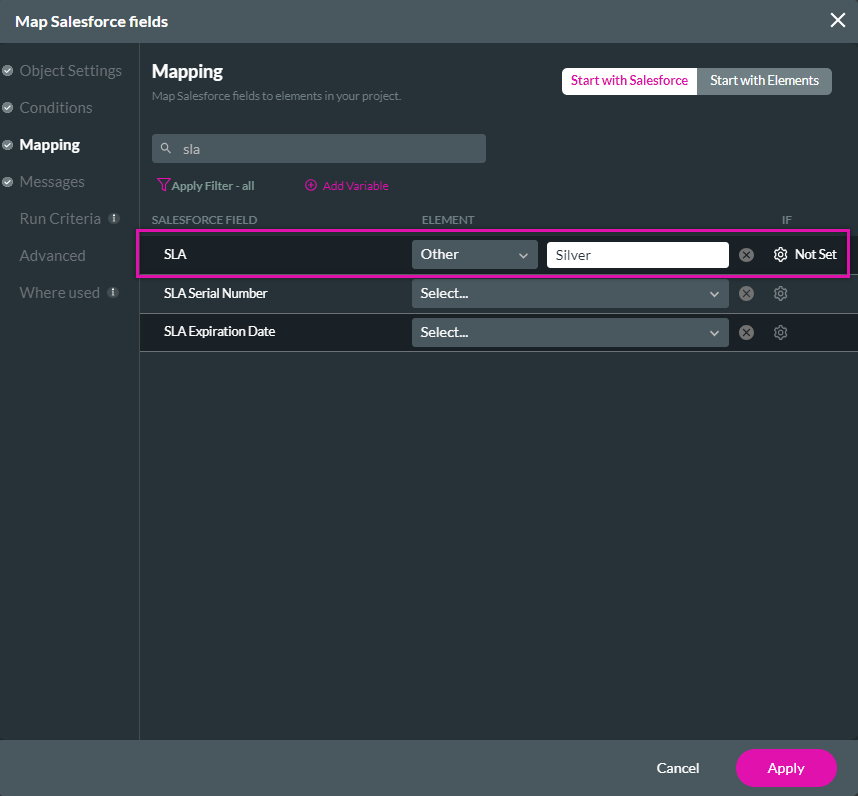
5. Click the Mapping tab. Use the dropdowns to map Salesforce fields to the Power Table elements. For example, the SLA was mapped to Other and given the value Silver. Click Apply.
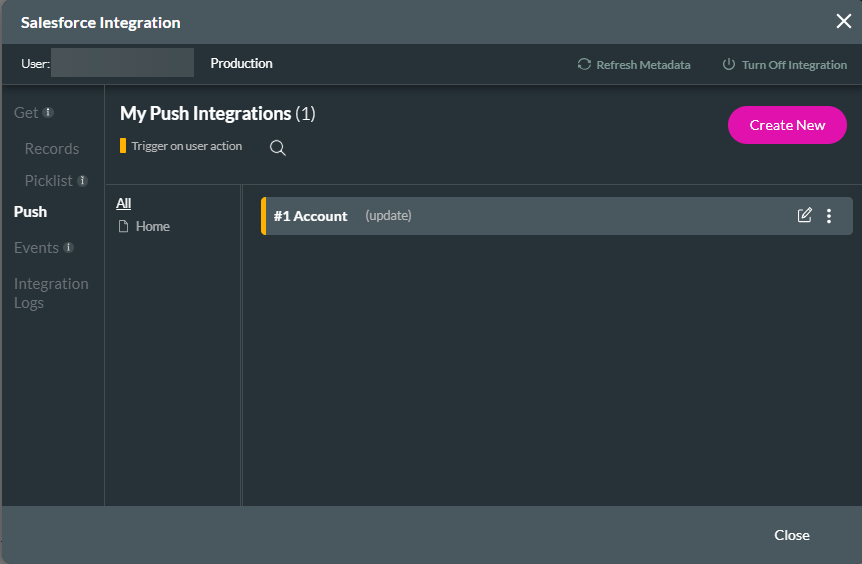
The configured push displays in the Salesforce Integration window.
6. Click Close.

Next, add the configured Salesforce push to a button as an on-click action.
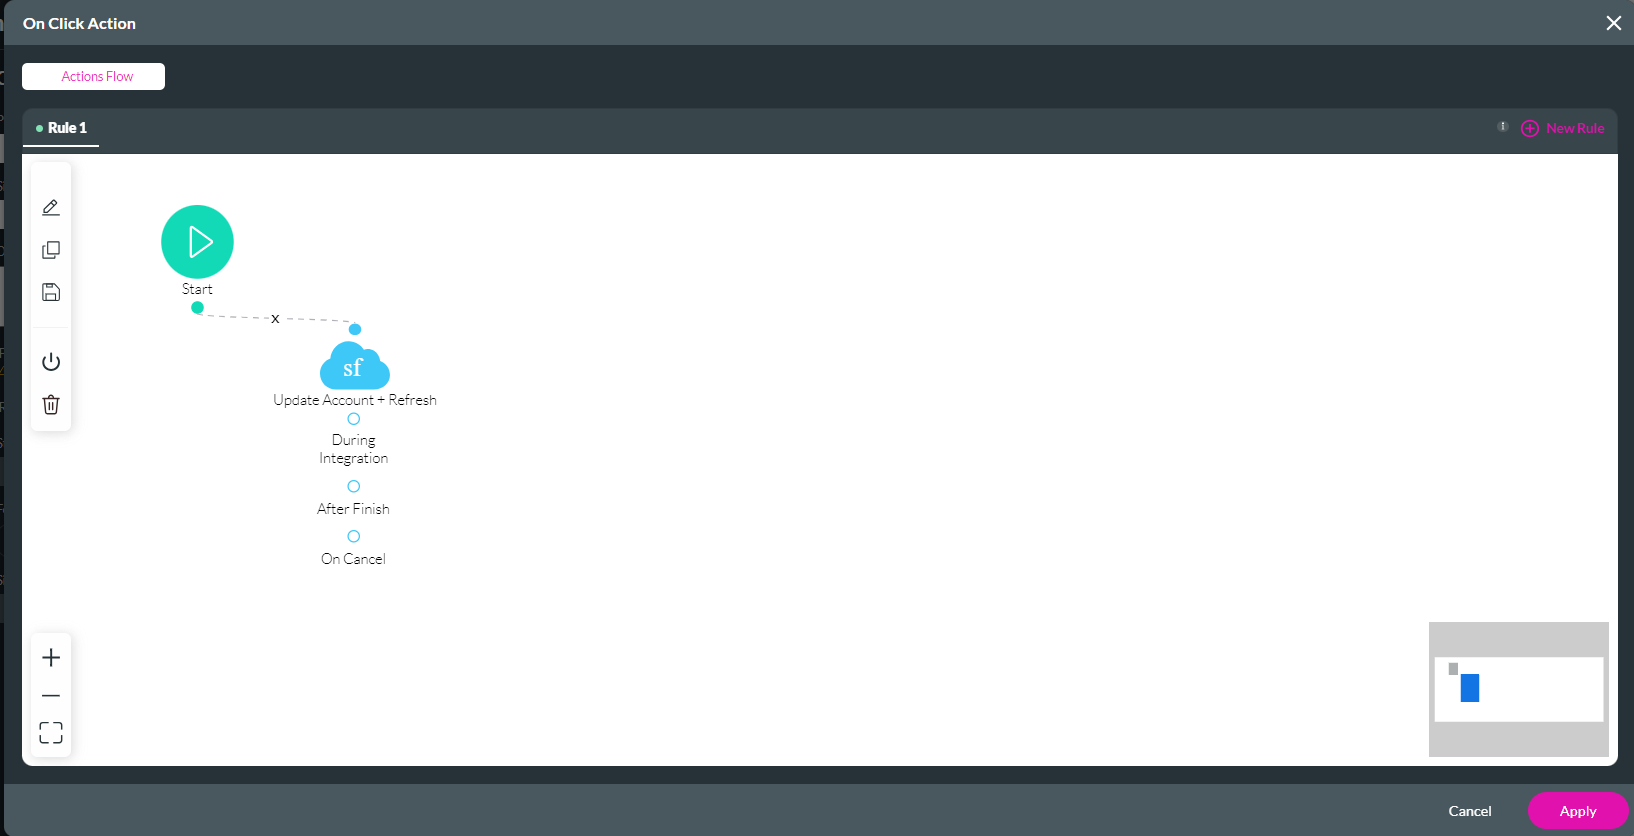
1. Click the button link icon. The On Click Action window opens.
2. Select the Start + icon. The Add Node screen opens.
3. Choose Salesforce Action and click Next.

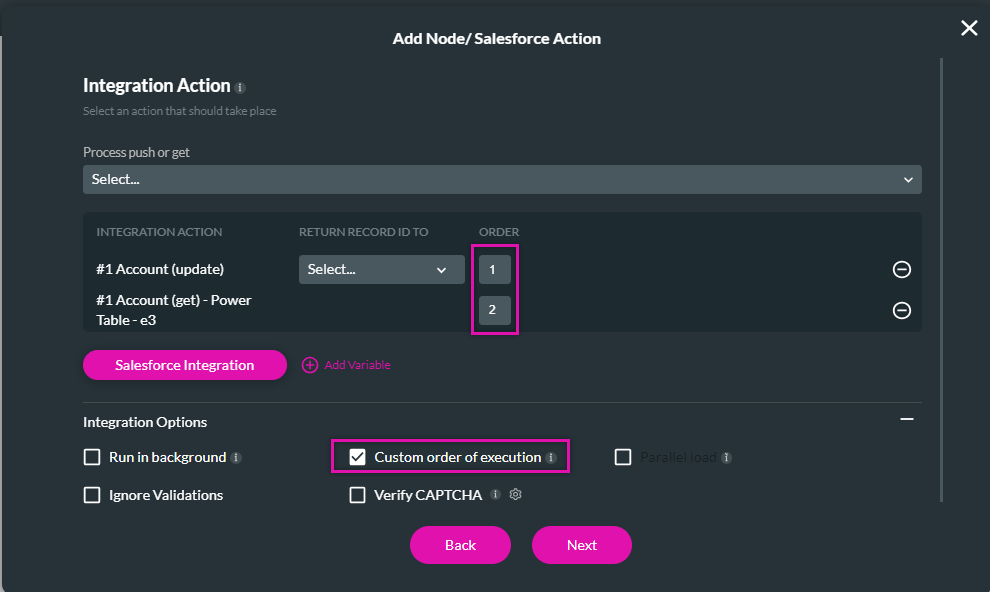
4. For the Integration action, select both the configured Salesforce push and the Power Table get. The Power Table Get is automatically created when inserting a power table.
When choosing multiple Integration Actions, you can configure the action order by enabling Custom Order of Execution and assigning a number to each action. For this example, the Account will update, and the table will refresh when clicking the button. Click Next.
5. Add a Tag and click Insert.
The node is added to the screen.
6. Click Apply.
Save and Preview. When the button is clicked, all SLAs are updated to Silver.
First, create a Salesforce push.
1. Navigate to the Project Settings Menu and click the Salesforce tab. The Salesforce Integration screen opens.
2. Select the Push tab and click Create New. The Map Salesforce Fields window opens.
3. In the Object Settings tab, use the dropdowns to select the Object in Salesforce and the Action, such as "Update the Account."
4. Select the Conditions tab and configure the push conditions with the dropdowns. For example, the Account ID must be in the Power Table Values.
5. Click the Mapping tab. Use the dropdowns to map Salesforce fields to the Power Table elements. For example, the SLA was mapped to Other and given the value Silver. Click Apply.
The configured push displays in the Salesforce Integration window.
6. Click Close.
Next, add the configured Salesforce push to a button as an on-click action.
1. Click the button link icon. The On Click Action window opens.
2. Select the Start + icon. The Add Node screen opens.
3. Choose Salesforce Action and click Next.
4. For the Integration action, select both the configured Salesforce push and the Power Table get. The Power Table Get is automatically created when inserting a power table.
When choosing multiple Integration Actions, you can configure the action order by enabling Custom Order of Execution and assigning a number to each action. For this example, the Account will update, and the table will refresh when clicking the button. Click Next.
5. Add a Tag and click Insert.
The node is added to the screen.
6. Click Apply.
Save and Preview. When the button is clicked, all SLAs are updated to Silver.
03 Update Selected Records
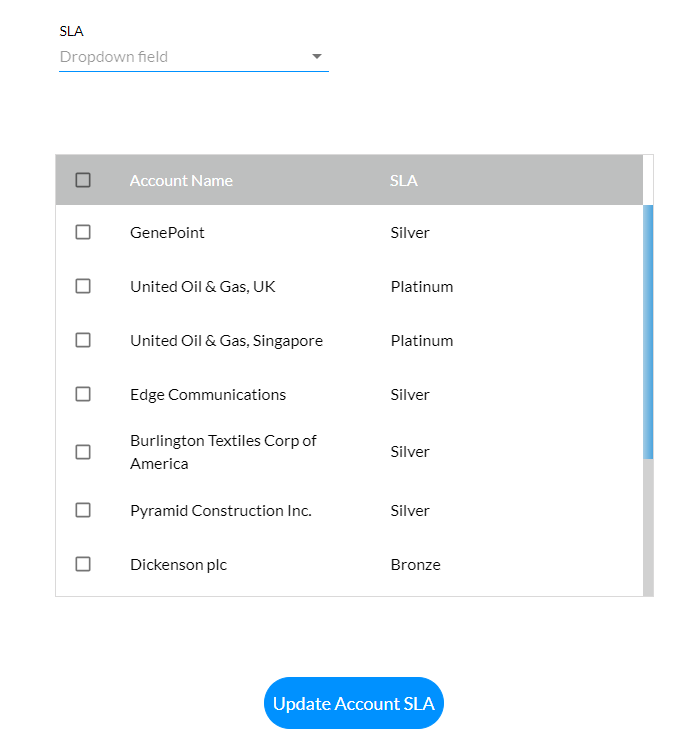
You can update specific fields in your table. For this example, the selected records will be updated using a dropdown.
To allow users to select specific records in a table:
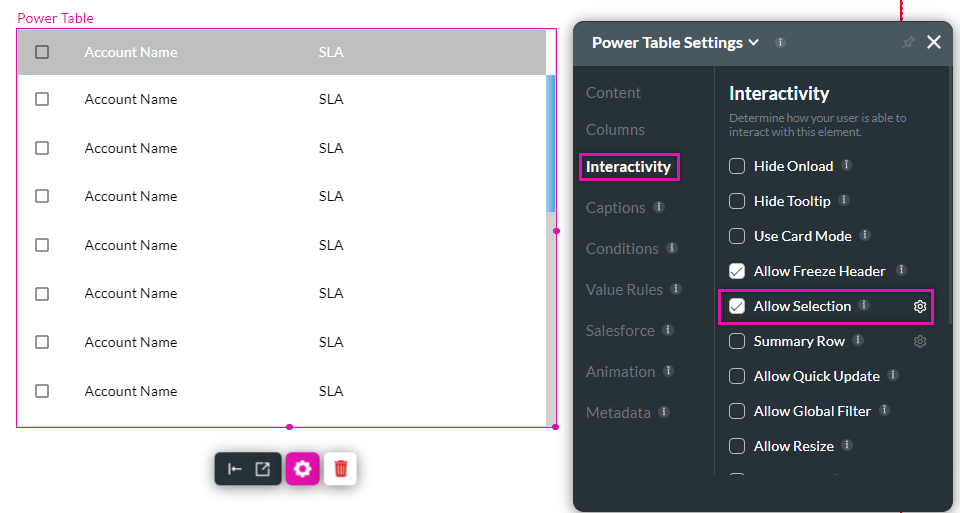
1. Navigate to the Power Table Settings menu and click the Interactivity tab.
2. Enable the Allow Selection function. A column with selection boxes is added to the table.
To map dynamic values for the dropdown:
1. Navigate to the DropDown Settings menu.
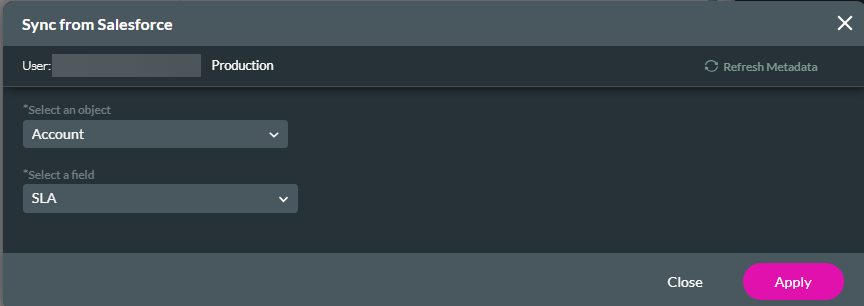
2. Select the Dynamic Values radio button and click Sync from Salesforce. The Sync from Salesforce window opens.
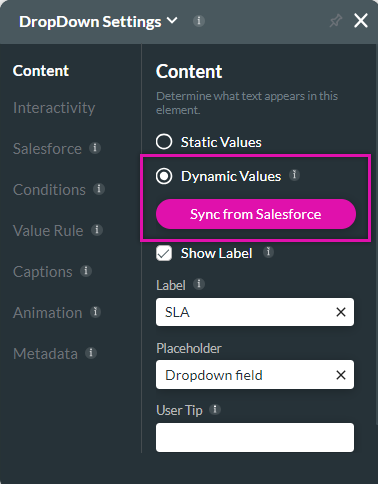
3. Use the dropdowns to configure the object and corresponding fields. Click Apply.
To edit the existing Push:
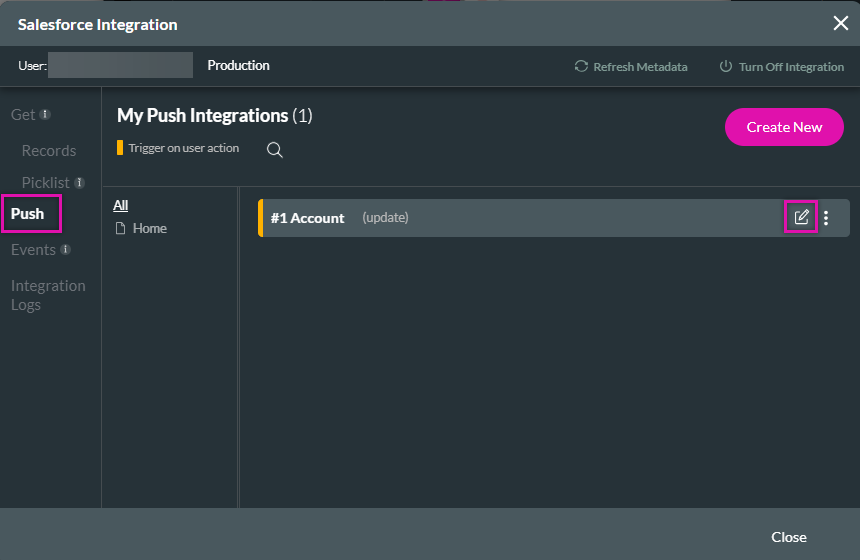
1. Navigate to the Salesforce Integrations window and select the Push tab.
2. Click the push edit icon.
The Object Settings remain as is.
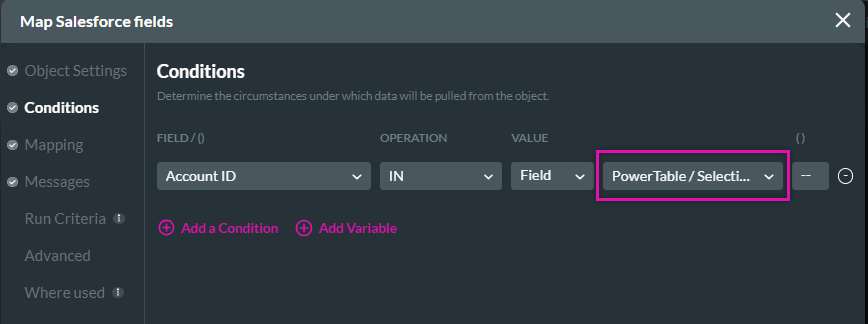
3. Select the Conditions tab. Use the dropdown to change the condition to Power Table Selection.
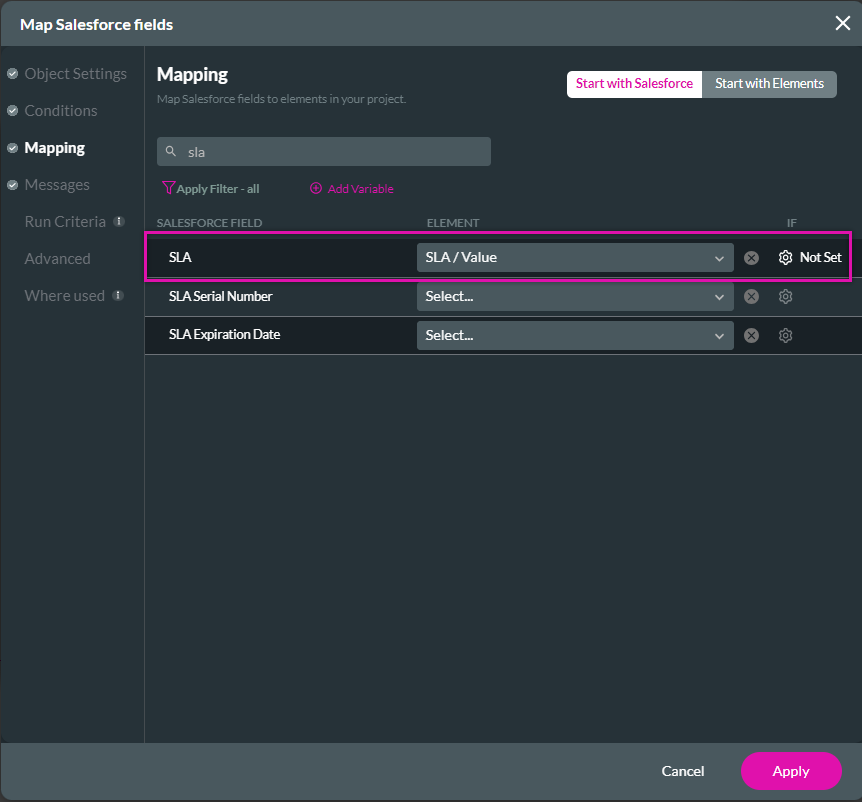
4. Click the Mapping tab. Change the SLA mapping to the SLA value. Click Apply.
The Push is updated.
5. Click Close.
The Push updates will automatically reflect in the on-click action configuration.
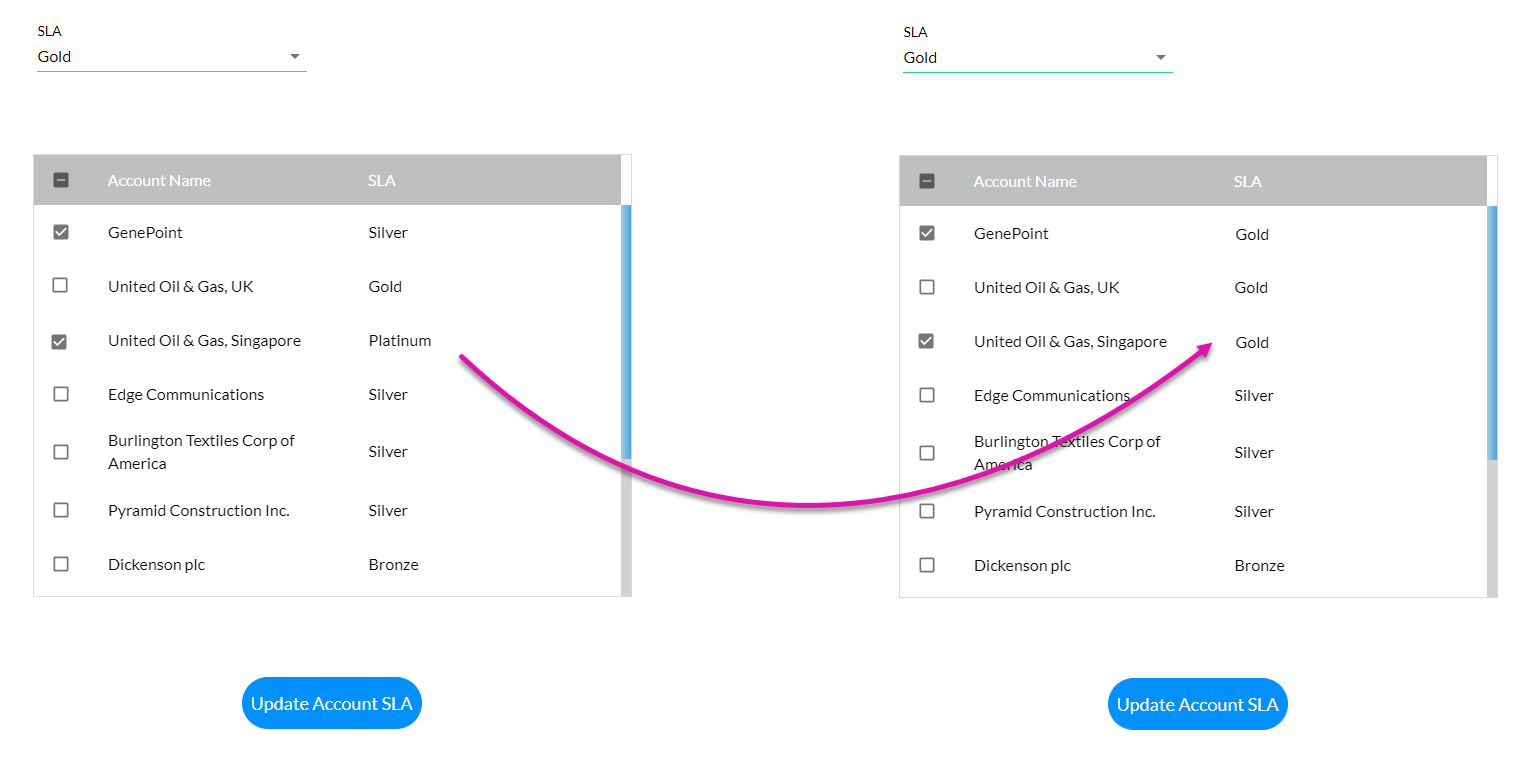
Save and Preview. Use the SLA dropdown and select an SLA, check the check box next to each account you want to be updated, and click the button. The Account SLAs are updated.
To allow users to select specific records in a table:
1. Navigate to the Power Table Settings menu and click the Interactivity tab.
2. Enable the Allow Selection function. A column with selection boxes is added to the table.
To map dynamic values for the dropdown:
1. Navigate to the DropDown Settings menu.
2. Select the Dynamic Values radio button and click Sync from Salesforce. The Sync from Salesforce window opens.
3. Use the dropdowns to configure the object and corresponding fields. Click Apply.
To edit the existing Push:
1. Navigate to the Salesforce Integrations window and select the Push tab.
2. Click the push edit icon.
The Object Settings remain as is.
3. Select the Conditions tab. Use the dropdown to change the condition to Power Table Selection.
4. Click the Mapping tab. Change the SLA mapping to the SLA value. Click Apply.
The Push is updated.
5. Click Close.
The Push updates will automatically reflect in the on-click action configuration.
Save and Preview. Use the SLA dropdown and select an SLA, check the check box next to each account you want to be updated, and click the button. The Account SLAs are updated.
04 Create a New Object
For this example, we will create a campaign member using specific contacts in a Power Table.
The existing table, the button, and the dropdown field were deleted for the following steps.
A lookup element was inserted and configured to bring in campaigns from Salesforce. A power table was inserted to display contacts associated with that campaign, and the Allow Selection function was enabled. A button with the label Create CM was inserted.
To create a new Push:
1. Navigate to the Project Settings Menu and click the Salesforce tab. The Salesforce Integration screen opens.
2. Select the Push tab and click Create New. The Map Salesforce Fields window opens.
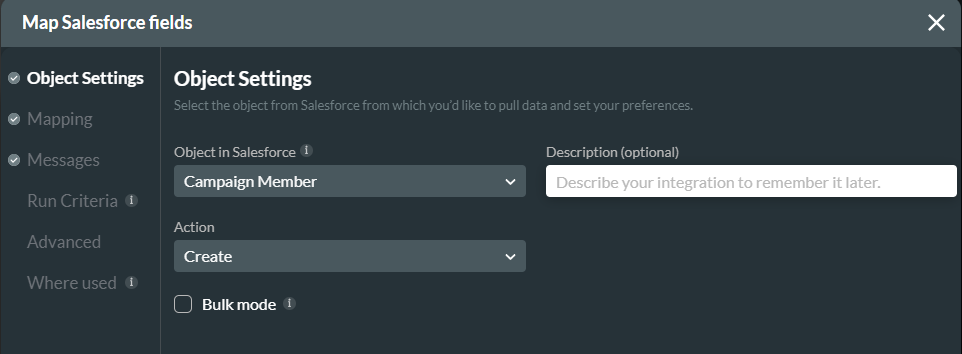
3. In the Object Settings Tab, we set the Object in Salesforce to Campaign Member and the Action to Create.
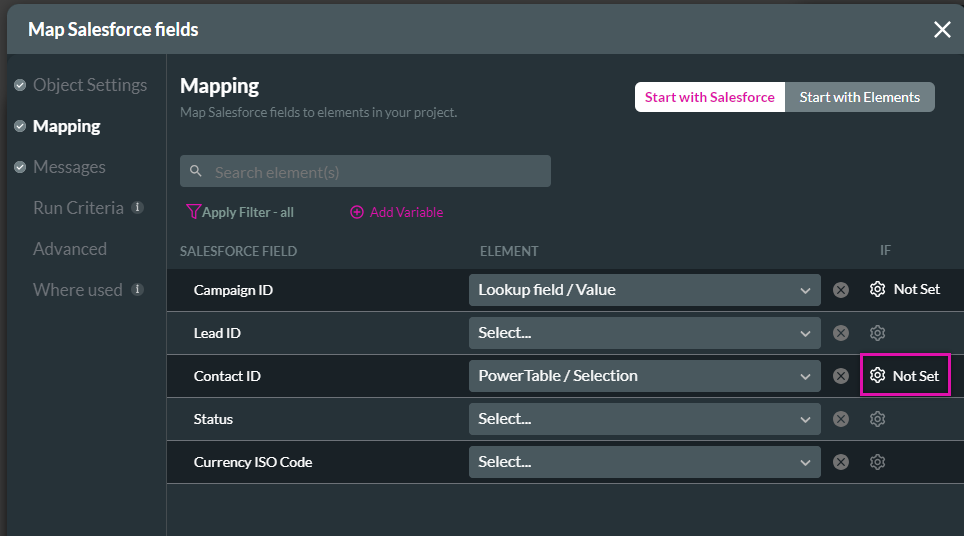
4. Click the Mapping tab. Ns use dropdowns to map Salesforce fields to project elements. You can push a list of items to Salesforce as separate records. Click the gear icon next to the Salesforce field that represents the separate records (in our case, Contact ID), and if the Settings window opens.
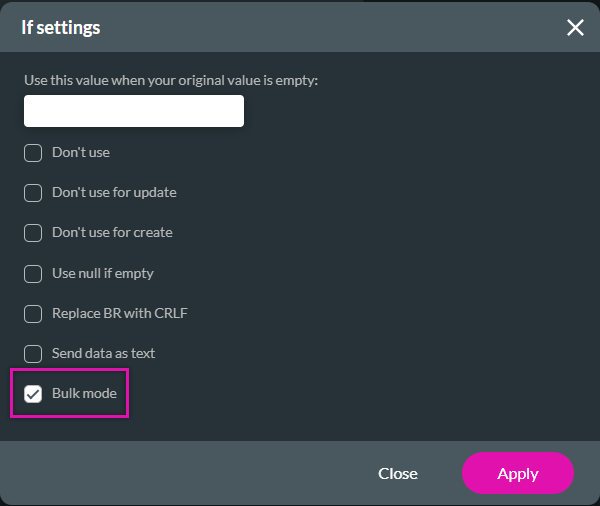
5. Enable Bulk Mode and click Apply. Each Contact ID in the list will create a brand-new campaign member.
6. Click Apply on the Map Salesforce Fields window.
Once the push is configured, we can assign the Salesforce Action to the button:
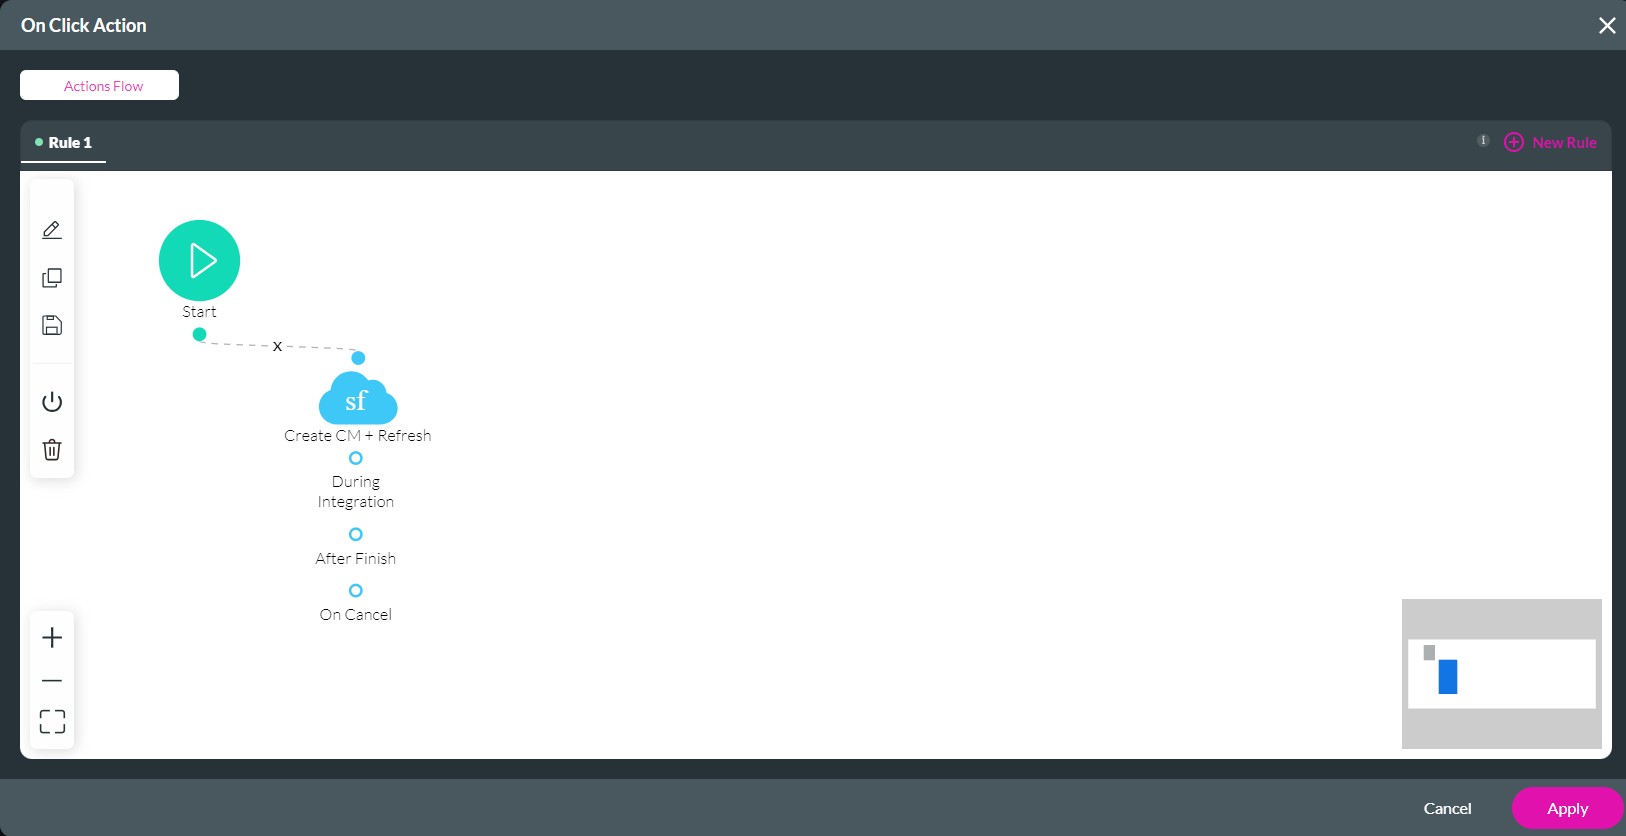
1. Click the button link icon. The On Click Action window opens.
2. Select the Start + icon. The Add Node screen opens.
3. Choose Salesforce Action and click Next.

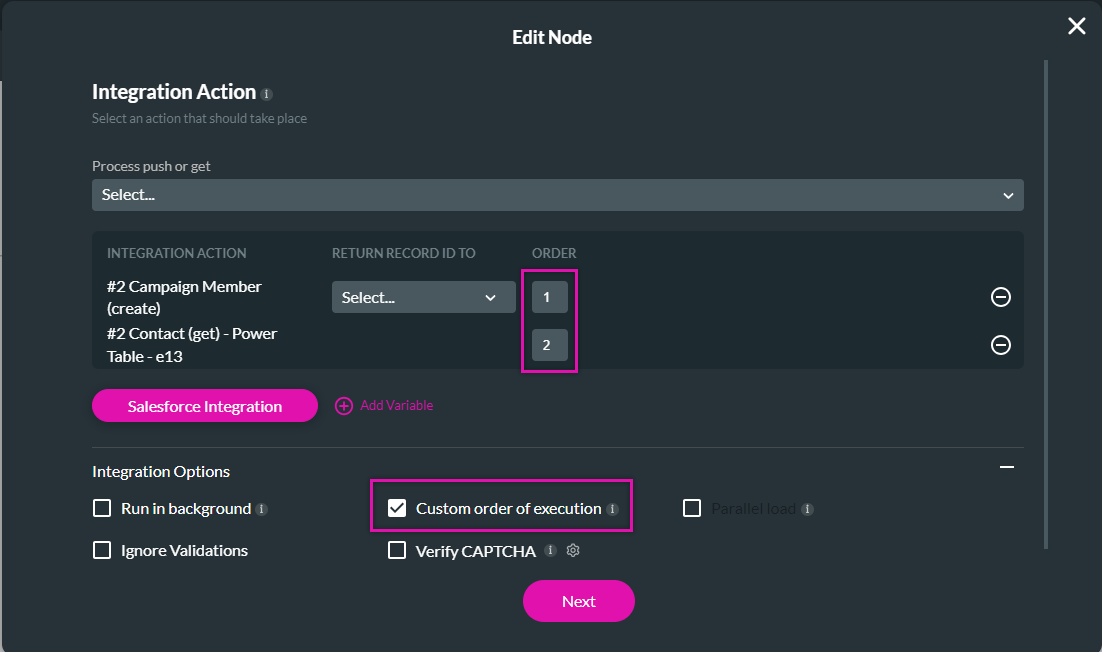
4. Two configured actions were selected from the dropdown. By enabling the Custom Order of Execution function, the create push will run first, then refresh the table. Click Next.
5. Add a Tag and Click Insert.
The node is added to the screen.
6. Click Apply.
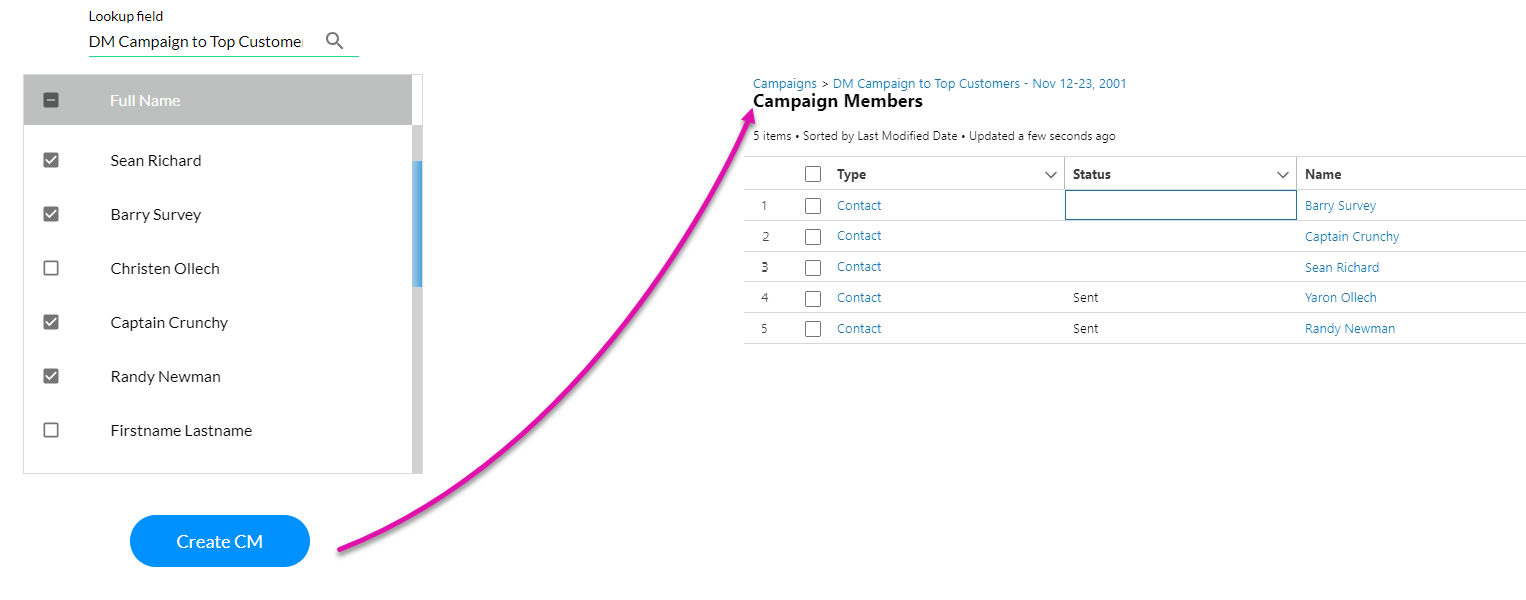
Save a lookup view. Use the lookup field to find a campaign and select names to be added to the campaign as members. Click the Create CM button. The names are added to the campaign in Salesforce.
Remember to visit the Integration Logs to view your Titan project's and Salesforce's integration activity.
The existing table, the button, and the dropdown field were deleted for the following steps.
A lookup element was inserted and configured to bring in campaigns from Salesforce. A power table was inserted to display contacts associated with that campaign, and the Allow Selection function was enabled. A button with the label Create CM was inserted.
To create a new Push:
1. Navigate to the Project Settings Menu and click the Salesforce tab. The Salesforce Integration screen opens.
2. Select the Push tab and click Create New. The Map Salesforce Fields window opens.
3. In the Object Settings Tab, we set the Object in Salesforce to Campaign Member and the Action to Create.
4. Click the Mapping tab. Ns use dropdowns to map Salesforce fields to project elements. You can push a list of items to Salesforce as separate records. Click the gear icon next to the Salesforce field that represents the separate records (in our case, Contact ID), and if the Settings window opens.
5. Enable Bulk Mode and click Apply. Each Contact ID in the list will create a brand-new campaign member.
6. Click Apply on the Map Salesforce Fields window.
Once the push is configured, we can assign the Salesforce Action to the button:
1. Click the button link icon. The On Click Action window opens.
2. Select the Start + icon. The Add Node screen opens.
3. Choose Salesforce Action and click Next.
4. Two configured actions were selected from the dropdown. By enabling the Custom Order of Execution function, the create push will run first, then refresh the table. Click Next.
5. Add a Tag and Click Insert.
The node is added to the screen.
6. Click Apply.
Save a lookup view. Use the lookup field to find a campaign and select names to be added to the campaign as members. Click the Create CM button. The names are added to the campaign in Salesforce.
Remember to visit the Integration Logs to view your Titan project's and Salesforce's integration activity.