Table Filtering (7 min)
Completion requirements
01 Getting Started
This tutorial looks at table filtering for your Power Table in Titan Web. We show you how to set up column filters, configure global filters, and, lastly, how to work with external filters for your Power Tables.
02 How to Set Up Column Filters
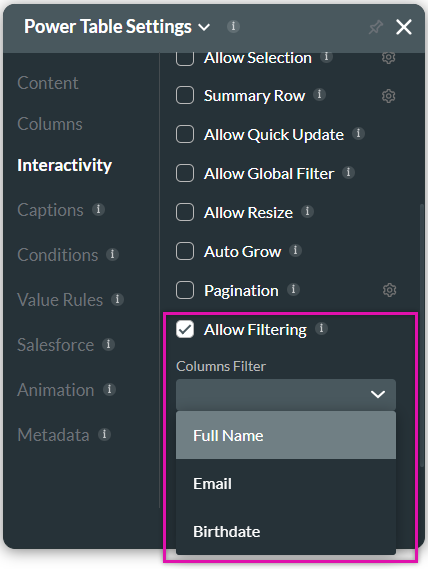
1. Navigate to Interactivity in your Power Table Settings panel and select the Allow Filtering checkbox.
2. Use the Columns Filter dropdown menu to select the column you want to filter. For example, we filtered the Power Table’s column by Full Name and Birthdate.
2. Use the Columns Filter dropdown menu to select the column you want to filter. For example, we filtered the Power Table’s column by Full Name and Birthdate.
03 How to Change the Filter Type
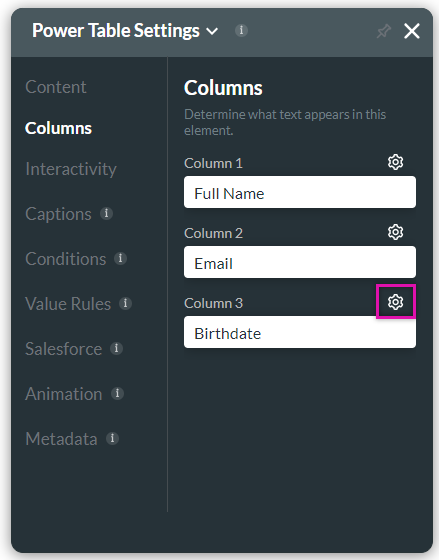
1. Head to Columns in your Power Table Settings panel and select the gear icon next to the Birthdate column.
2. Select the Filter By checkbox and click the gear icon to open the Configure Filter settings.
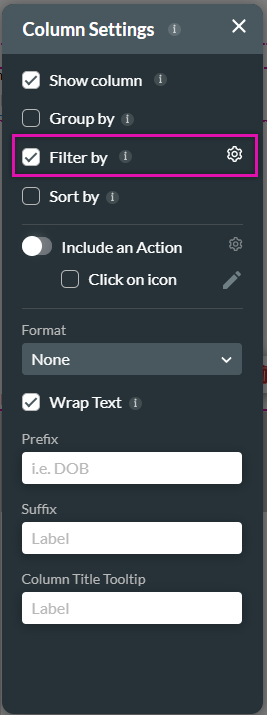
3. Use the dropdown menu to change the UI Control option to Date Range before clicking the Apply button.
4. Notice that your filter has now changed in your Birthdate column in your Power Table.

2. Select the Filter By checkbox and click the gear icon to open the Configure Filter settings.
3. Use the dropdown menu to change the UI Control option to Date Range before clicking the Apply button.
4. Notice that your filter has now changed in your Birthdate column in your Power Table.
04 How Filtering Works
1. Save and preview your project.
2. Use the calendar icon to filter between the birthdate range to pull through specific ranges of dates.
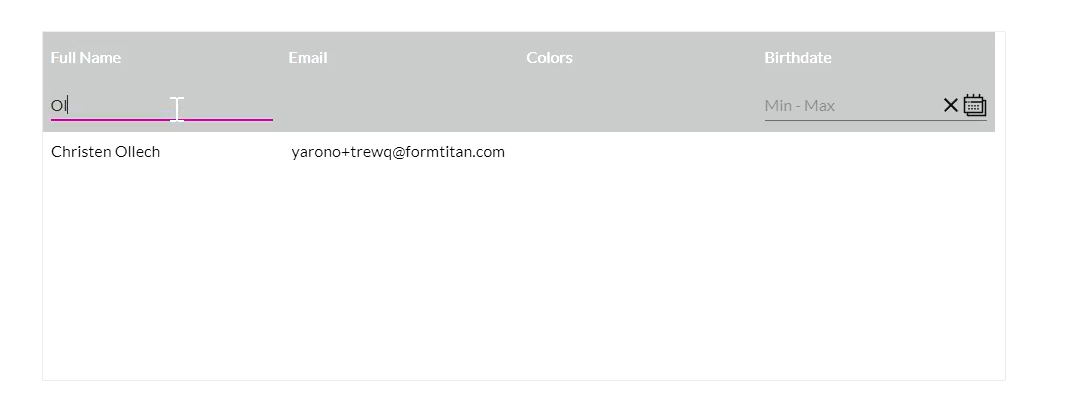
3. Alternatively, type in the filter in the Full Name column to organize data by full name.
2. Use the calendar icon to filter between the birthdate range to pull through specific ranges of dates.
3. Alternatively, type in the filter in the Full Name column to organize data by full name.
05 How to Set Up Global Filters
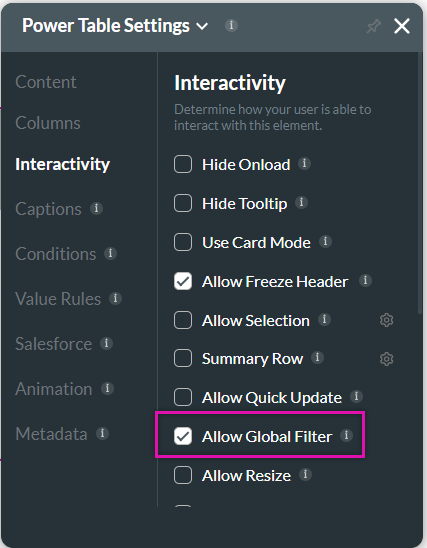
1. Go to Interactivity in your Power Table Settings panel and select the Allow Global Filter checkbox. This checkbox creates a global filter for your entire Power Table instead of a specific column. You can use the global filter to search based on any columns in the Power Table.
2. Save and preview your project.
3. When you type a word into the global filter, the Power Table will display data that matches the search from any column.

2. Save and preview your project.
3. When you type a word into the global filter, the Power Table will display data that matches the search from any column.
06 External Filters
External filters are a cool functionality that allows you to use an external input field or variable.
Our tutorial will show you how to work with external filters on an input field.
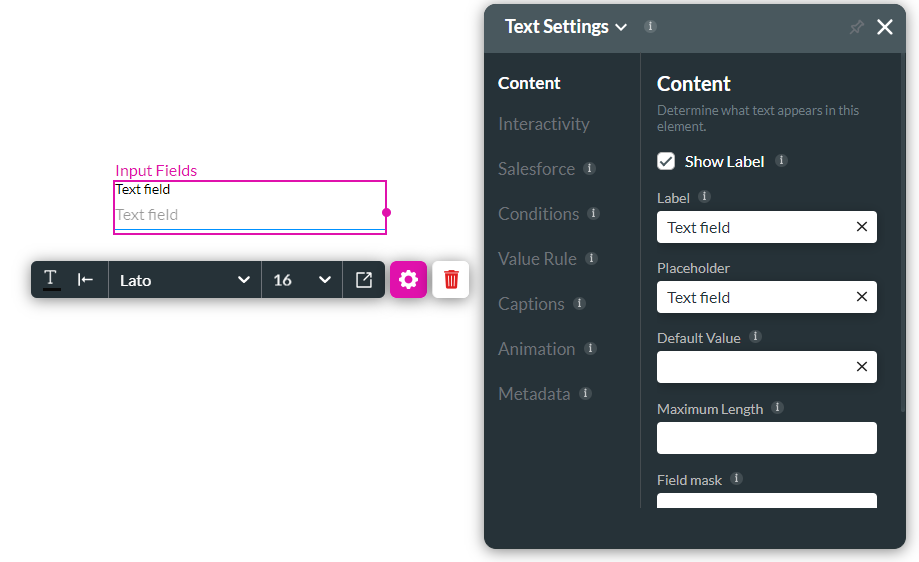
1. Drag a text field from the elements library to your canvas, and click the gear icon to open the Text Settings panel.
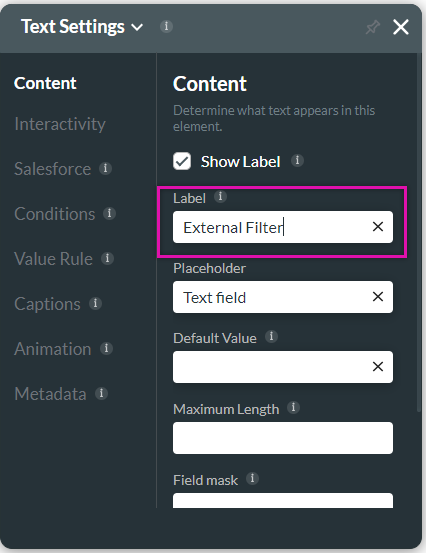
2. Add a name to the Label field. For this example, we have chosen External Filter, which allows us to filter based on the Text Field.
Note that you can set up your text field in several ways. For example, you can write a condition that the filter runs every time the text field changes. In our tutorial, we will add and use buttons.
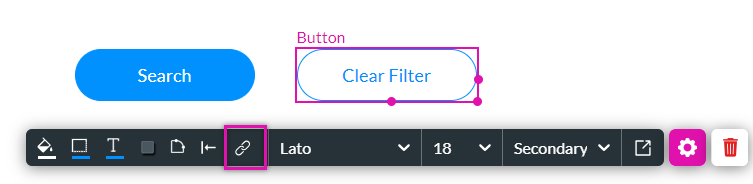
3. Add a primary and secondary button to the canvas and type on the buttons to rename them to Search and Clear Filter.
4. Click the link button to add an On Click action to the Search button.

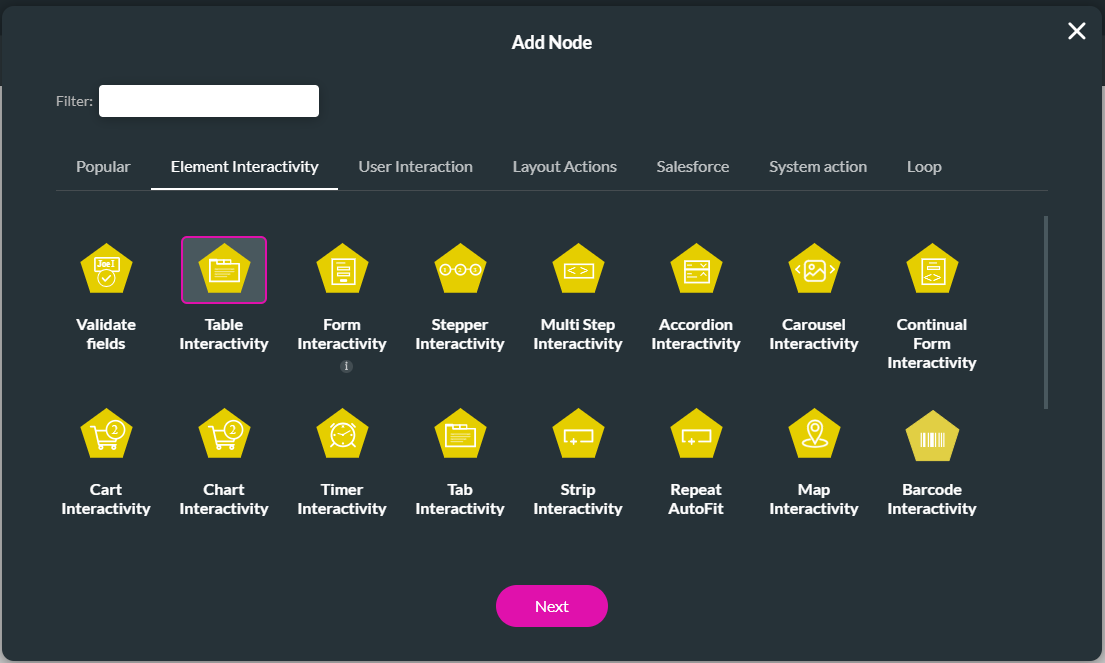
5. Click the + button under the Start icon to open the Add Node menu.
6. Select the Element Interactivity tab and the Table Interactivity button before clicking Next.
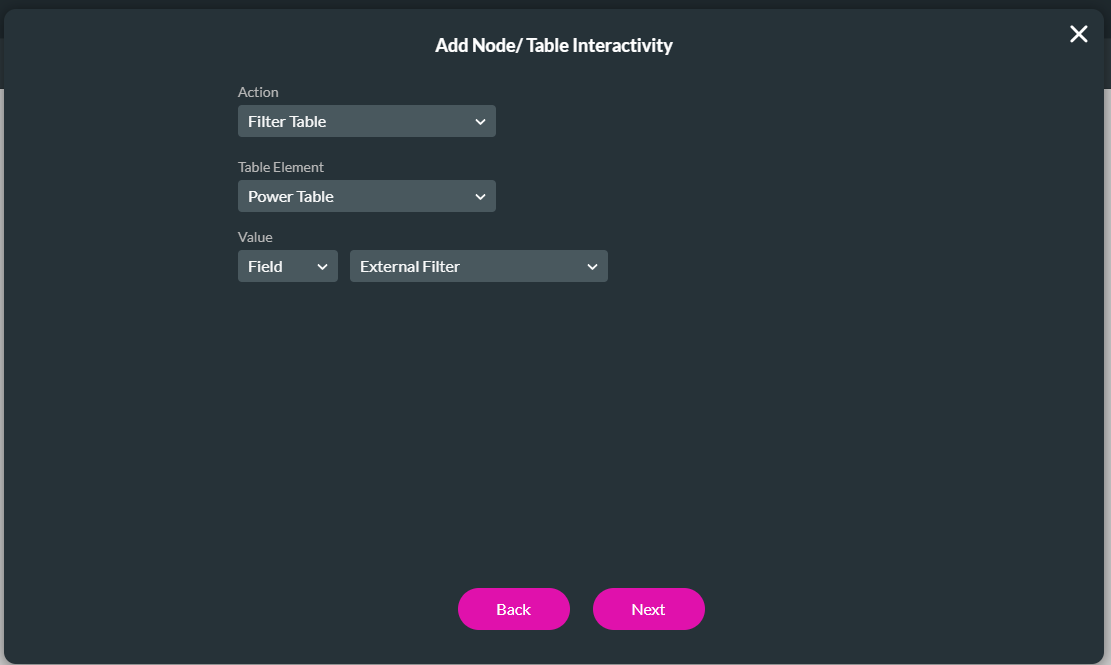
7. The Table Interactivity settings box pops up. In our tutorial, we have chosen Filter Table for our action, Power Table as our table element, and Field and External Filter as the values before clicking the Next button.
8. Remember to add a tag. We have used the External Filter as our tag before clicking the Insert button.
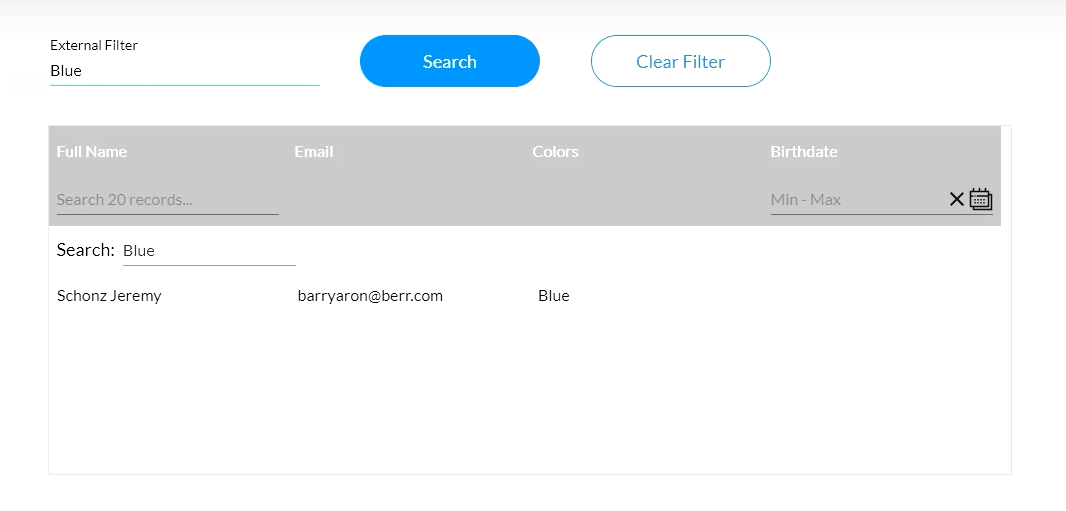
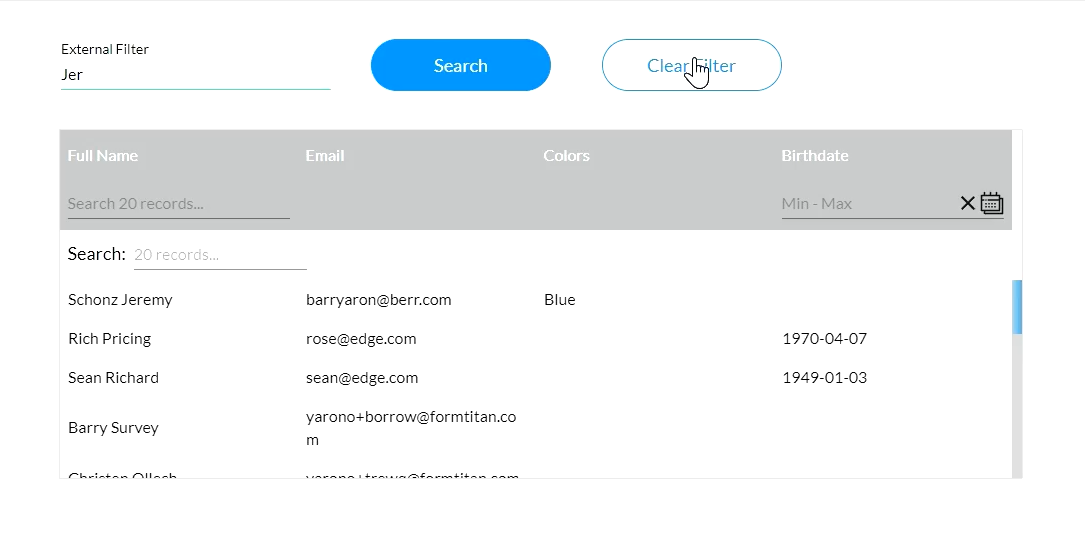
9. Preview your example, the demonstration shows that if you search for a word in the External Filter text field and click the Search button, the relevant data should display in your Power Table.
1. Drag a text field from the elements library to your canvas, and click the gear icon to open the Text Settings panel.
2. Add a name to the Label field. For this example, we have chosen External Filter, which allows us to filter based on the Text Field.
Note that you can set up your text field in several ways. For example, you can write a condition that the filter runs every time the text field changes. In our tutorial, we will add and use buttons.
3. Add a primary and secondary button to the canvas and type on the buttons to rename them to Search and Clear Filter.
4. Click the link button to add an On Click action to the Search button.
5. Click the + button under the Start icon to open the Add Node menu.
6. Select the Element Interactivity tab and the Table Interactivity button before clicking Next.
7. The Table Interactivity settings box pops up. In our tutorial, we have chosen Filter Table for our action, Power Table as our table element, and Field and External Filter as the values before clicking the Next button.
8. Remember to add a tag. We have used the External Filter as our tag before clicking the Insert button.
9. Preview your example, the demonstration shows that if you search for a word in the External Filter text field and click the Search button, the relevant data should display in your Power Table.
07 Clearing Searched Data from Power Tables
This demonstration shows how to configure a button to clear any filter actions made on the table. To do this, follow the steps below.
1. Click on the link button to add an On Click action to the Clear Filter button.
2. Click the + button under the Start icon to open the Add Node menu.
3. Select the Element Interactivity tab and the Table Interactivity button before clicking Next.

4. The Table Interactivity settings box pops up. In our tutorial, we chose Clear Row Selection for our action and Power Table as our table element before clicking the Next button.
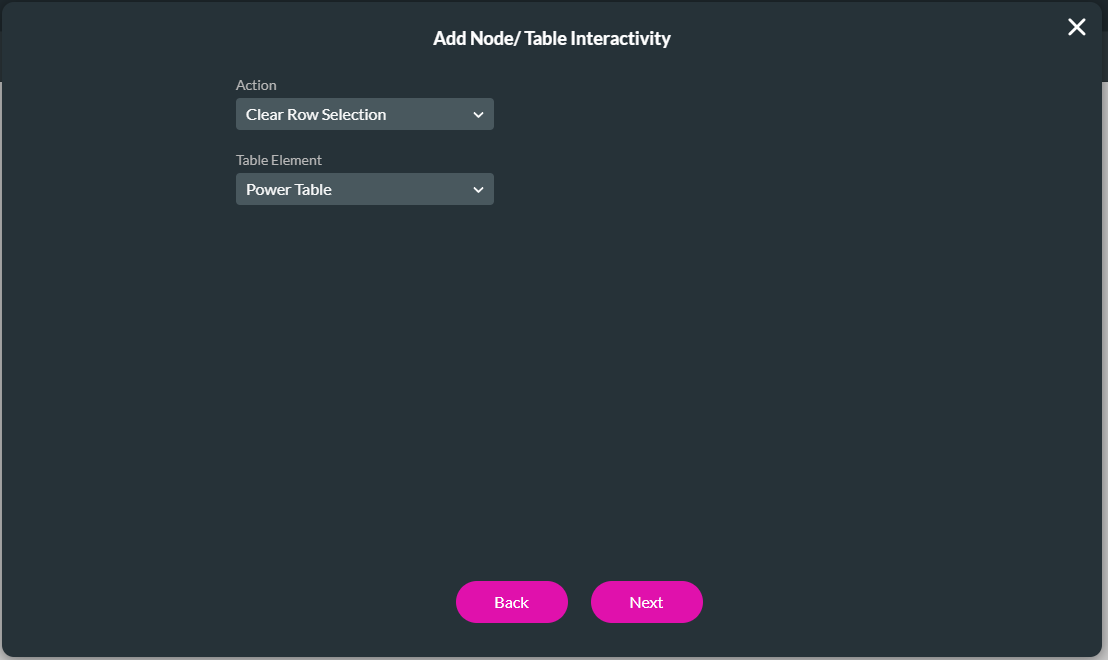
5. Remember to add a tag. We have used Clear Filter as our tag before clicking the Insert button.
6. Save, preview, and refresh your browser to interact with your demo. When you click the Clear Filter button after searching for data, your Power Table findings will be cleared, and the data will return to how it was displayed before the search.
1. Click on the link button to add an On Click action to the Clear Filter button.
2. Click the + button under the Start icon to open the Add Node menu.
3. Select the Element Interactivity tab and the Table Interactivity button before clicking Next.
4. The Table Interactivity settings box pops up. In our tutorial, we chose Clear Row Selection for our action and Power Table as our table element before clicking the Next button.
5. Remember to add a tag. We have used Clear Filter as our tag before clicking the Insert button.
6. Save, preview, and refresh your browser to interact with your demo. When you click the Clear Filter button after searching for data, your Power Table findings will be cleared, and the data will return to how it was displayed before the search.