Custom Modal/Page (17 min)
Completion requirements
01 Getting Started
This tutorial covers custom modals. Custom modals are great when you need to customize your web page heavily. A custom modal could be any page within Titan or any external page, either from another Titan application or a completely external site.
A power table displaying contact information was inserted into the home page for this tutorial.
A power table displaying contact information was inserted into the home page for this tutorial.
02 Open a Modal From an Action
This tutorial aims to show a modal whenever a button is clicked. We will use a full template page as our modal.
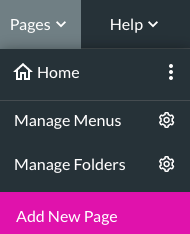
1. Click on the Pages tab and then Add New Page.
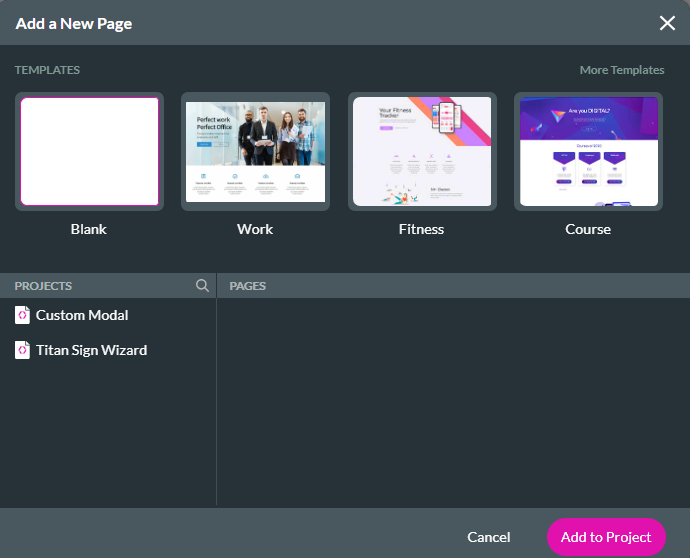
2. Select a page from the Templates list and click the Add to Project button.
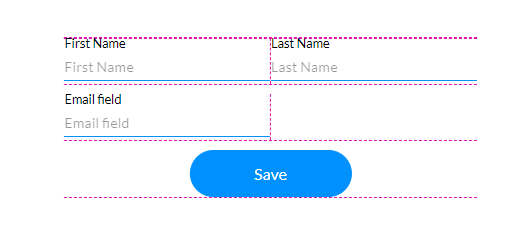
3. Drag and drop elements onto your new page. For example, this modal will be used to create a contact. The button was assigned a Salesforce Action to push the captured data to Salesforce.
4. Navigate back to the project home page and add a button.
5. Click on the Interactivity settings and then set up an action for your button.

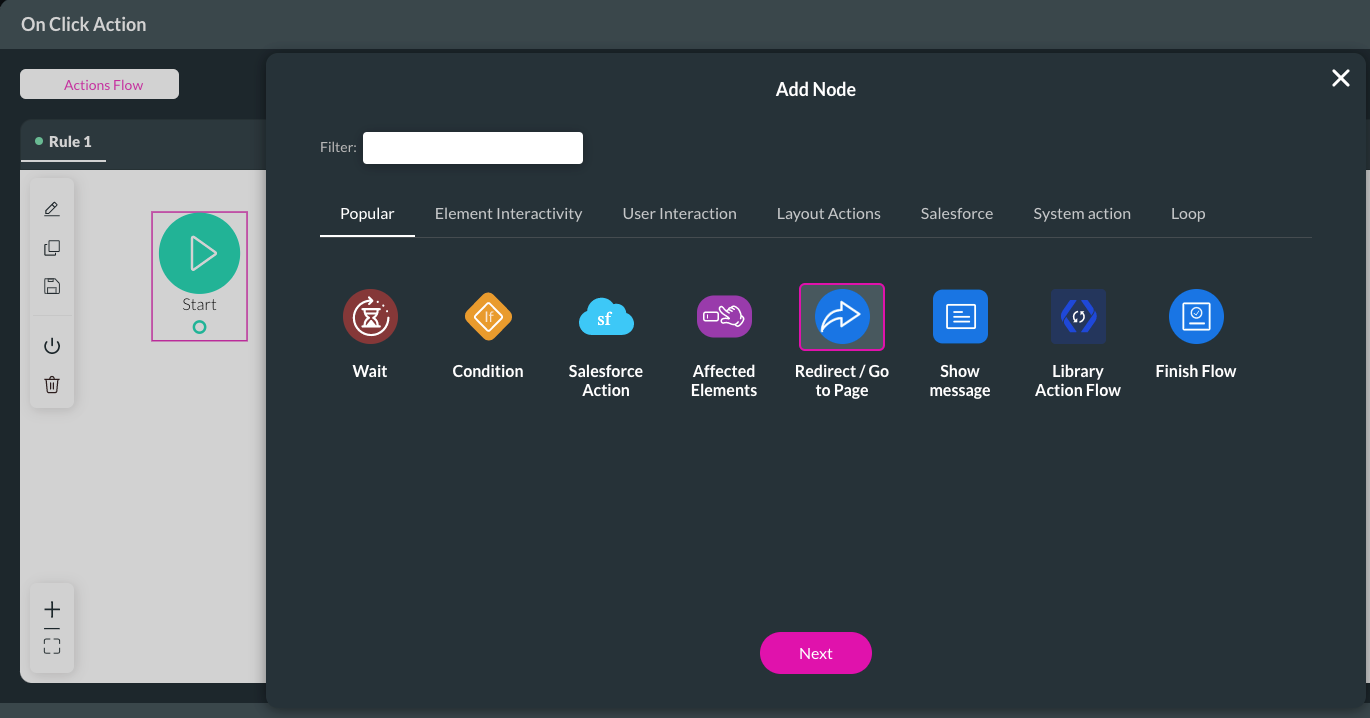
6. Click the Start + icon and select Redirect/ Go to Page as an action. Click Next.
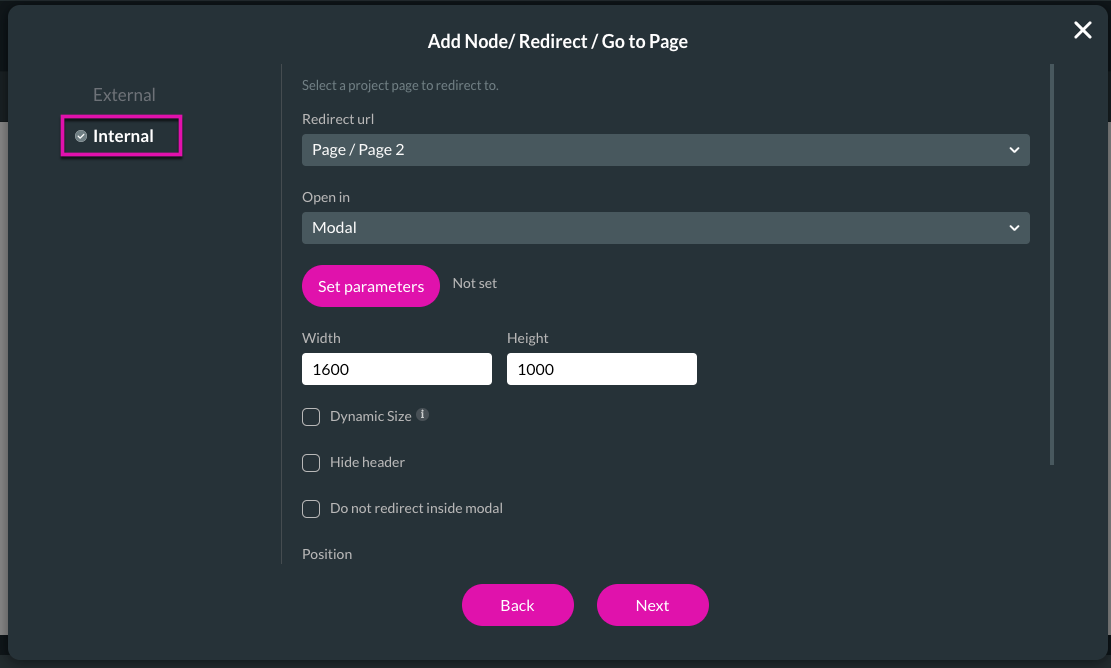
7. Choose whether you want your button to navigate to an external or internal site. For this example, we will display our newly created page.
8. Select the Redirect URL and Open In options for your Redirect action. For this example, the page must open in a Modal.
9. Configure your parameter settings to set how the modal will display. Click Next.
10. Add a Tag and click Insert.
The node is added to the screen.
11. Click Apply.
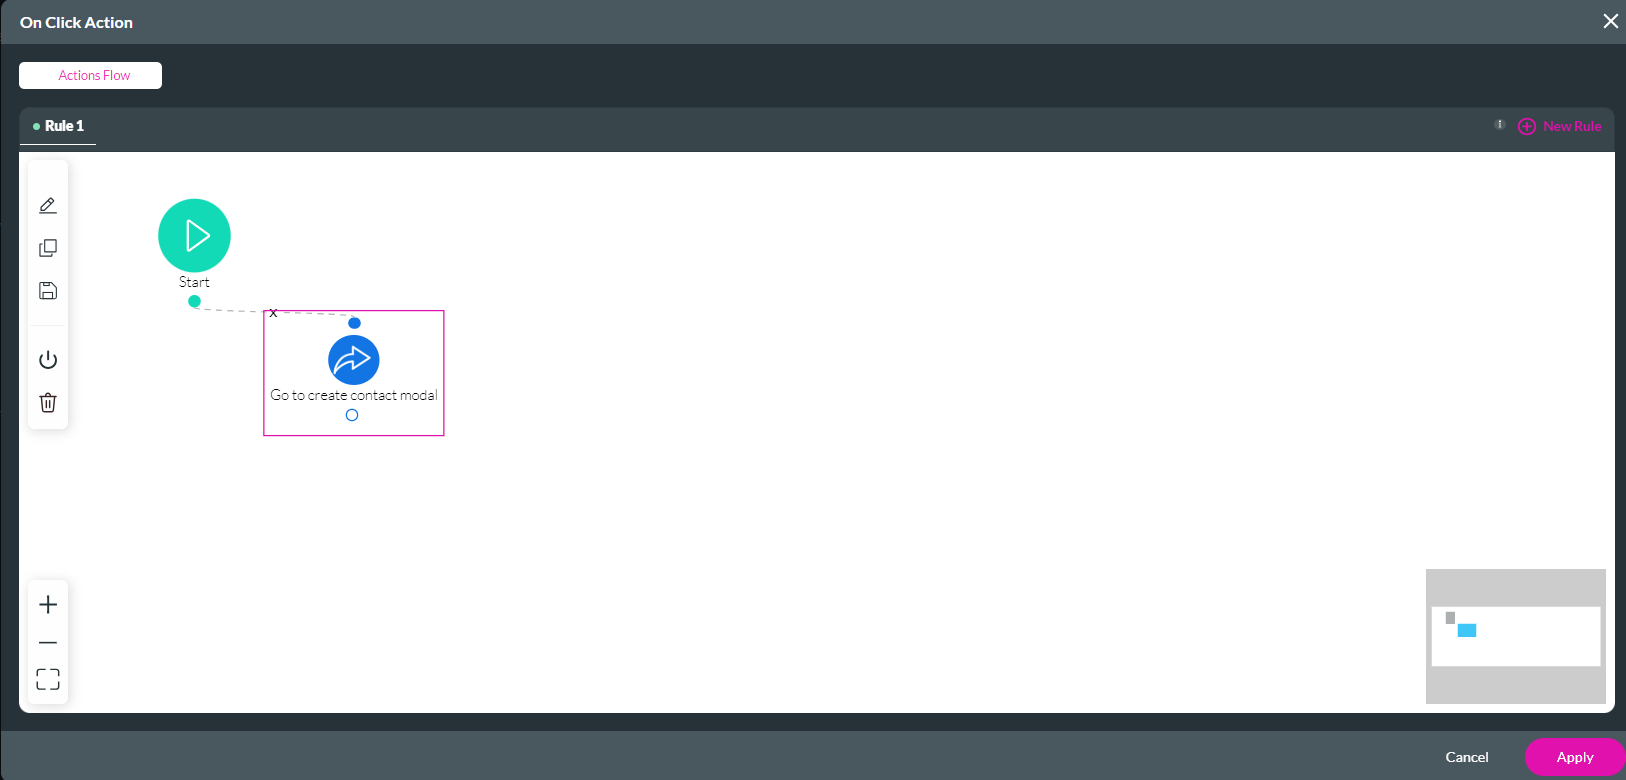
Save your project and preview your button’s actions. The Create Contact form will display as a modal when you click your button.

1. Click on the Pages tab and then Add New Page.

2. Select a page from the Templates list and click the Add to Project button.

3. Drag and drop elements onto your new page. For example, this modal will be used to create a contact. The button was assigned a Salesforce Action to push the captured data to Salesforce.

4. Navigate back to the project home page and add a button.
5. Click on the Interactivity settings and then set up an action for your button.

6. Click the Start + icon and select Redirect/ Go to Page as an action. Click Next.

7. Choose whether you want your button to navigate to an external or internal site. For this example, we will display our newly created page.
8. Select the Redirect URL and Open In options for your Redirect action. For this example, the page must open in a Modal.
9. Configure your parameter settings to set how the modal will display. Click Next.

10. Add a Tag and click Insert.
The node is added to the screen.
11. Click Apply.

Save your project and preview your button’s actions. The Create Contact form will display as a modal when you click your button.

03 Close a Modal From an Action
This tutorial aims to close a modal whenever the Save button is clicked. The same create contact form will be used to configure this action.
Add variables to the page:
1. Expand the page dropdown, select the kebab menu, and click Configure Actions. The Configure Actions screen opens.
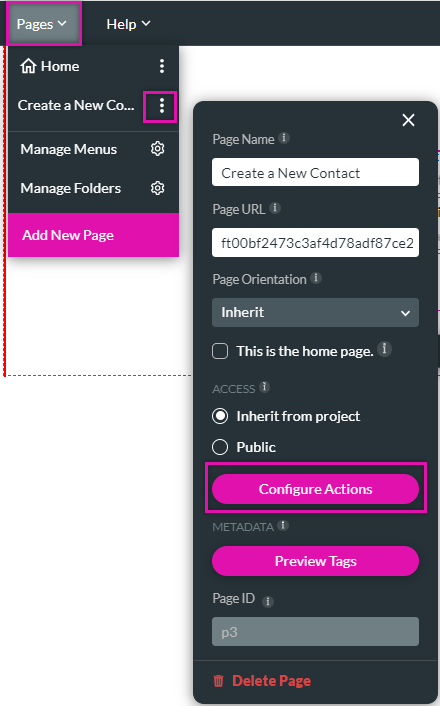
2. Click the Static Variables tab and add the following static variables:
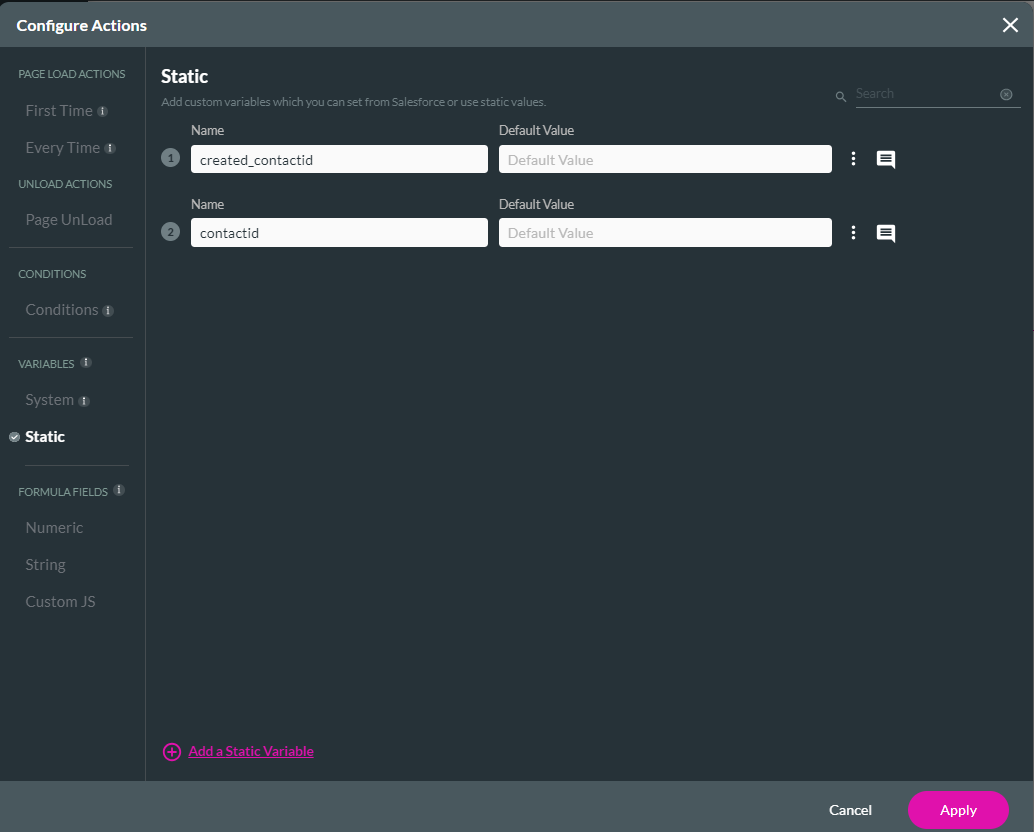
Note: It is essential to set the variables on a page level, not a project level.
To map the static variables to the configured Create Contact push:
1. Click on the button Interactivity settings. The On Click Action screen opens.
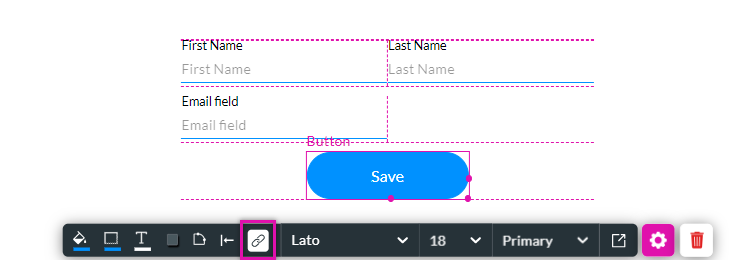
2. Double-click on the Salesforce Action Icon. The Integration Action screen opens. Use the dropdown to select the created_contactid variable. Click Next and Save.
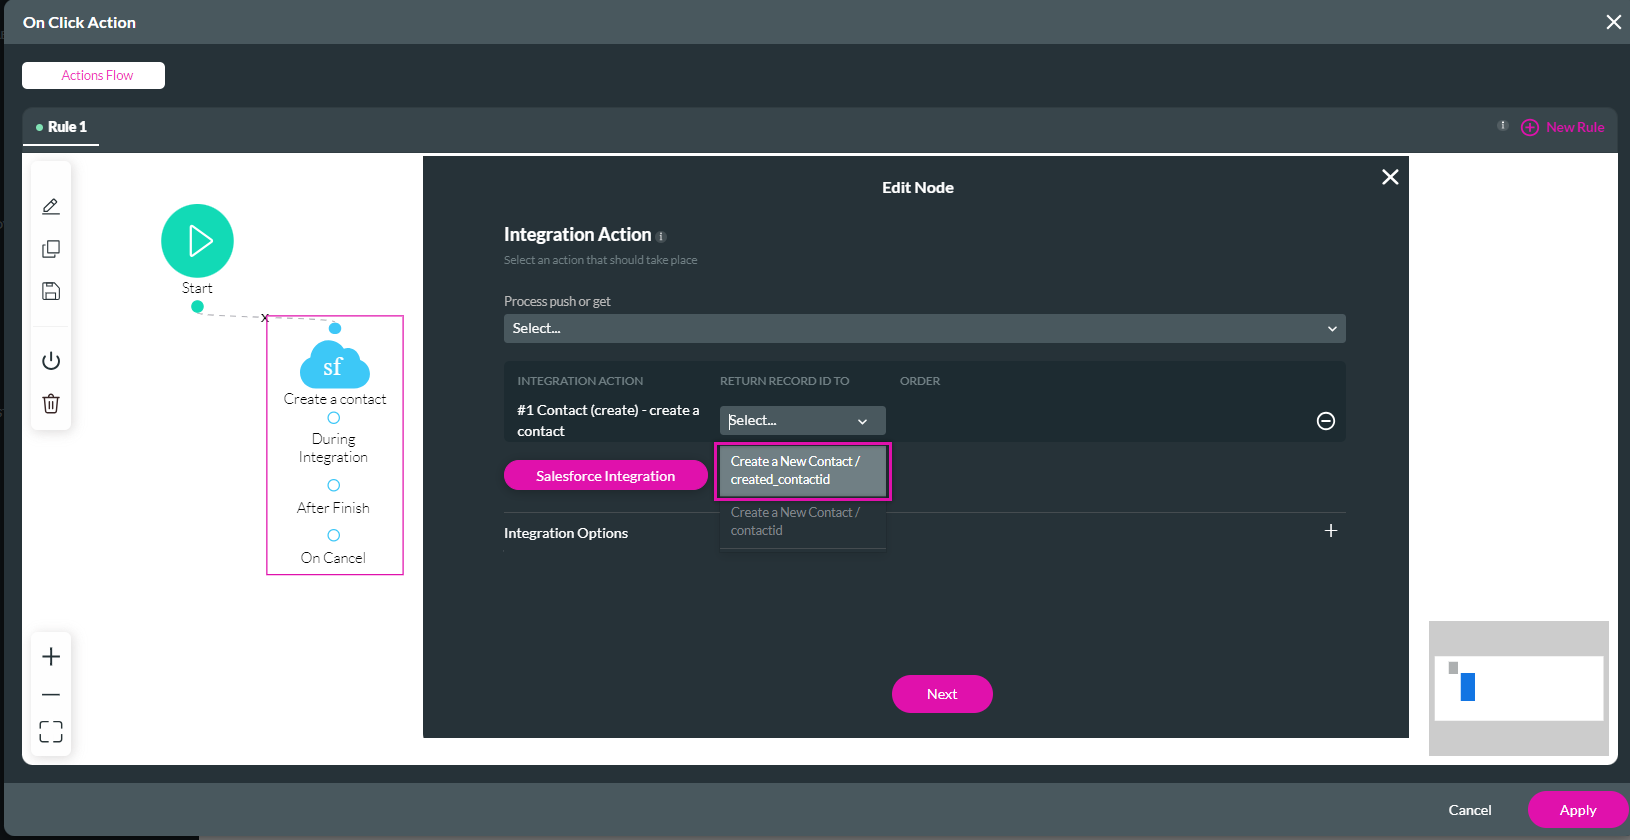
To configure the close modal action:
1. Click the After Finish + icon and select Page Actions as an action. Click Next.
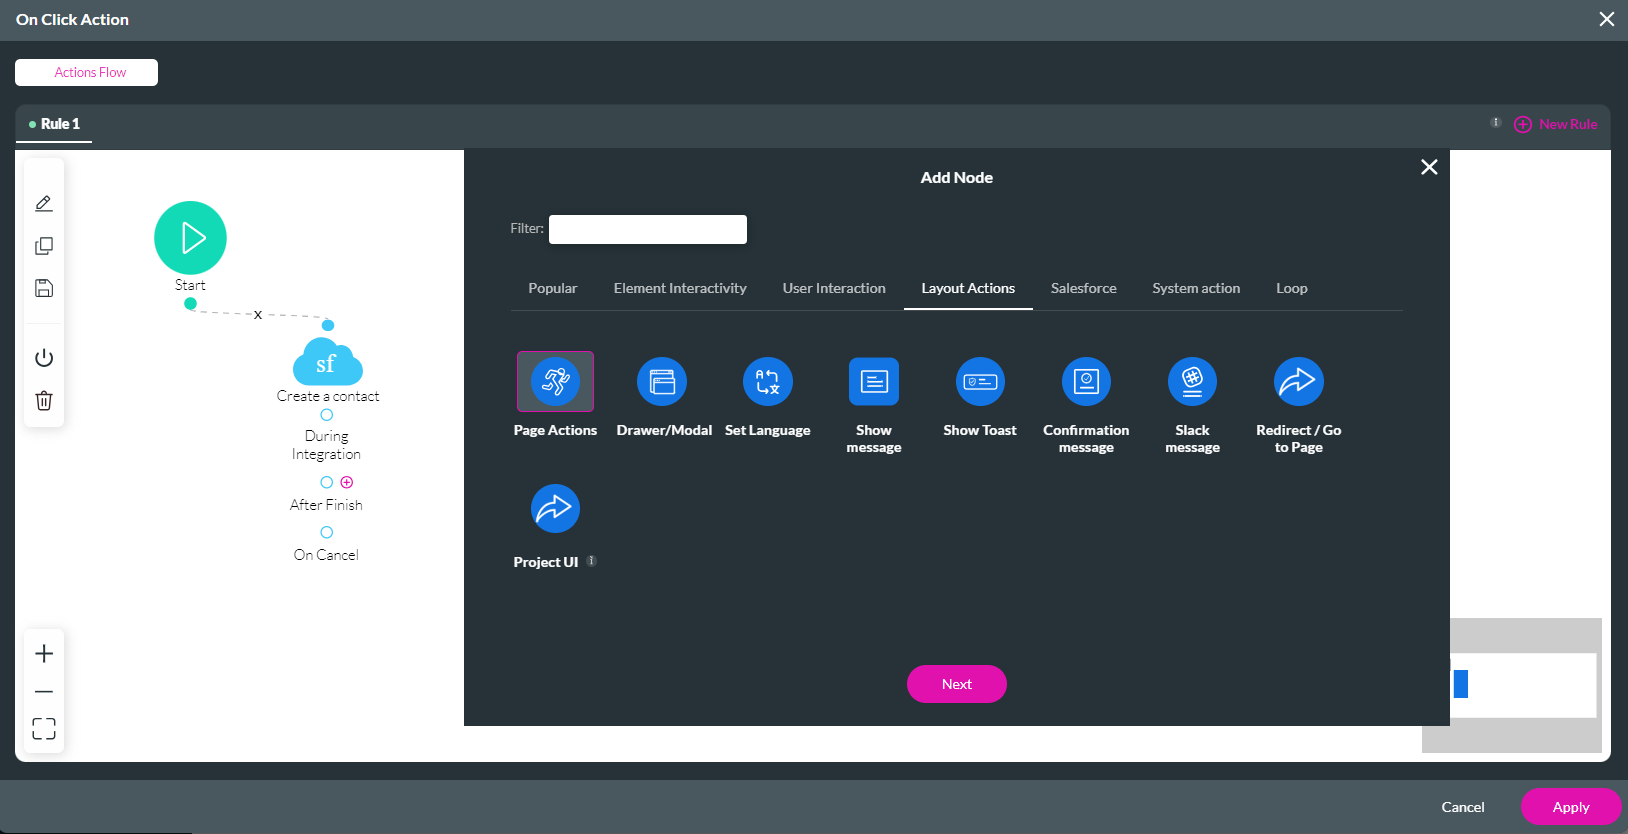
2. Click the Close Modal tab and Select Enable. Click Next.
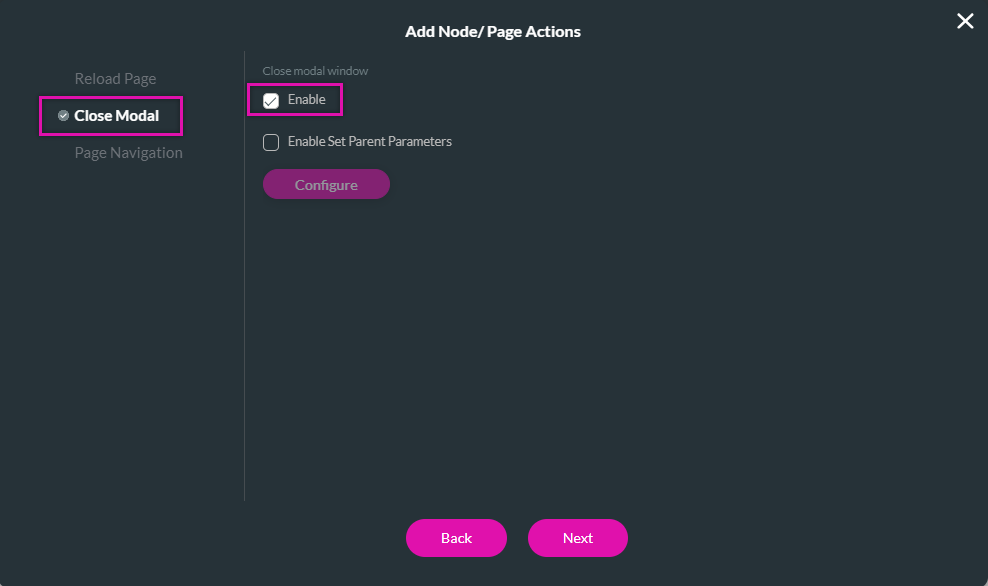
3. Add a Tag and click Insert.
The Node is added.
4. Click Apply.
To add a variable to the home page:
1. Expand the page dropdown, select the kebab menu, and click Configure Actions. The Configure Actions screen opens.
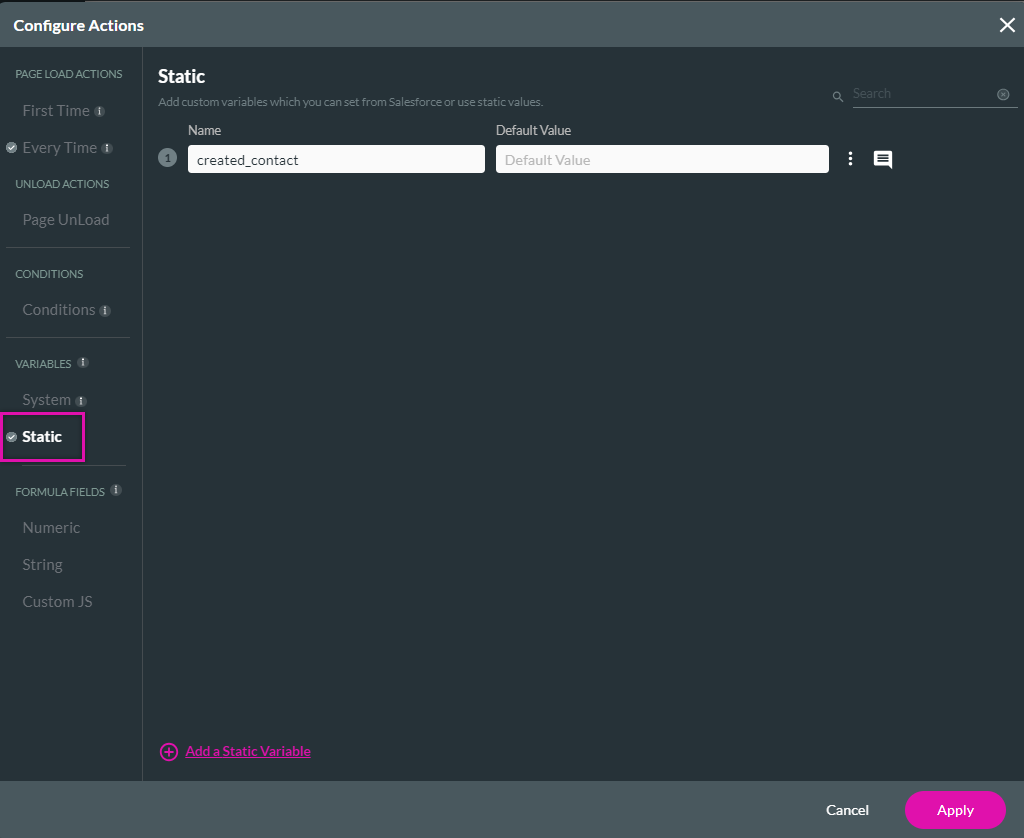
2. Select the Static Variables tab and add the following variable:
To create a condition to refresh the table:
1. Click the Conditions tab. Double-click on the If condition icon. The Edit Node page opens.
2. Configure a condition using the drop downs. For example, the created contact is not empty. Click Next.
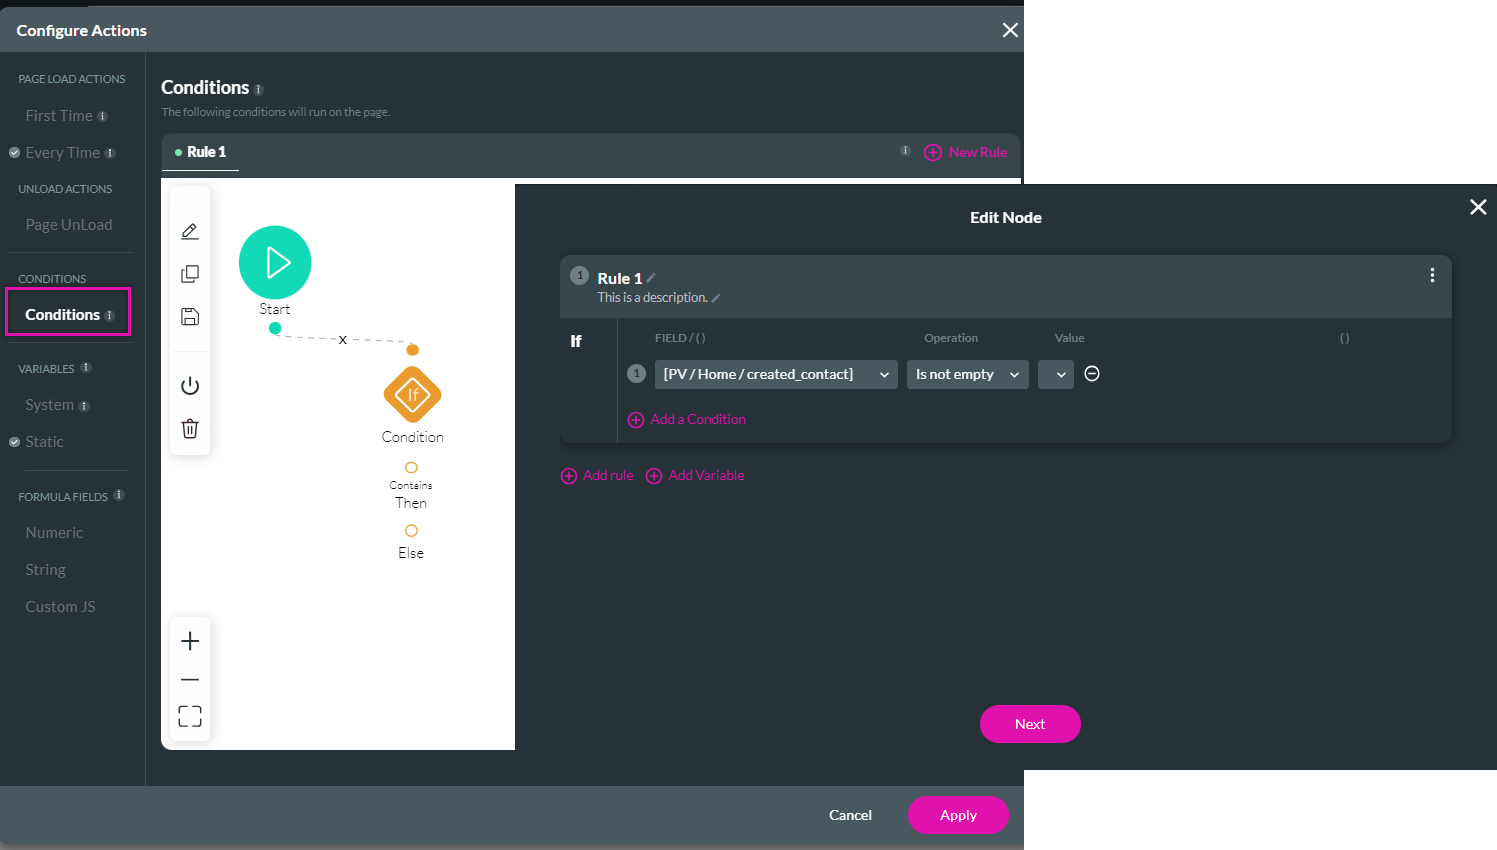
3. Add a Tag and click Save.
4. Click the Then + icon and select Table Interactivity as an action. Click Next.
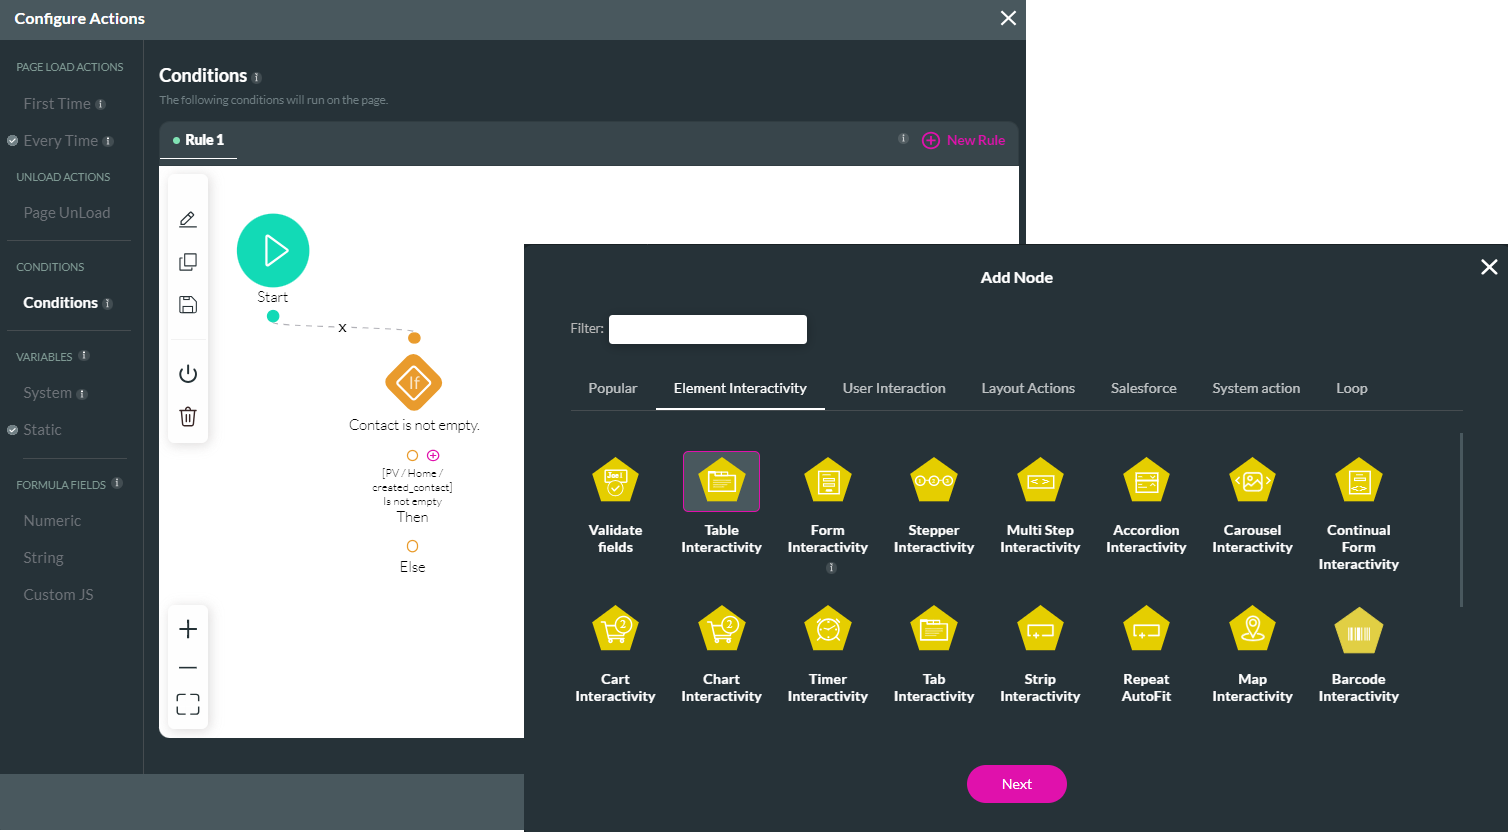
5. Use the dropdowns to configure the action and element. For example, refresh the power table. Click Next.
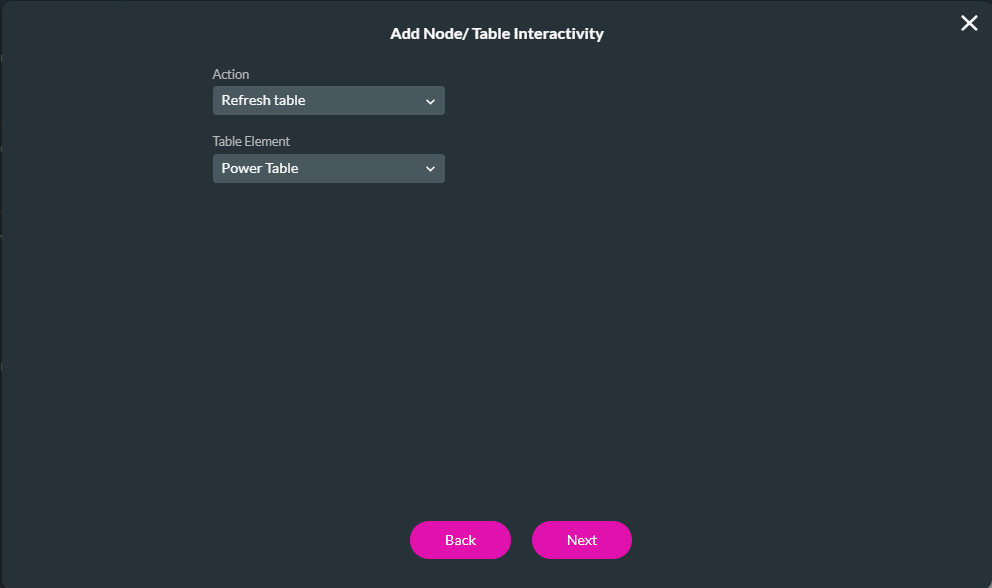
6. Add a Tag and click Insert.
The Node is added to the screen.
7. Click Apply.
To configure the close page parameters:
1. Navigate to your modal page.
2. Click on the Button Interactivity settings. The On ClickActions screen opens.
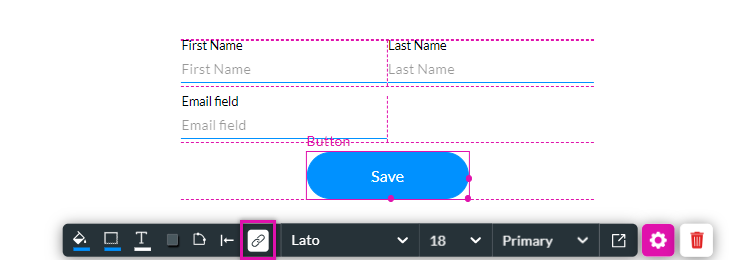
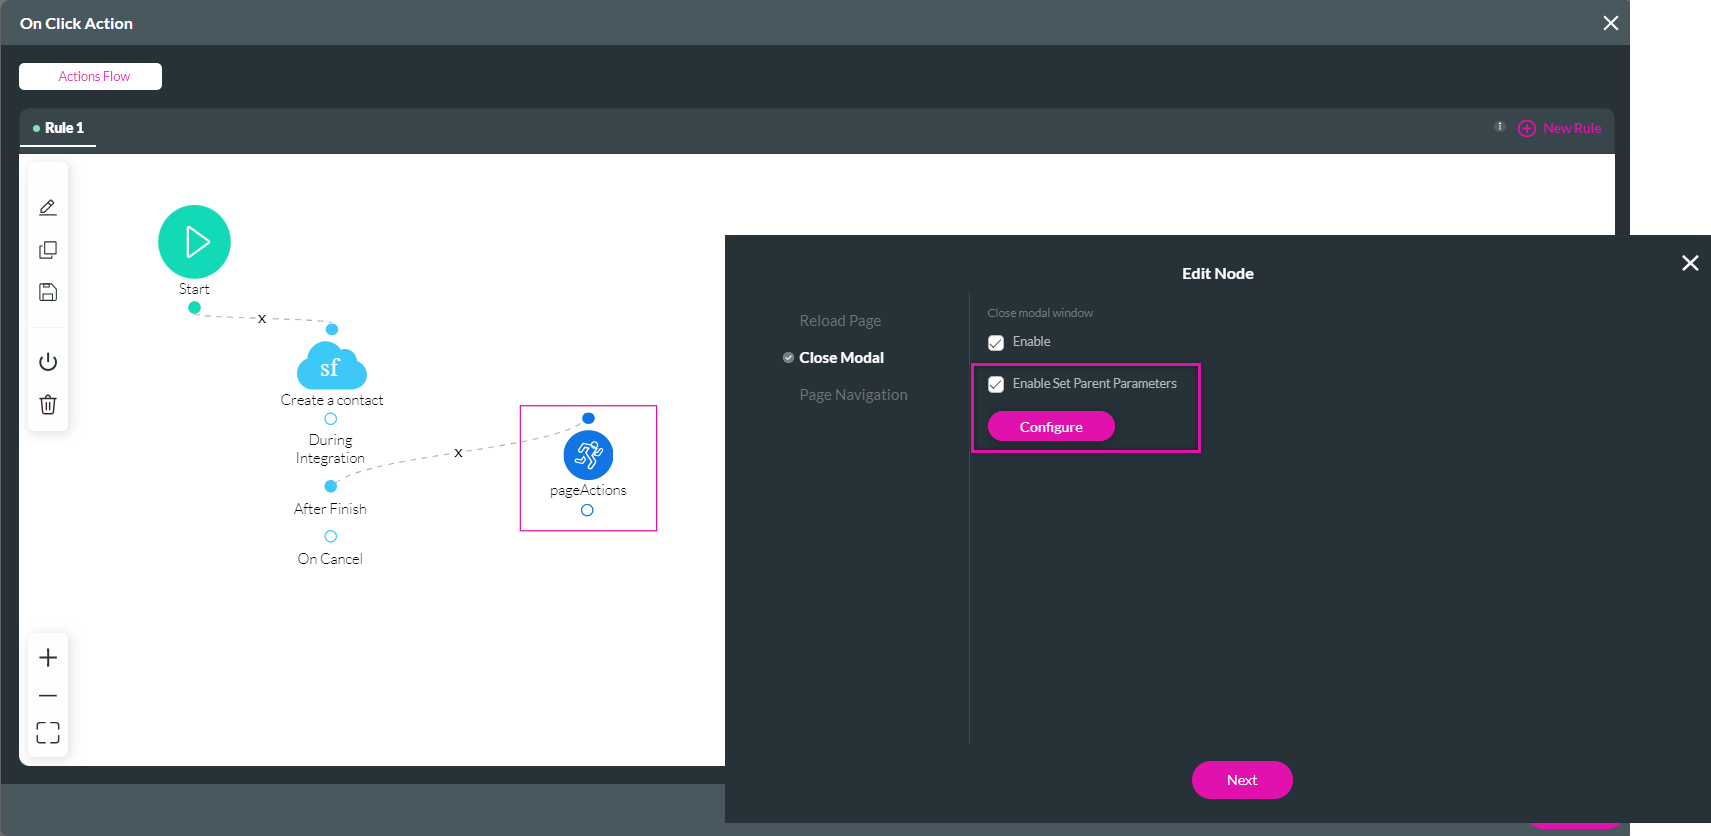
3. Double-click on the Page Actions node. The Edit Node screen opens.
4. Click the Enable Set Parent Parameters checkbox and click Configure. The Configure parameters screen opens.
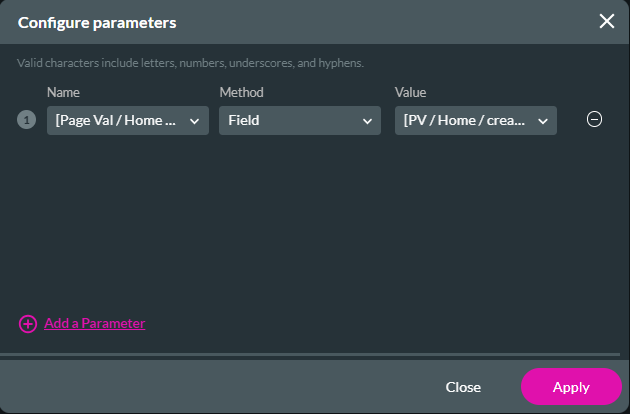
5. Use the dropdowns to configure your parameters. Click Apply.
6. Click Next.
7. Add a Tag and click Save.
After completing the modal fields and clicking the button, save and preview. The table refreshes to display the newly created contact.

Add variables to the page:
1. Expand the page dropdown, select the kebab menu, and click Configure Actions. The Configure Actions screen opens.

2. Click the Static Variables tab and add the following static variables:
- created_contactid
- contactid

Note: It is essential to set the variables on a page level, not a project level.
To map the static variables to the configured Create Contact push:
1. Click on the button Interactivity settings. The On Click Action screen opens.

2. Double-click on the Salesforce Action Icon. The Integration Action screen opens. Use the dropdown to select the created_contactid variable. Click Next and Save.

To configure the close modal action:
1. Click the After Finish + icon and select Page Actions as an action. Click Next.

2. Click the Close Modal tab and Select Enable. Click Next.

3. Add a Tag and click Insert.
The Node is added.
4. Click Apply.
To add a variable to the home page:
1. Expand the page dropdown, select the kebab menu, and click Configure Actions. The Configure Actions screen opens.
2. Select the Static Variables tab and add the following variable:
- created_contact

To create a condition to refresh the table:
1. Click the Conditions tab. Double-click on the If condition icon. The Edit Node page opens.
2. Configure a condition using the drop downs. For example, the created contact is not empty. Click Next.

3. Add a Tag and click Save.
4. Click the Then + icon and select Table Interactivity as an action. Click Next.

5. Use the dropdowns to configure the action and element. For example, refresh the power table. Click Next.

6. Add a Tag and click Insert.
The Node is added to the screen.
7. Click Apply.
To configure the close page parameters:
1. Navigate to your modal page.
2. Click on the Button Interactivity settings. The On ClickActions screen opens.

3. Double-click on the Page Actions node. The Edit Node screen opens.
4. Click the Enable Set Parent Parameters checkbox and click Configure. The Configure parameters screen opens.

5. Use the dropdowns to configure your parameters. Click Apply.

6. Click Next.
7. Add a Tag and click Save.
After completing the modal fields and clicking the button, save and preview. The table refreshes to display the newly created contact.

04 Prepopulate the Modal
You can repopulate the modal with data from Salesforce. This allows users to check their information and make updates if required.
1. Navigate to the Modal page configure actions screen.
2. Click the Conditions tab—Double-click on the Conditions icon. The Edit Node window opens.
3. Configure the condition that the Create a New Contact static ID must not be empty. Click Next.
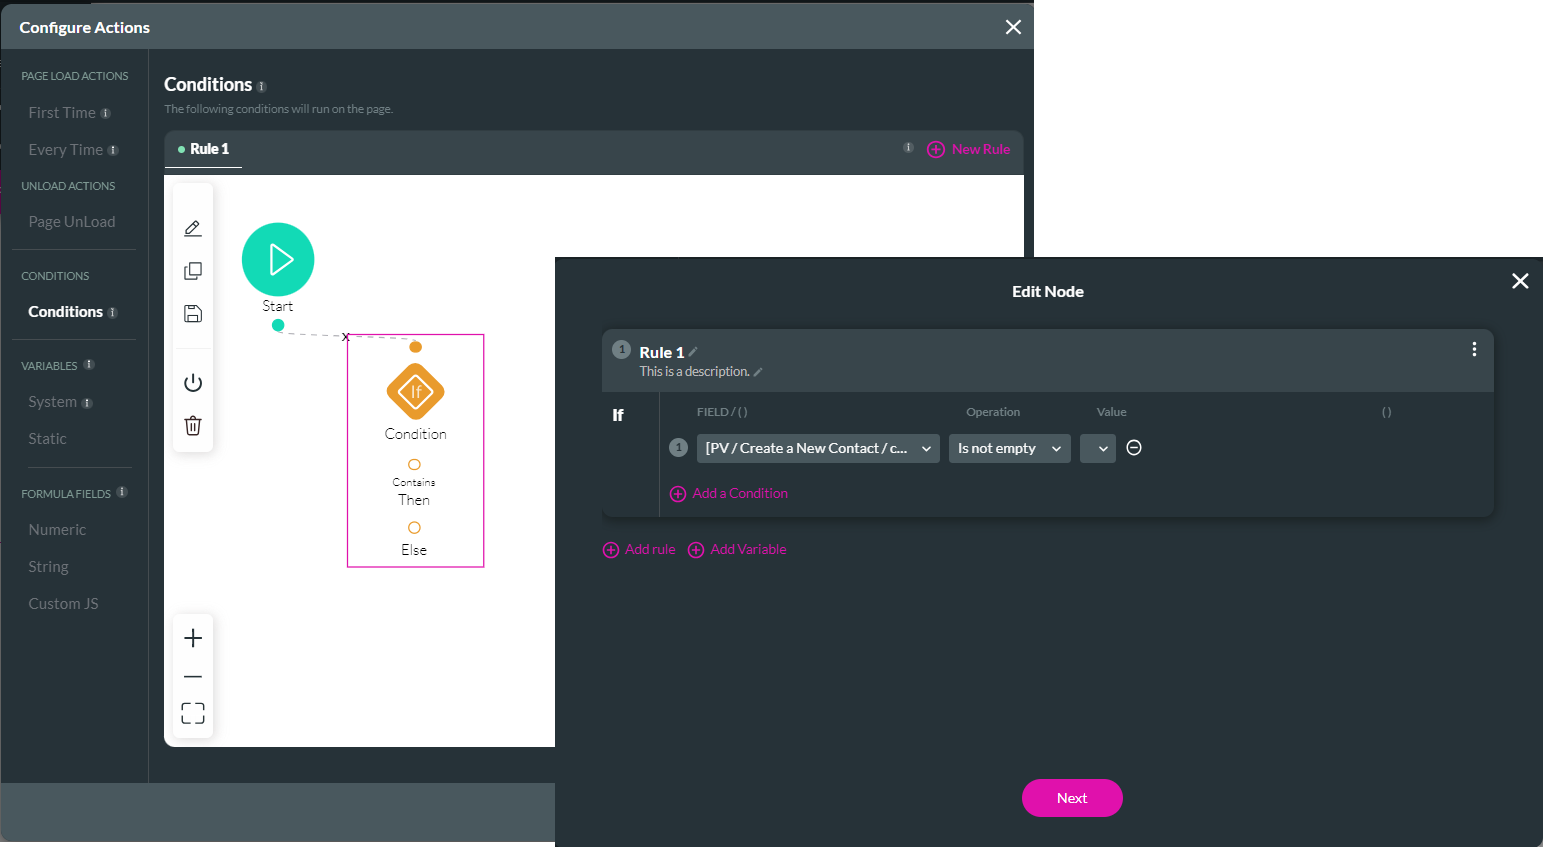
4. Add a Tag and click Save.
5. Click the Then + icon and select the Salesforce Action node as an action. Click Next.
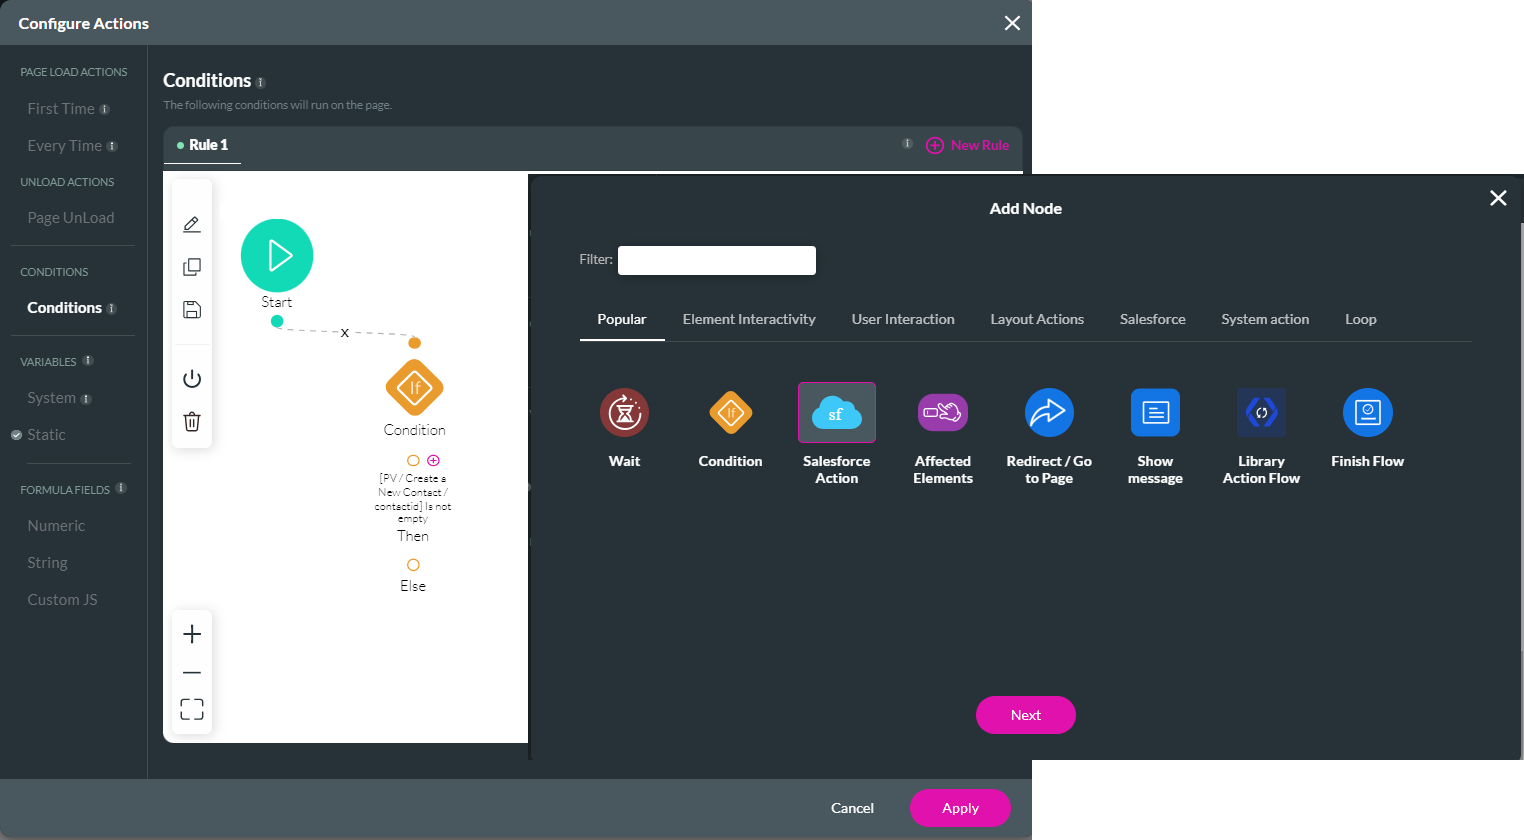
6. Click Salesforce Integration. The Salesforce Integration window opens.
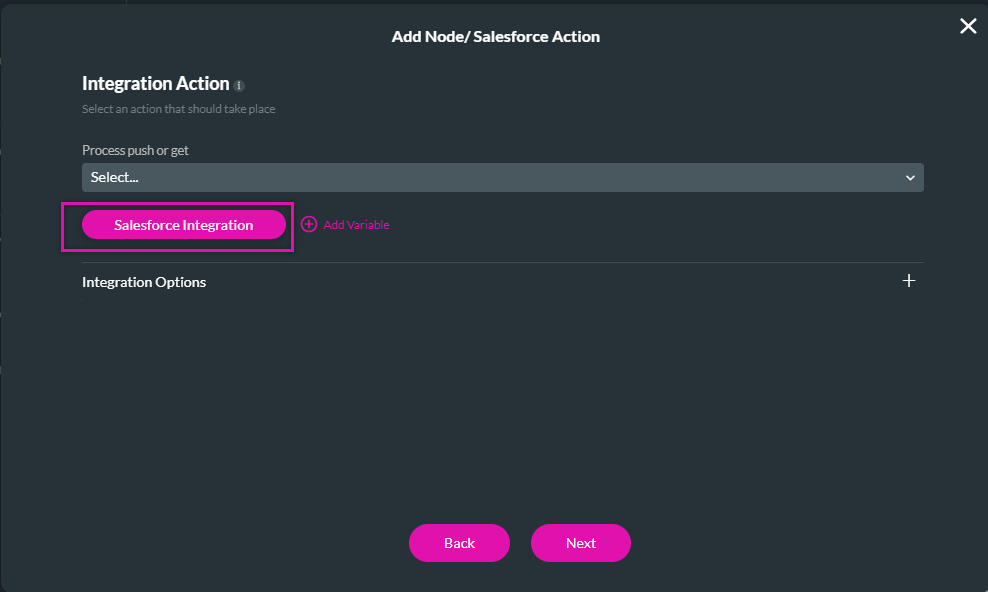
7. Under the Get Records tab, click Create New. The Map Salesforce Fields window opens.
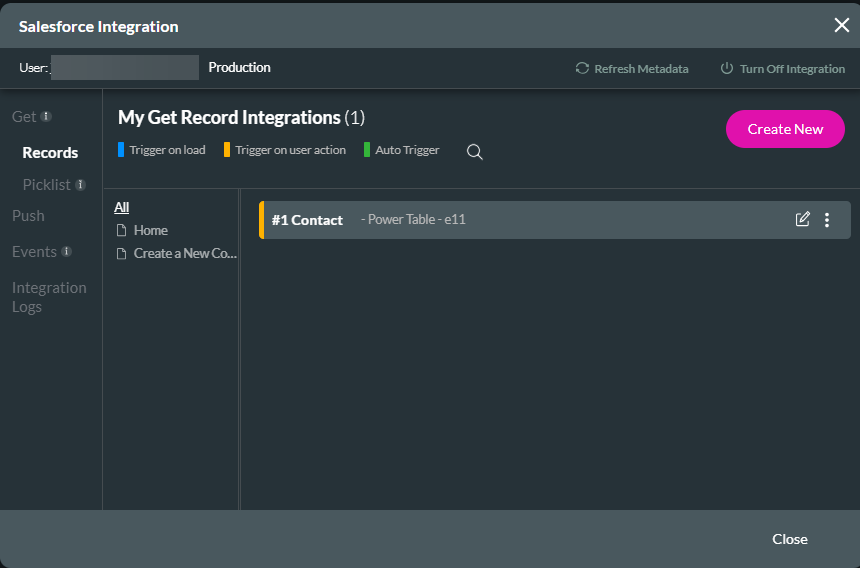
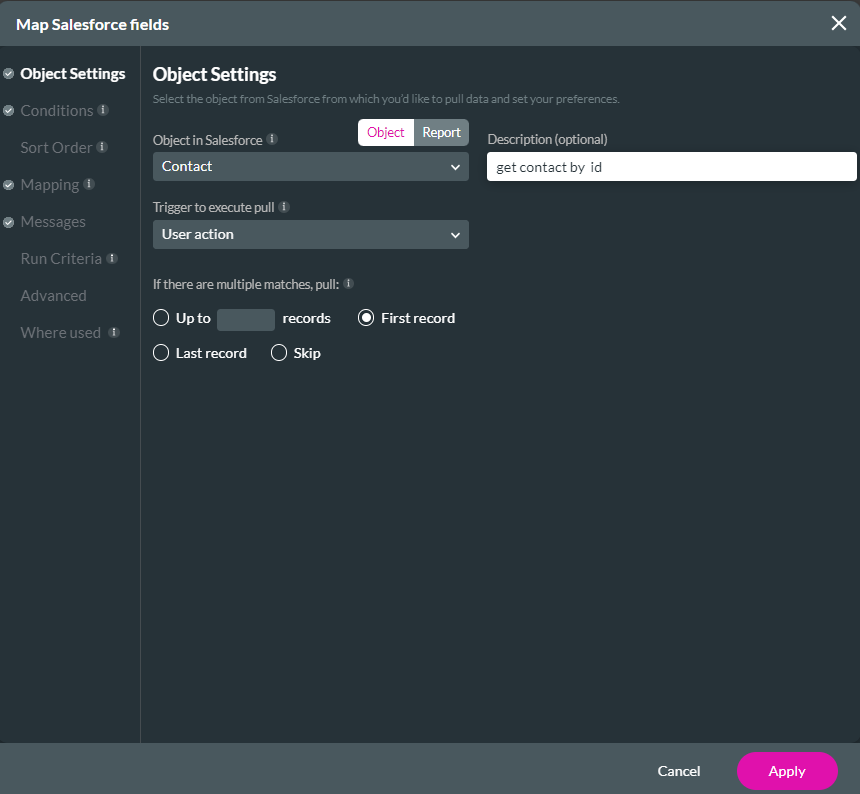
8. In the Object Settings tab, set the Object in Salesforce as Contact and The Trigger as User Action.
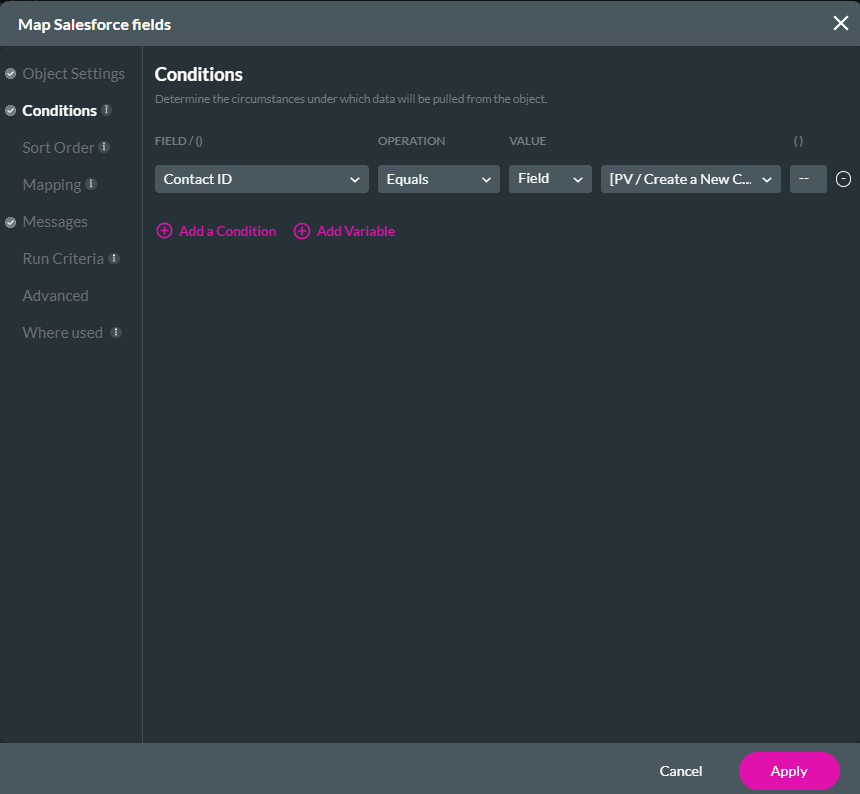
9. In the conditions tab, configure the condition: The Contact ID equals the Page variable contactid.
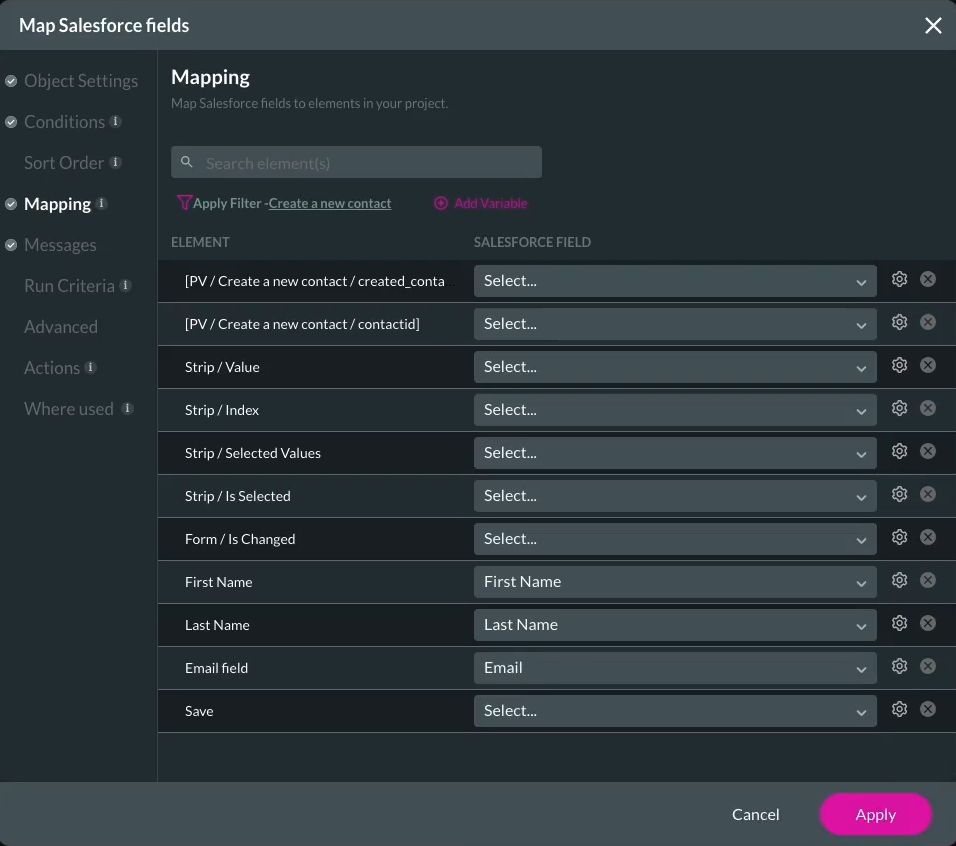
10. Click the Mapping tab. Map the Elements to the Salesforce fields. Click Apply.
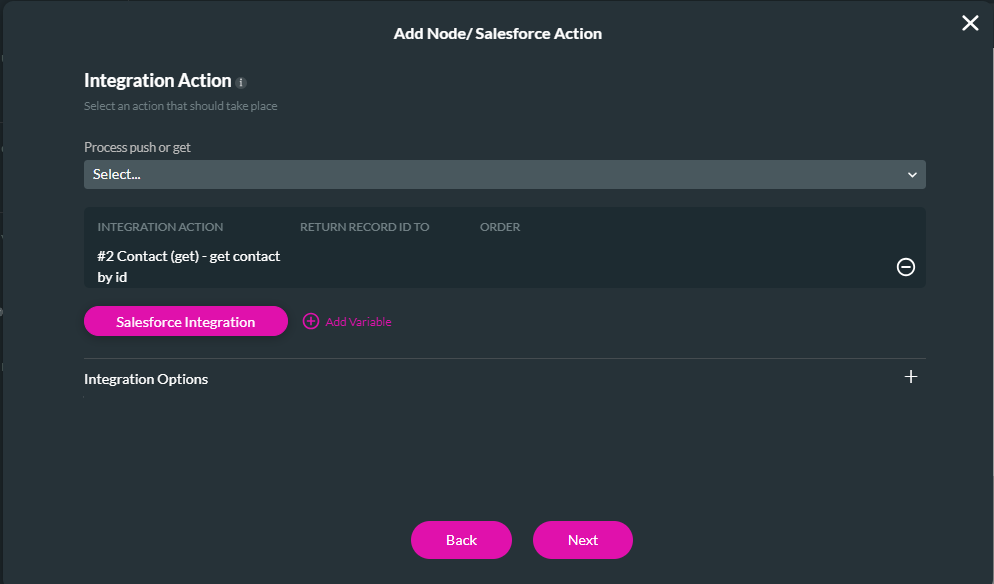
11. Choose the configured Get from the dropdown and click Next.
12. Add a Tag and click Insert.
The node is added to the screen.
13. Click Apply.
To configure an on-click icon for the power table:
1. Navigate to the home page and click on the power table gear icon. The power table settings menu opens.
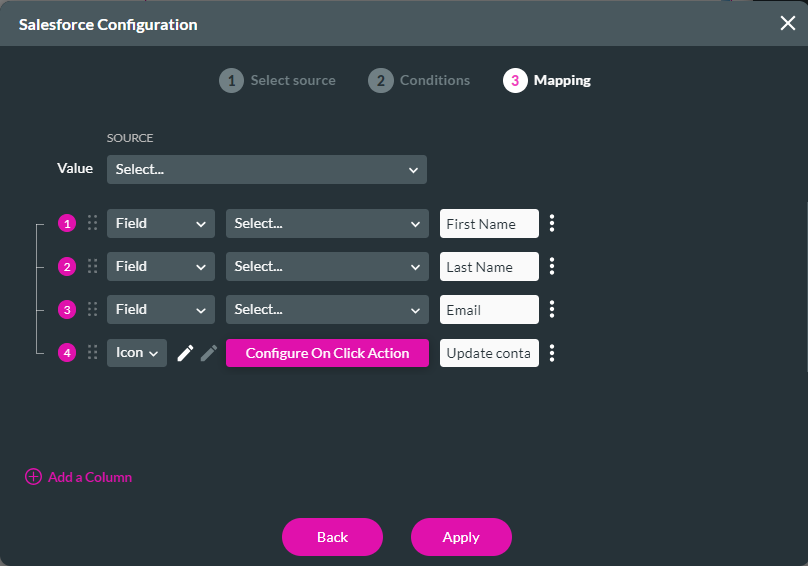
2. Click the Edit Mapping button. The Salesforce Configuration screen opens.
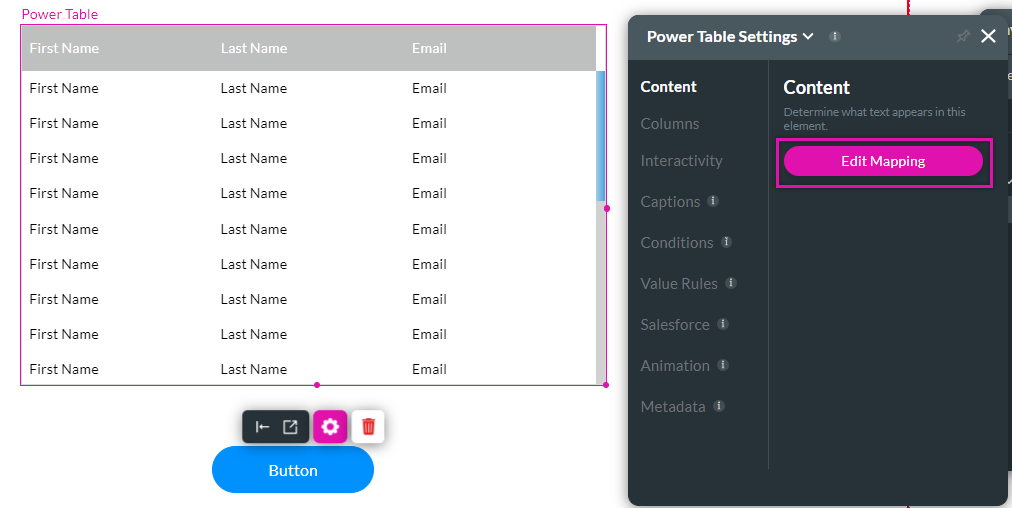
3. Add a new column and change the type to the icon. Choose an icon; in our example, the edit icon was selected.
4. Click configure on click action. The On Click Action window opens.
5. Click the Start + icon and select the Redirect/Go to Page node as an action. Click Next.
6. Click the Internal Tab and configure the page to open in a modal.
7. Click the Set Parameters button. The Configure Redirect Parameters window opens.
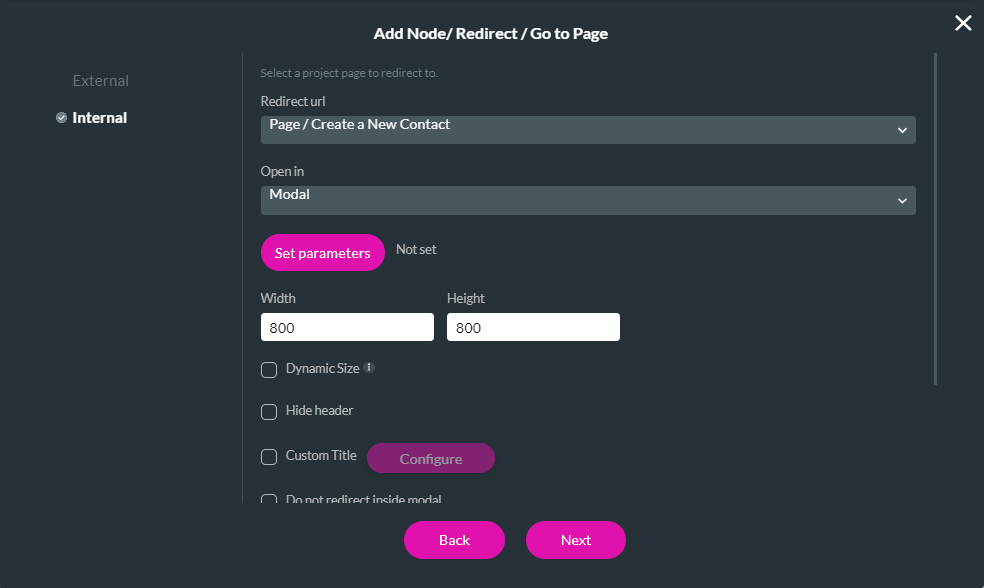
8. Configure the Contact ID variable to the Power Table Value. Click Apply.
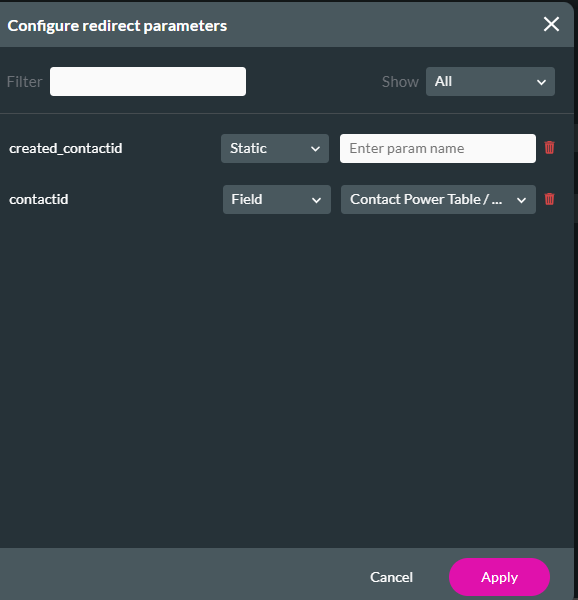
9. Click Next.
10. Add a Tag and click Insert.
The node is added to the screen.
11. Click Apply.
12. Change the column name and click Apply.
Save and Preview. When you click the edit icon next to a contact, the modal will display the prepopulated details.

1. Navigate to the Modal page configure actions screen.
2. Click the Conditions tab—Double-click on the Conditions icon. The Edit Node window opens.
3. Configure the condition that the Create a New Contact static ID must not be empty. Click Next.

4. Add a Tag and click Save.
5. Click the Then + icon and select the Salesforce Action node as an action. Click Next.

6. Click Salesforce Integration. The Salesforce Integration window opens.

7. Under the Get Records tab, click Create New. The Map Salesforce Fields window opens.

8. In the Object Settings tab, set the Object in Salesforce as Contact and The Trigger as User Action.

9. In the conditions tab, configure the condition: The Contact ID equals the Page variable contactid.

10. Click the Mapping tab. Map the Elements to the Salesforce fields. Click Apply.

11. Choose the configured Get from the dropdown and click Next.

12. Add a Tag and click Insert.
The node is added to the screen.
13. Click Apply.
To configure an on-click icon for the power table:
1. Navigate to the home page and click on the power table gear icon. The power table settings menu opens.
2. Click the Edit Mapping button. The Salesforce Configuration screen opens.

3. Add a new column and change the type to the icon. Choose an icon; in our example, the edit icon was selected.
4. Click configure on click action. The On Click Action window opens.

5. Click the Start + icon and select the Redirect/Go to Page node as an action. Click Next.
6. Click the Internal Tab and configure the page to open in a modal.
7. Click the Set Parameters button. The Configure Redirect Parameters window opens.

8. Configure the Contact ID variable to the Power Table Value. Click Apply.

9. Click Next.
10. Add a Tag and click Insert.
The node is added to the screen.
11. Click Apply.
12. Change the column name and click Apply.
Save and Preview. When you click the edit icon next to a contact, the modal will display the prepopulated details.
