Picklists and Selections (11 min)
Completion requirements
01 Getting Started
This lesson is focused on picklists or selection input fields, including
- Boolean fields such as checkbox and switch elements, the difference between static and dynamic picklist options, how to cache metadata for increased flow time, and how to filter some of the items in the picklist based on the record types in Salesforce.
- How do you set up dependent picklists using dependent picklists in Salesforce? How can we populate options in the picklist with records from Salesforce instead of picklists from Salesforce? How can we bring distinct options into the picklist?
- Use picklist interactivity, such as set value, and clear or activate items in the picklist.
02 The Setup
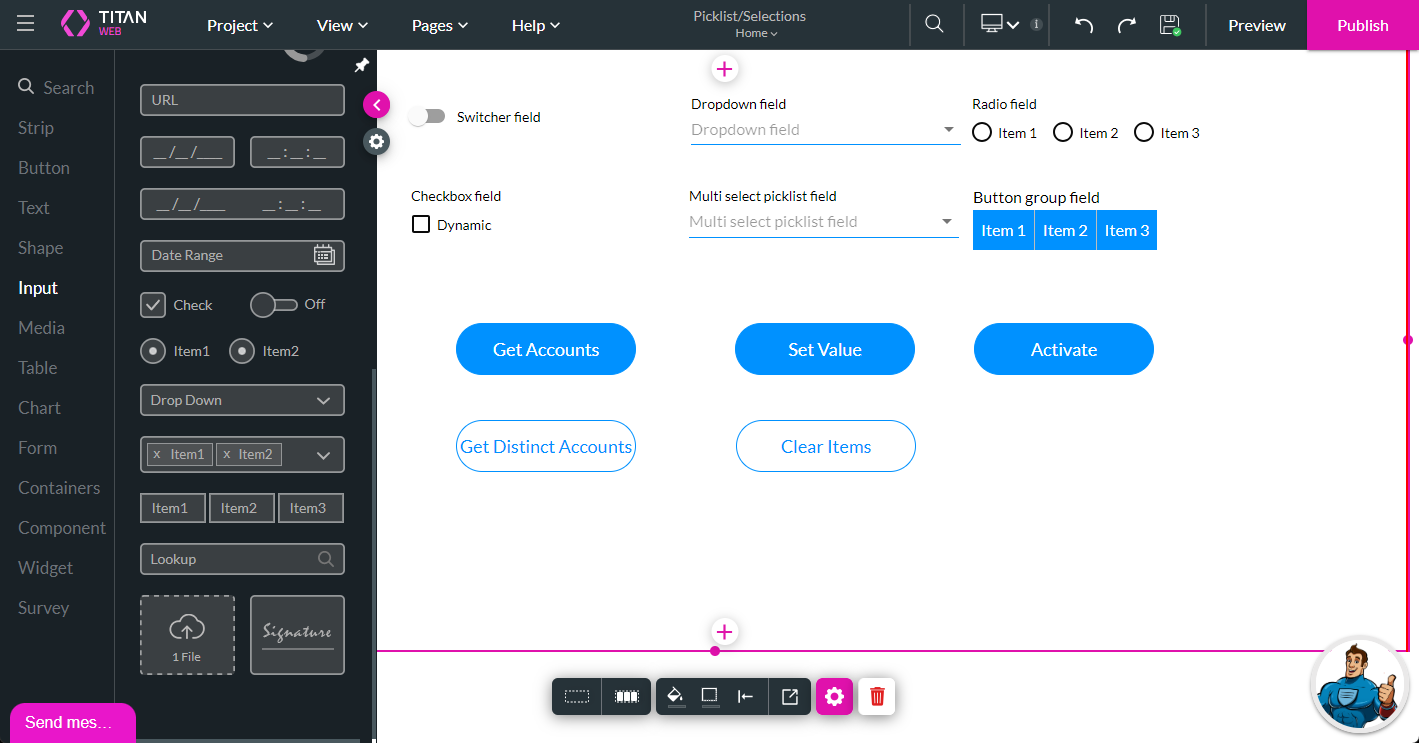
The project in this lesson has the following input fields:
The Debug Mode is on.
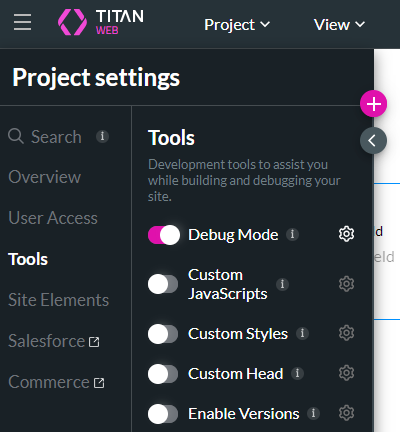
The Debug Mode is on.
03 Use Boolean values
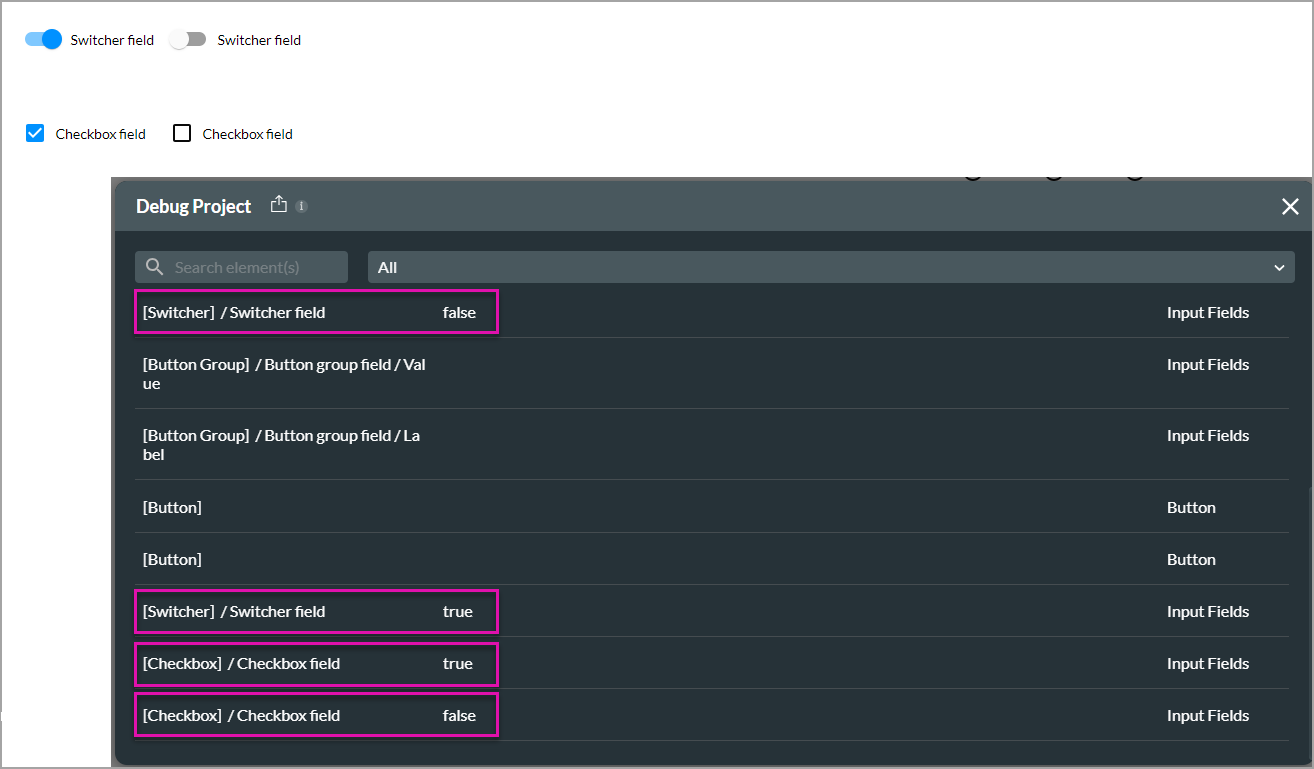
Boolean means a result with only one of two possible values: true or false. The switcher and checkbox are Boolean input elements. You can see the difference between an on and an off switcher and a checkbox that has been checked. You can push the values to, for instance, checkboxes in Salesforce.
Note: A checkbox can also have multiple values.
Note: A checkbox can also have multiple values.
04 Static and Dynamic Values
All the picklist elements, except the switcher field, can have static or dynamic values.
05 Static Values
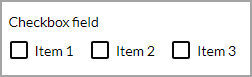
In this example, we added the static values to the checkbox element.
1. Select the checkbox element and click the Gear icon to open the Settings screen.
2. Click the Static Values radio button. There are, by default, three checkboxes.
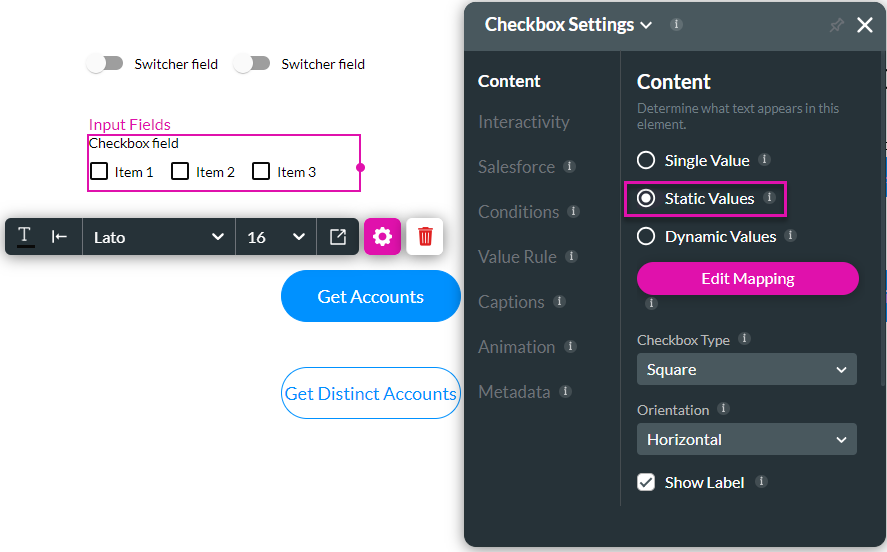
3. Click the Edit Mapping button.
4. Use the Configure Items screen to add values to each checkbox.
5. Click the Apply button.
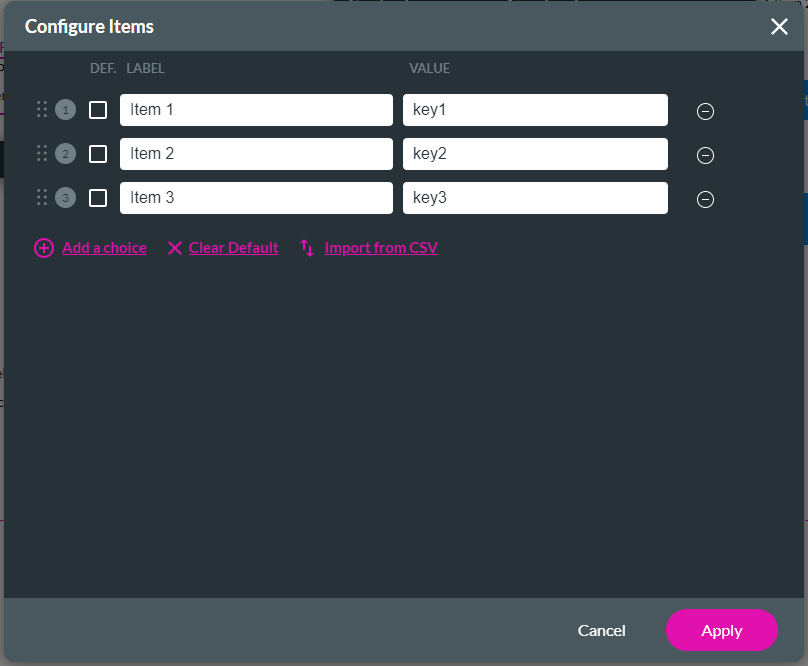
6. Save and preview the project. You will see the static values of the checkbox.
1. Select the checkbox element and click the Gear icon to open the Settings screen.
2. Click the Static Values radio button. There are, by default, three checkboxes.
3. Click the Edit Mapping button.
4. Use the Configure Items screen to add values to each checkbox.
5. Click the Apply button.
6. Save and preview the project. You will see the static values of the checkbox.
06 Dynamic Values
In this example, we added the static values to the checkbox element.
1. Select the checkbox element and click the Gear icon to open the Settings screen.
2. Click the Dynamic Values radio button.
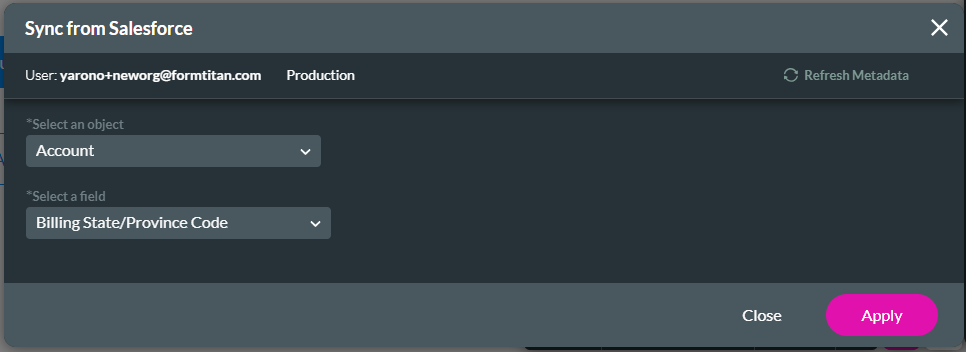
3. Click the Sync from Salesforce button.

4. Use the drop-down lists to select the object and field in Salesforce.
5. Click the Apply button.
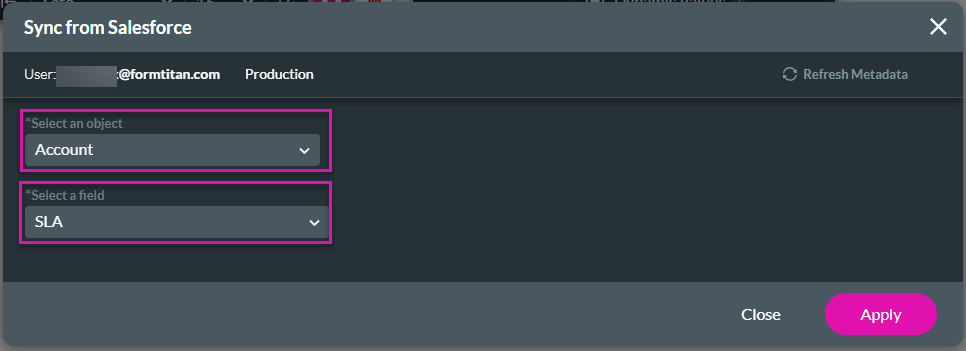
6. Save and preview the project. The checkboxes will be populated with values depending on what is available on the object in Salesforce.
1. Select the checkbox element and click the Gear icon to open the Settings screen.
2. Click the Dynamic Values radio button.
3. Click the Sync from Salesforce button.
4. Use the drop-down lists to select the object and field in Salesforce.
5. Click the Apply button.
6. Save and preview the project. The checkboxes will be populated with values depending on what is available on the object in Salesforce.
07 View the Salesforce Picklist Get
When you select dynamic values, a Salesforce Get is automatically created.
1. Click the Gear icon to open the Project Settings.
2. Click the Salesforce option and click the Picklist option. The Get Picklist Integration is added automatically.
3. Click the Edit icon to open the Get Picklist Integration.
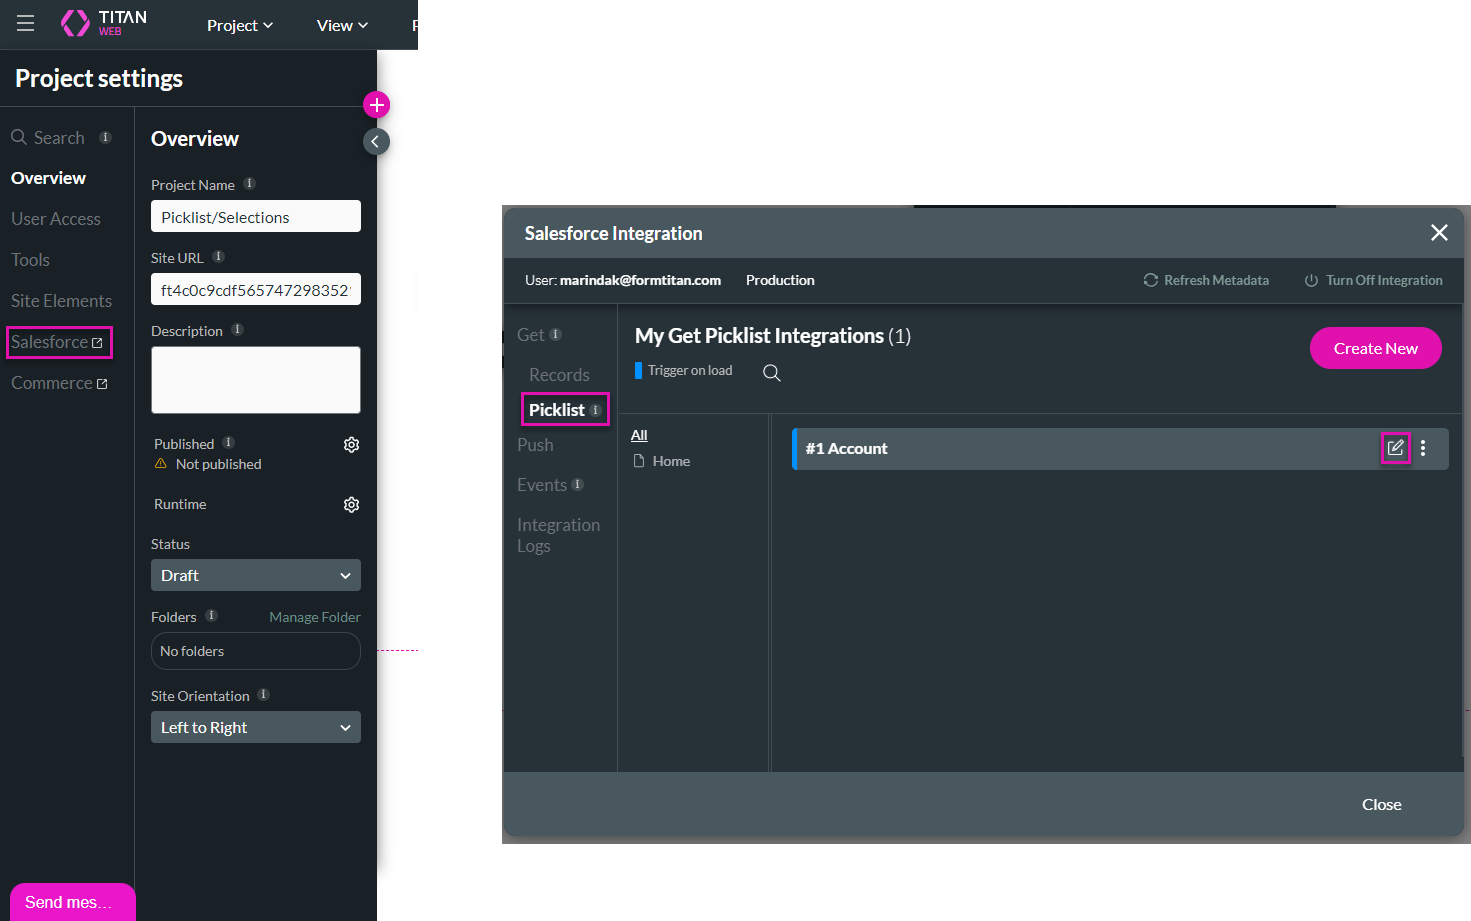
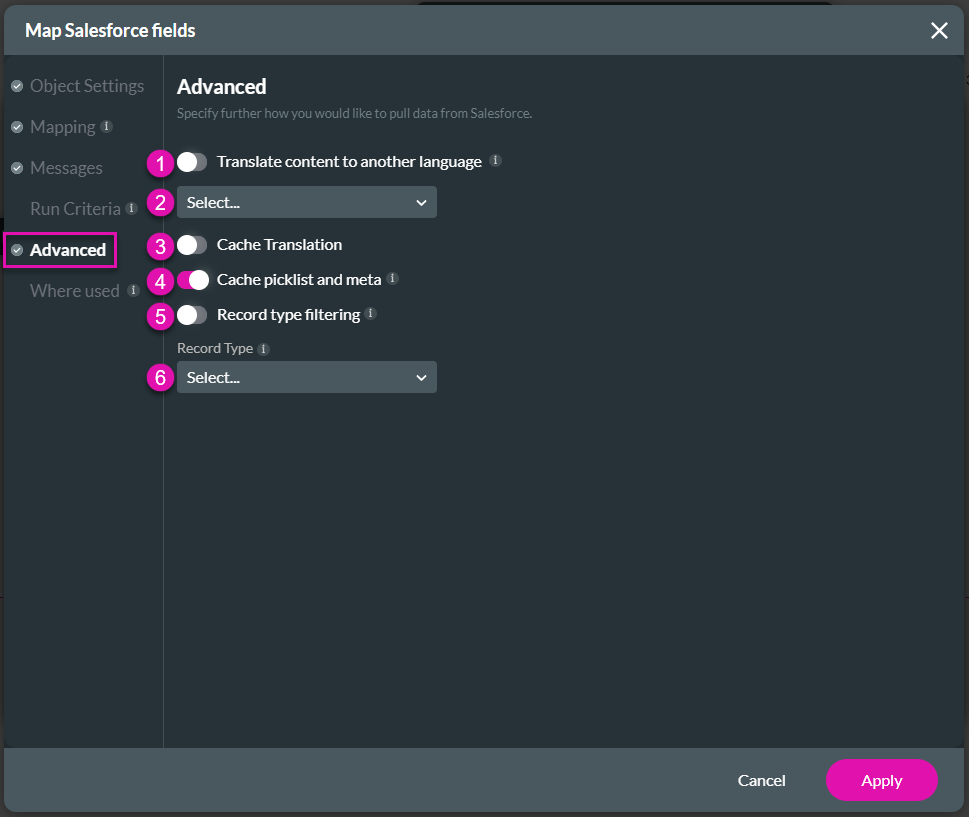
4. Click the Advanced option. You can configure the following:
5. Click the Apply button.
6. Click the Close button to close the Salesforce Integration screen.
1. Click the Gear icon to open the Project Settings.
2. Click the Salesforce option and click the Picklist option. The Get Picklist Integration is added automatically.
3. Click the Edit icon to open the Get Picklist Integration.
4. Click the Advanced option. You can configure the following:
- Use the Translate content to another language toggle switch to enable the functionality.
- Use the drop-down list to select a language.
- Use the toggle switch to cache the Translation.
- Use the toggle switch to cache the picklist and the metadata. The Cache picklist and meta toggle switch are on by default. This speeds up the loading process so that the picklist information is used from the cache and does not load every time the page is opened, primarily when the picklist data is accessed often or when the data retrieval process is resource-intensive.
- Use the toggle switch to record the filtering type. This lets you filter the items in the picklist based on the record type in Salesforce.
- You can populate the record type in a variable and select it from the drop-down list.
5. Click the Apply button.
6. Click the Close button to close the Salesforce Integration screen.
08 Create a Dependent Picklist
In a dependent picklist, the choices in the second are dynamically filtered based on the option the user selected in the first picklist. This filtering helps to ensure that users can only choose valid and relevant options in the second picklist based on their initial selection in the first picklist.
1. Add two drop-down input elements.
2. Select the first drop-down input element and click the Gear icon to open the Settings screen.
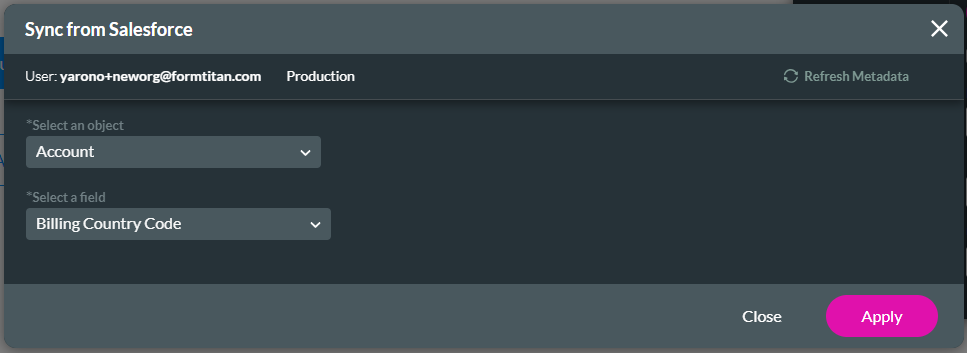
3. Select the Dynamic Values radio button and click the Sync from Salesforce.
4. Use the drop-down lists and select the object and field.
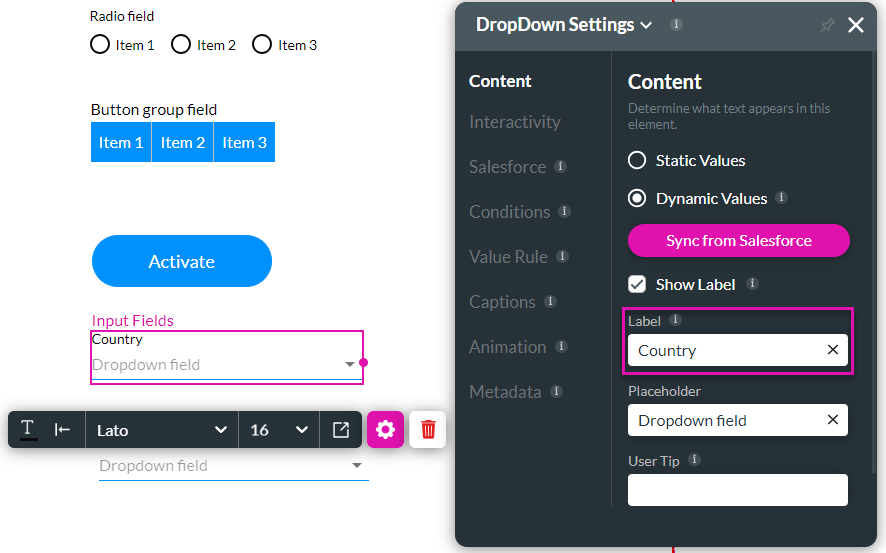
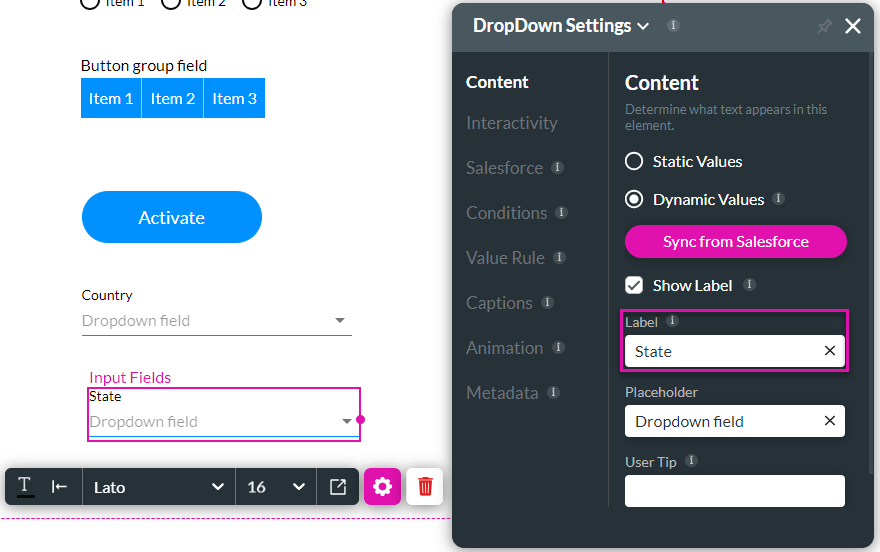
6. Change the label of the drop-down input element to Country.
7. Select the second drop-down element and click the Gear icon to open the Settings screen.
8. Select the Dynamic Values radio button and click the Sync from Salesforce.
9. Use the drop-down lists and select the object and field.
11. Change the label of the drop-down input element to State.
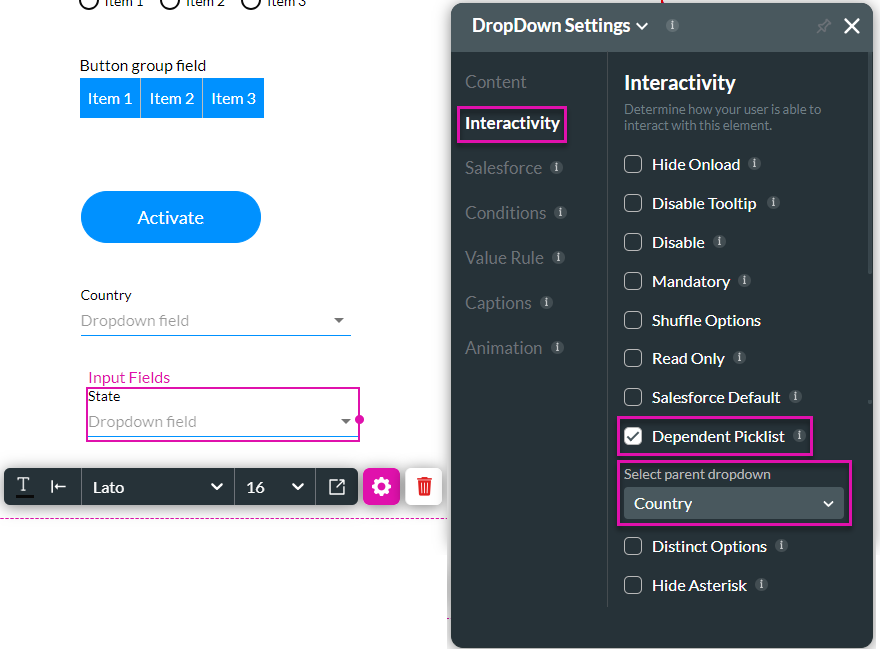
12. Ensure the second (child) drop-down element is still selected.
13. On the Settings screen, click the Interactivity option.
14. Click the Dependent Picklist checkbox and use the drop-down list to select the parent picklist; in this example, the parent drop-down list is called “Country.”
15. Save and preview the project.
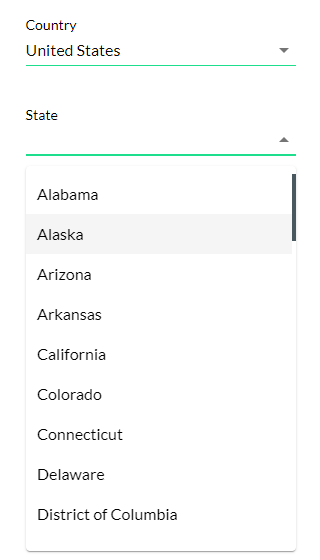
16. Use the drop-down list to select a country, for instance, the United States.
17. Use the drop-down list to select a state. The list only includes the states in the USA.
1. Add two drop-down input elements.
2. Select the first drop-down input element and click the Gear icon to open the Settings screen.
3. Select the Dynamic Values radio button and click the Sync from Salesforce.
4. Use the drop-down lists and select the object and field.
- In this example, we selected Account and Billing Country Code.
6. Change the label of the drop-down input element to Country.
7. Select the second drop-down element and click the Gear icon to open the Settings screen.
8. Select the Dynamic Values radio button and click the Sync from Salesforce.
9. Use the drop-down lists and select the object and field.
- In this example, we selected Account and Billing State/Province Code.
11. Change the label of the drop-down input element to State.
12. Ensure the second (child) drop-down element is still selected.
13. On the Settings screen, click the Interactivity option.
14. Click the Dependent Picklist checkbox and use the drop-down list to select the parent picklist; in this example, the parent drop-down list is called “Country.”
15. Save and preview the project.
16. Use the drop-down list to select a country, for instance, the United States.
17. Use the drop-down list to select a state. The list only includes the states in the USA.
09 Using Salesforce Records to Populate the Picklist
You can populate a picklist using Salesforce records.
1. Make sure you have selected the dropdown element and the Dynamic Values radio button is selected.
2. Don’t click the Sync from Salesforce button.
3. Open the Project Settings and click the Salesforce option.
4. Under Records, click the Create New button.
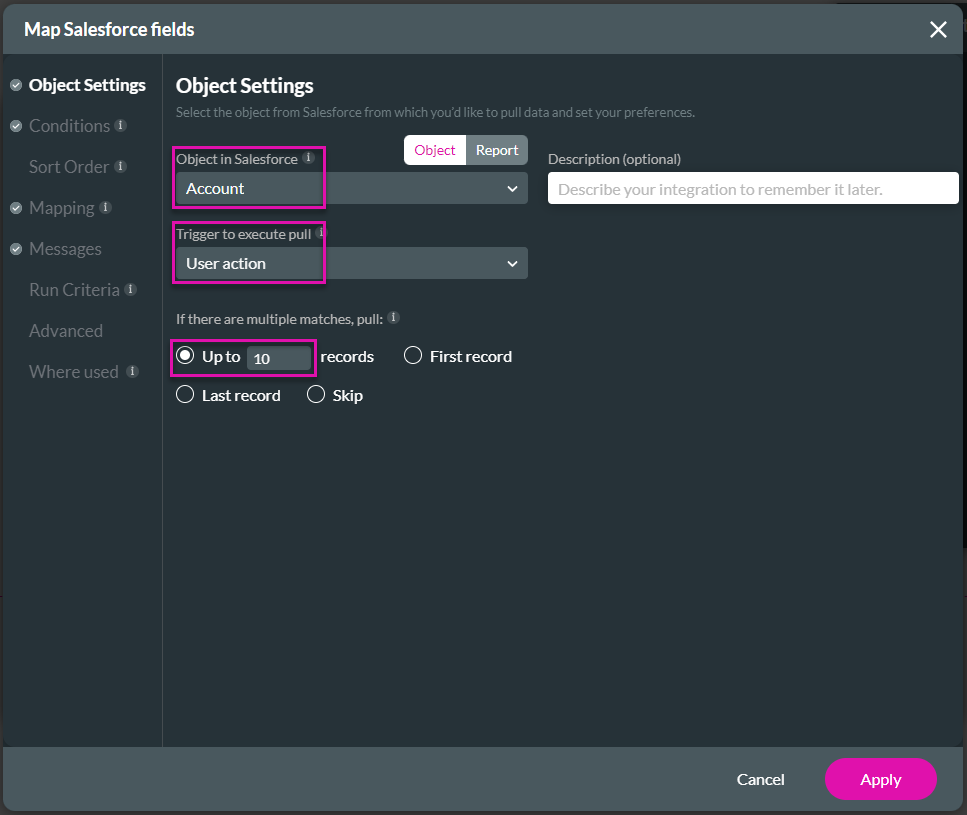
5. Use the dropdown lists to select the following:
6. Click the Conditions option and configure the condition as follows:
7. Click the Mapping option and configure the following:

8. Click the Apply button.
9. Click the Close button.
10. Select the Get Account button on the project and click the On Click Action icon.

11. Click the + icon next to the Start node.
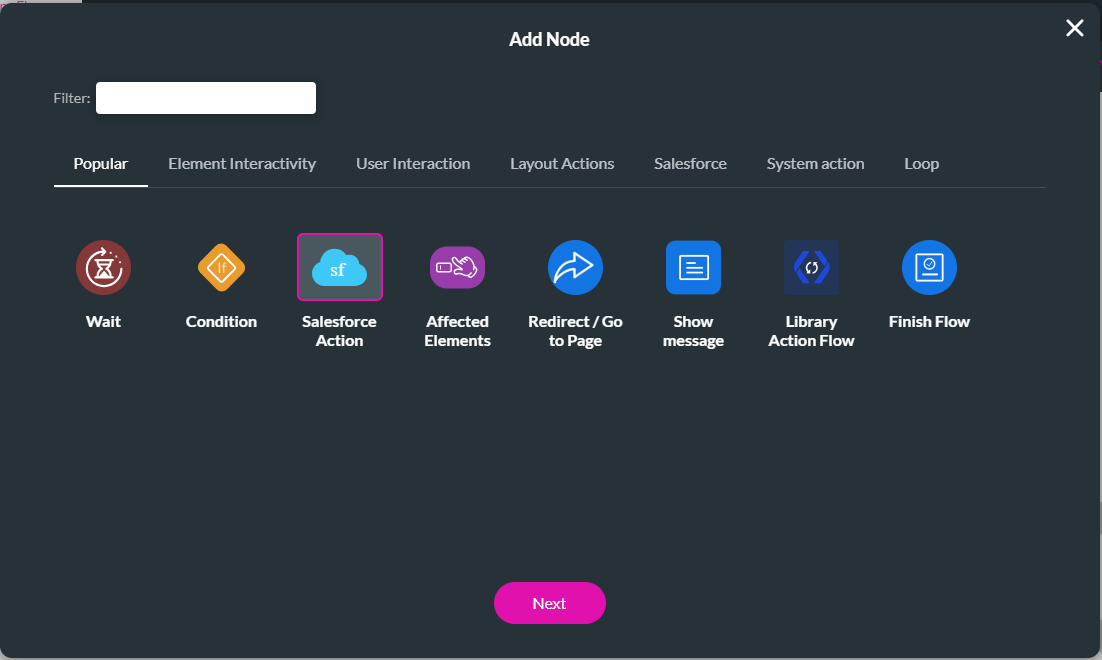
12. Click the Salesforce Action option and click the Next button.
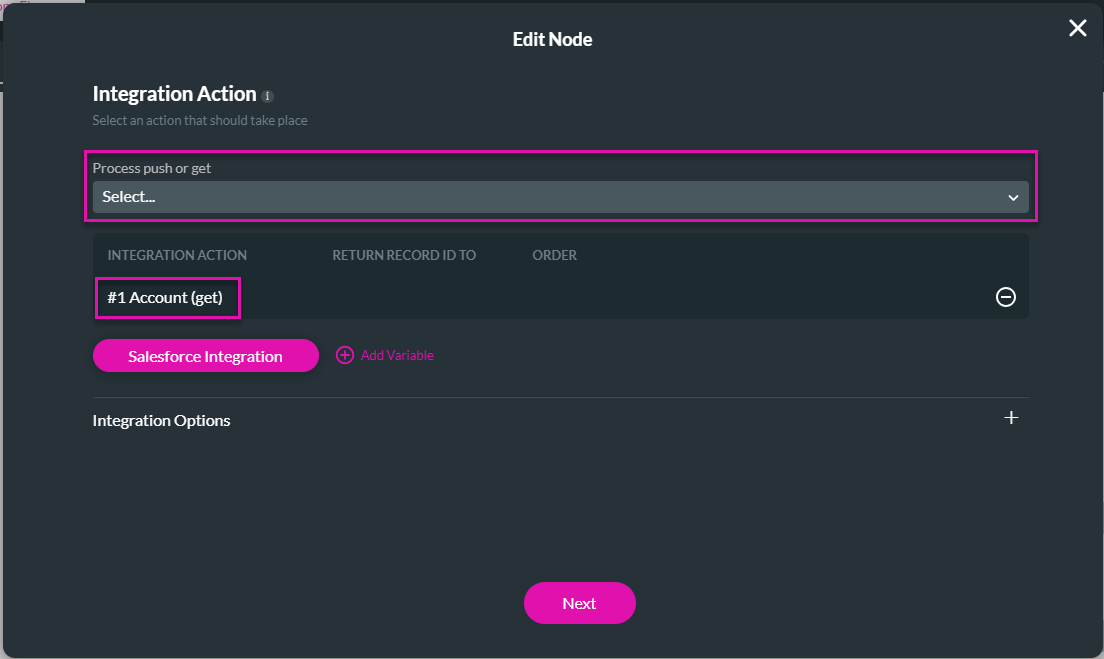
13. Use the dropdown list to select the Account Get and click the Next button.
14. Add a tag and click the Insert button. The Node is added to the screen.
15. Click the Apply button.
16. Save and preview the project.
17. Click the Get Accounts button.
18. Use the dropdown list to view the accounts.
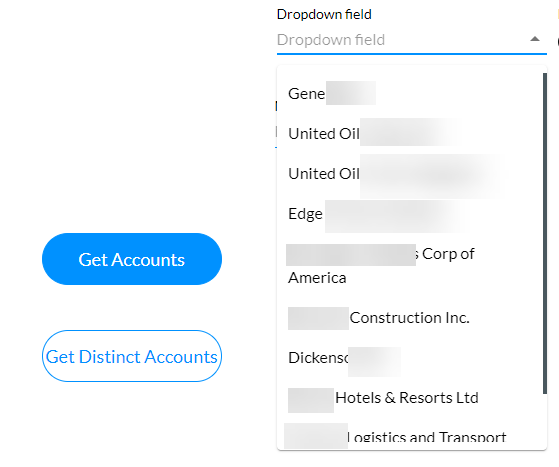
The dropdown list is populated with ten records from Salesforce.
1. Make sure you have selected the dropdown element and the Dynamic Values radio button is selected.
2. Don’t click the Sync from Salesforce button.
3. Open the Project Settings and click the Salesforce option.
4. Under Records, click the Create New button.
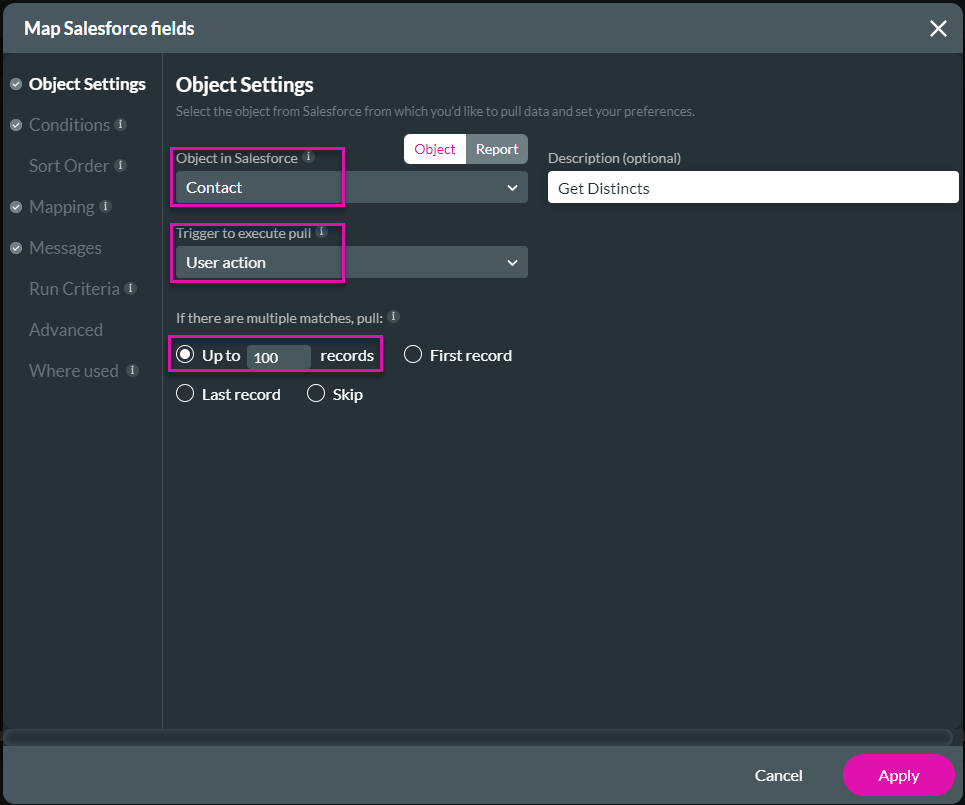
5. Use the dropdown lists to select the following:
- An object in Salesforce, such as an Account.
- Trigger to execute the pull, in this example, User action.
- Up to 10 records.
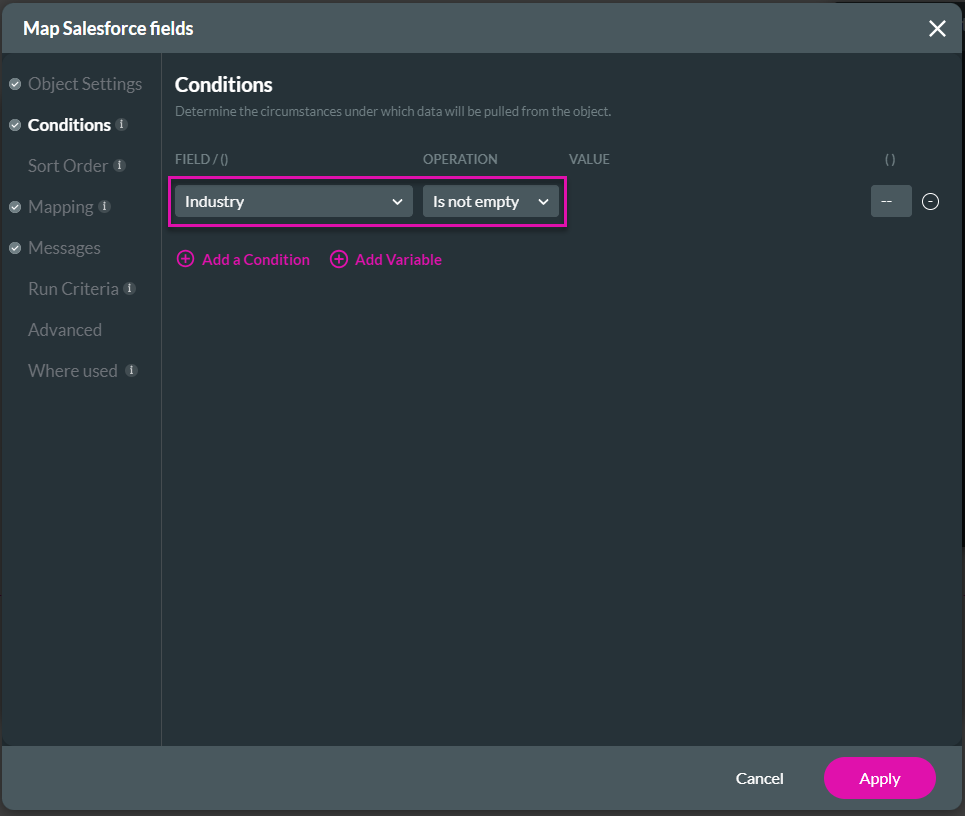
6. Click the Conditions option and configure the condition as follows:
- Industry is not empty
7. Click the Mapping option and configure the following:
- Dropdown field/Value = Account ID. You can select anything here, but the ID of the record is the best option for this background value.
- Dropdown field/Label = Account Name
8. Click the Apply button.
9. Click the Close button.
10. Select the Get Account button on the project and click the On Click Action icon.
11. Click the + icon next to the Start node.
12. Click the Salesforce Action option and click the Next button.
13. Use the dropdown list to select the Account Get and click the Next button.
14. Add a tag and click the Insert button. The Node is added to the screen.
15. Click the Apply button.
16. Save and preview the project.
17. Click the Get Accounts button.
18. Use the dropdown list to view the accounts.
The dropdown list is populated with ten records from Salesforce.
10 Distinct List from Salesforce
1. Open the Project Settings and click the Salesforce option.
2. Under Records, click the Create New button.
3. Use the dropdown lists to select the following:
4. Click the Conditions option and configure the condition as follows:
5. Click the Mapping option and configure the following:
6. Click the Apply button.
7. Click the Close button.
8. Select the Get Distinct Accounts button on the project and click the On Click Action icon.
9. Click the + icon next to the Start node.
10. Click the Salesforce Action option and click the Next button.

11. Use the dropdown list to select the Contact Get and click the Next button.
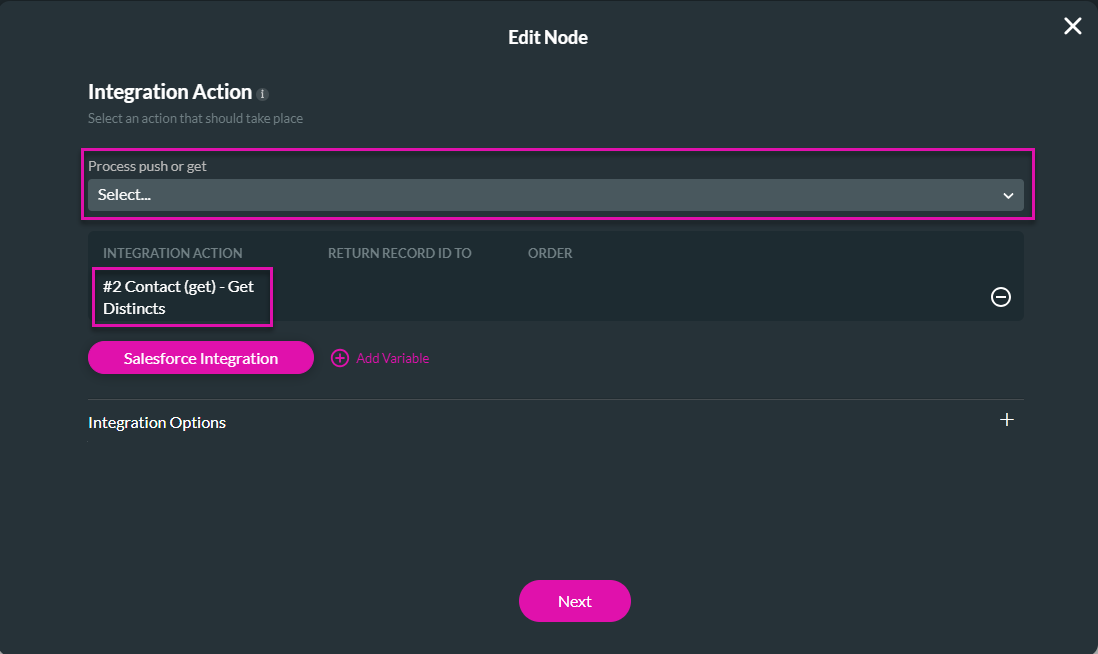
12. Add a tag and click the Insert button. The Node is added to the screen.
13. Click the Apply button.
14. Save and preview the project.
15. Click the Get Distinct Accounts button.
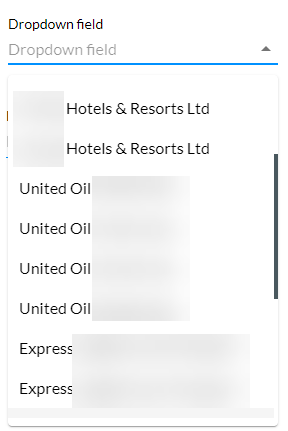
16. Use the dropdown list to view the contacts. You will see duplicate contacts because various contacts share the same account.
17. Go back to the Titan Web project.
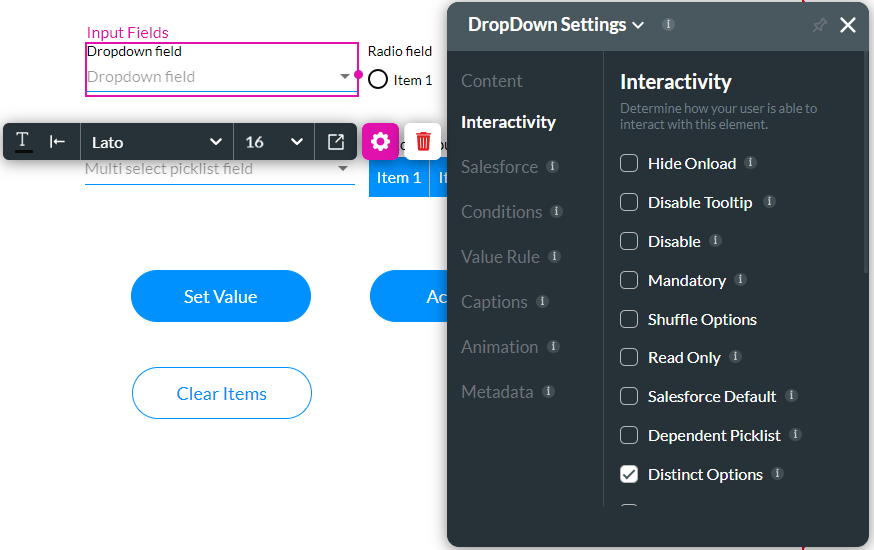
18. Select the dropdown element and click the Gear icon to open the Settings screen.
19. Click the Interactivity option and click the Distinct Options checkbox.
20. Save and preview the project.
21. Click the Get Distinct Accounts button.
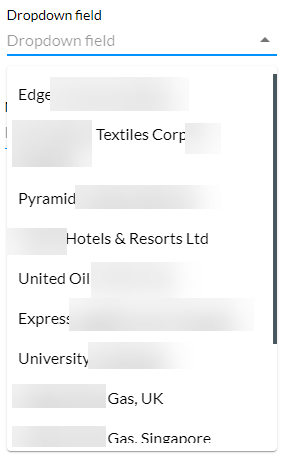
22. Use the dropdown list to view the contacts. You will now see that there are only distinct options.
2. Under Records, click the Create New button.
3. Use the dropdown lists to select the following:
- An object in Salesforce, such as a Contact.
- Trigger to execute the pull, in this example, User action.
- Up to 100 records.
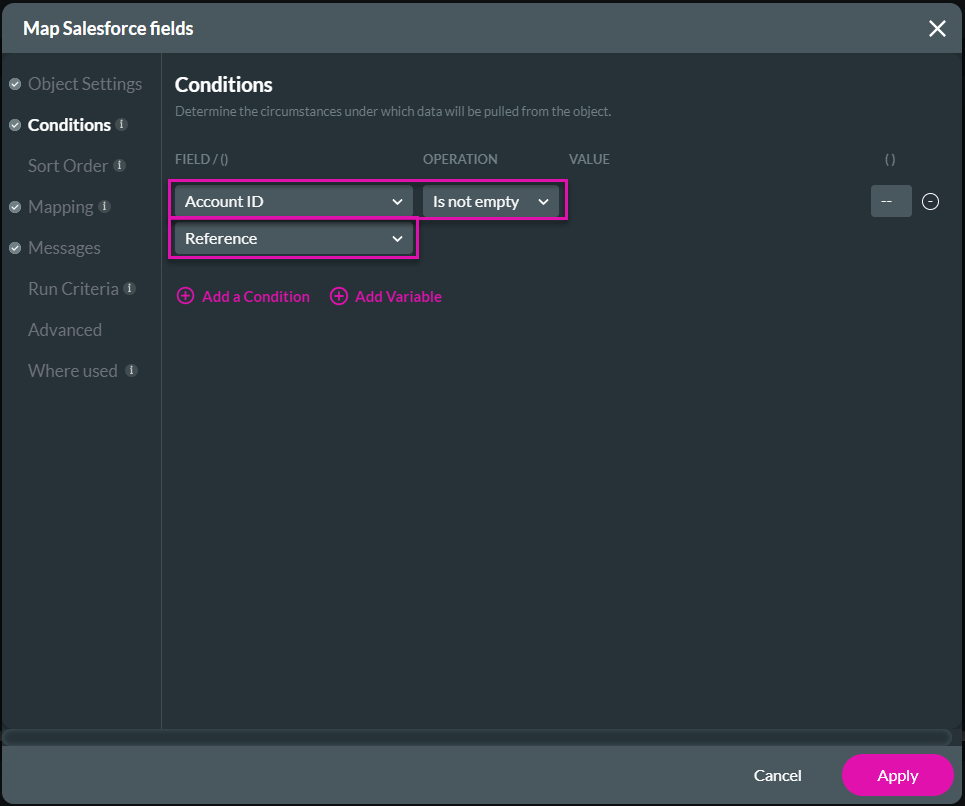
4. Click the Conditions option and configure the condition as follows:
- Industry is not empty
- Reference
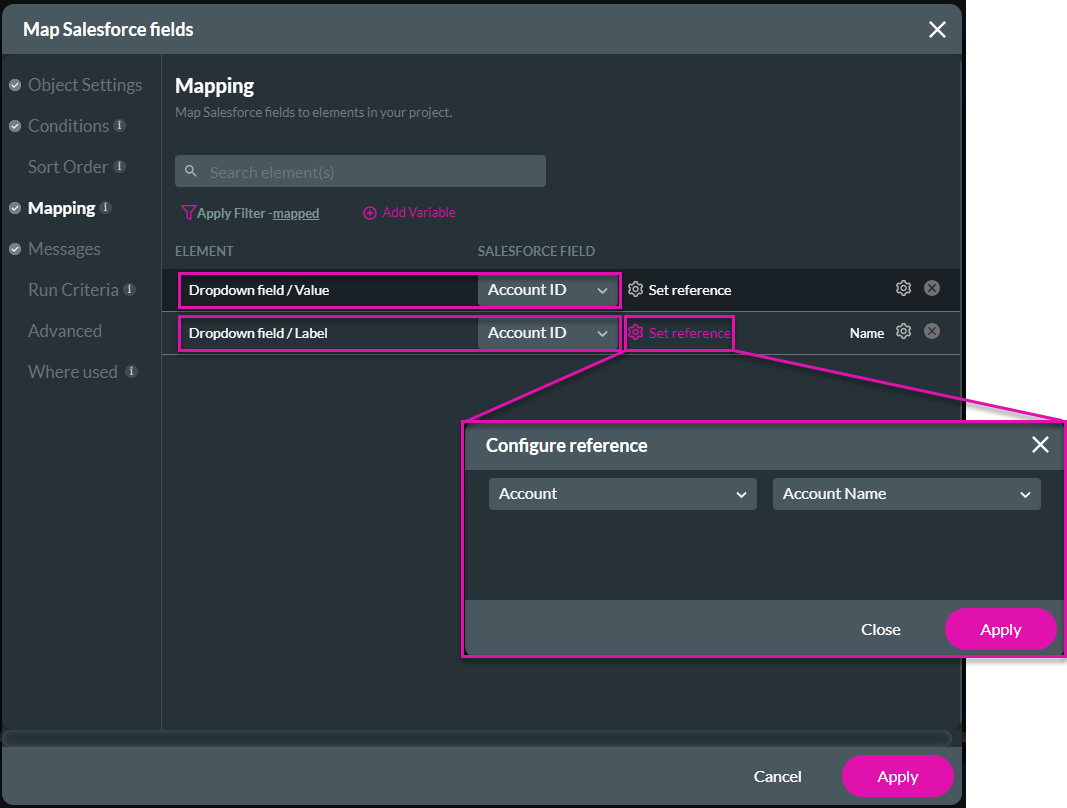
5. Click the Mapping option and configure the following:
- Dropdown field/Value = Account ID
- Dropdown field/Label = Account ID
- Set Reference:
- Account
- Account Name


- Set Reference:
6. Click the Apply button.
7. Click the Close button.
8. Select the Get Distinct Accounts button on the project and click the On Click Action icon.
9. Click the + icon next to the Start node.
10. Click the Salesforce Action option and click the Next button.
11. Use the dropdown list to select the Contact Get and click the Next button.
12. Add a tag and click the Insert button. The Node is added to the screen.
13. Click the Apply button.
14. Save and preview the project.
15. Click the Get Distinct Accounts button.
16. Use the dropdown list to view the contacts. You will see duplicate contacts because various contacts share the same account.
17. Go back to the Titan Web project.
18. Select the dropdown element and click the Gear icon to open the Settings screen.
19. Click the Interactivity option and click the Distinct Options checkbox.
20. Save and preview the project.
21. Click the Get Distinct Accounts button.
22. Use the dropdown list to view the contacts. You will now see that there are only distinct options.
11 Picklist Interactivity
There are several options, but we will look at set values, clear items, and active items.
12 Set Value
1. Select the Set Value button on the project and click the On Click Action icon.
2. Click the + icon next to the Start node.
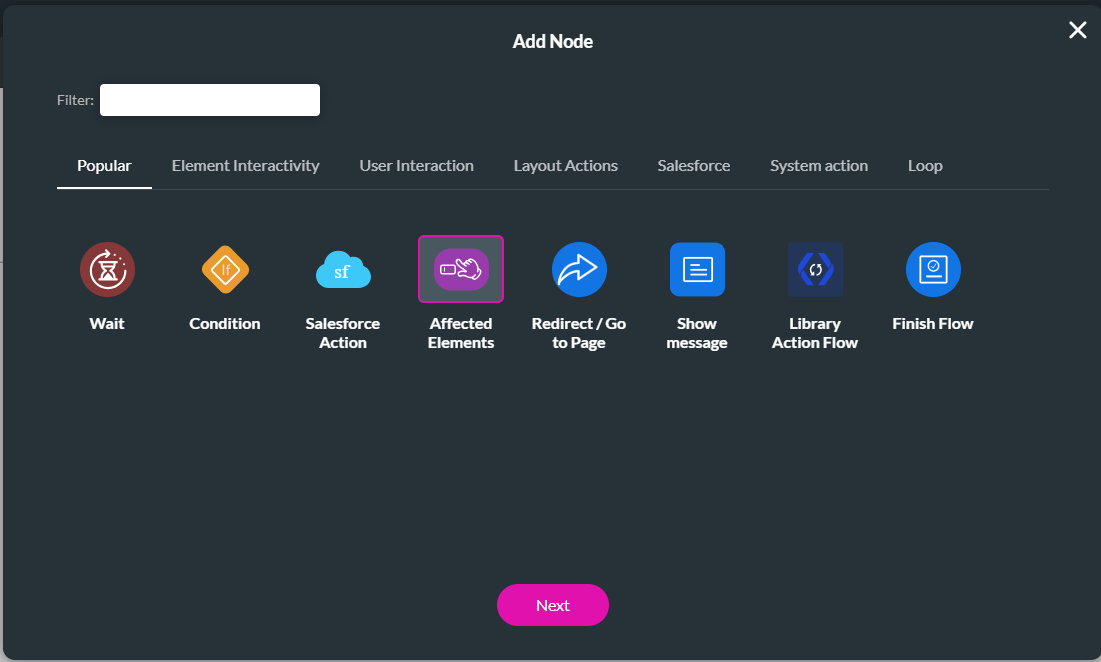
3. Click the Affected Elements option and click the Next button.
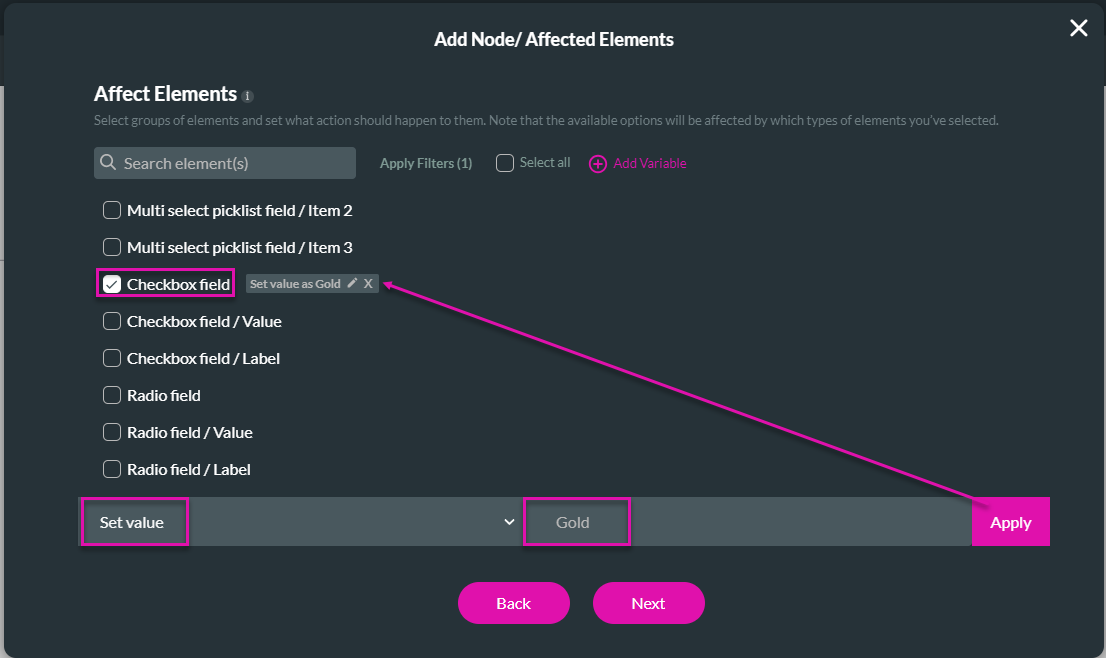
4. Click the Checkbox element.
5. Use the drop-down list to select the Set value option.
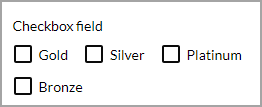
6. Type “Gold” in the field and click the Apply button. This value must match one of the values in the picklist.
7. Click the Next button.
8. Add a tag and click the Insert button. The Node is added to the screen.
9. Click the Apply button.
10. Save and preview the project.
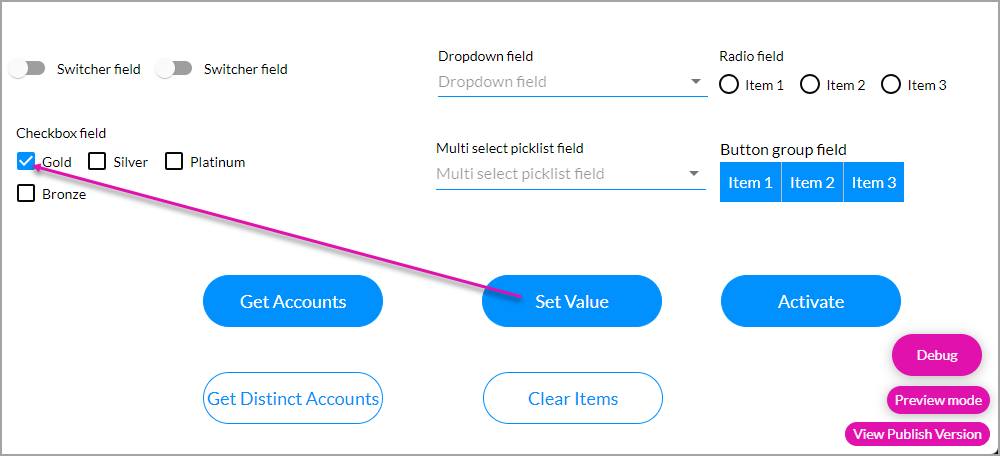
11. Click the Set Value button. The Gold checkbox is selected.
2. Click the + icon next to the Start node.
3. Click the Affected Elements option and click the Next button.
4. Click the Checkbox element.
5. Use the drop-down list to select the Set value option.
6. Type “Gold” in the field and click the Apply button. This value must match one of the values in the picklist.
7. Click the Next button.
8. Add a tag and click the Insert button. The Node is added to the screen.
9. Click the Apply button.
10. Save and preview the project.
11. Click the Set Value button. The Gold checkbox is selected.
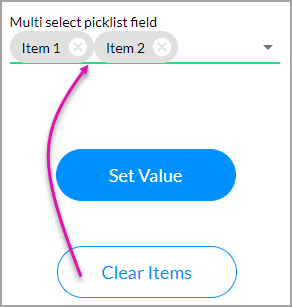
13 Clear Items
This option works well with multi-select picklists; A user can clear the list after selecting multiple options.
1. Select the Clear items button on the project and click the On Click Action icon.
2. Click the + icon next to the Start node.
3. Click the Affected Elements option and click the Next button.

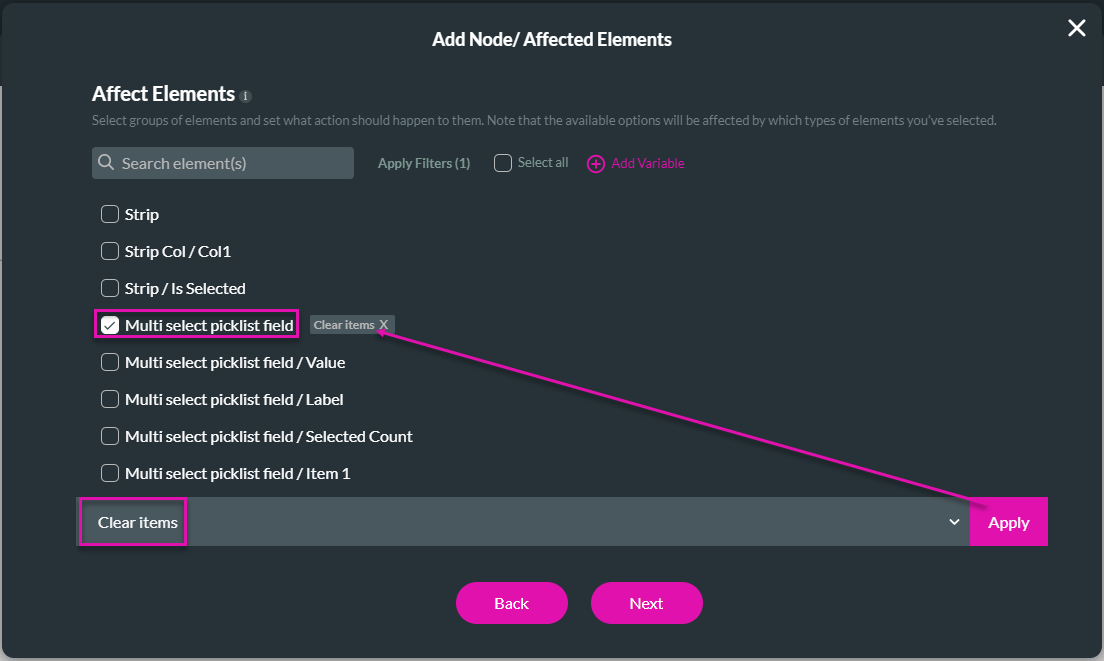
4. Click the Multi-select picklist field.
5. Use the drop-down list to select the Clear items option.
6. Click the Apply button.
7. Click the Next button.
8. Add a tag and click the Insert button. The Node is added to the screen.
9. Click the Apply button.
10. Save and preview the project.
11. Select multiple items.
12. Click the Clear Items button. All the items in the multi-select picklist are cleared.
1. Select the Clear items button on the project and click the On Click Action icon.
2. Click the + icon next to the Start node.
3. Click the Affected Elements option and click the Next button.
4. Click the Multi-select picklist field.
5. Use the drop-down list to select the Clear items option.
6. Click the Apply button.
7. Click the Next button.
8. Add a tag and click the Insert button. The Node is added to the screen.
9. Click the Apply button.
10. Save and preview the project.
11. Select multiple items.
12. Click the Clear Items button. All the items in the multi-select picklist are cleared.
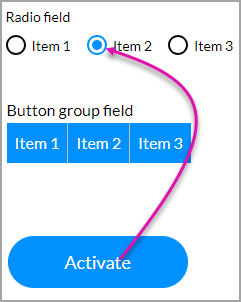
14 Activate
For instance, you can select a specific item in a picklist with multiple radio buttons.
1. Select the Activate button on the project and click the On Click Action icon.
2. Click the + icon next to the Start node.
3. Click the Affected Elements option and click the Next button.

4. Click the Radio field/item 2 element.
5. Use the drop-down list to select the Activate option.
6. Click the Apply button.
7. Click the Next button.
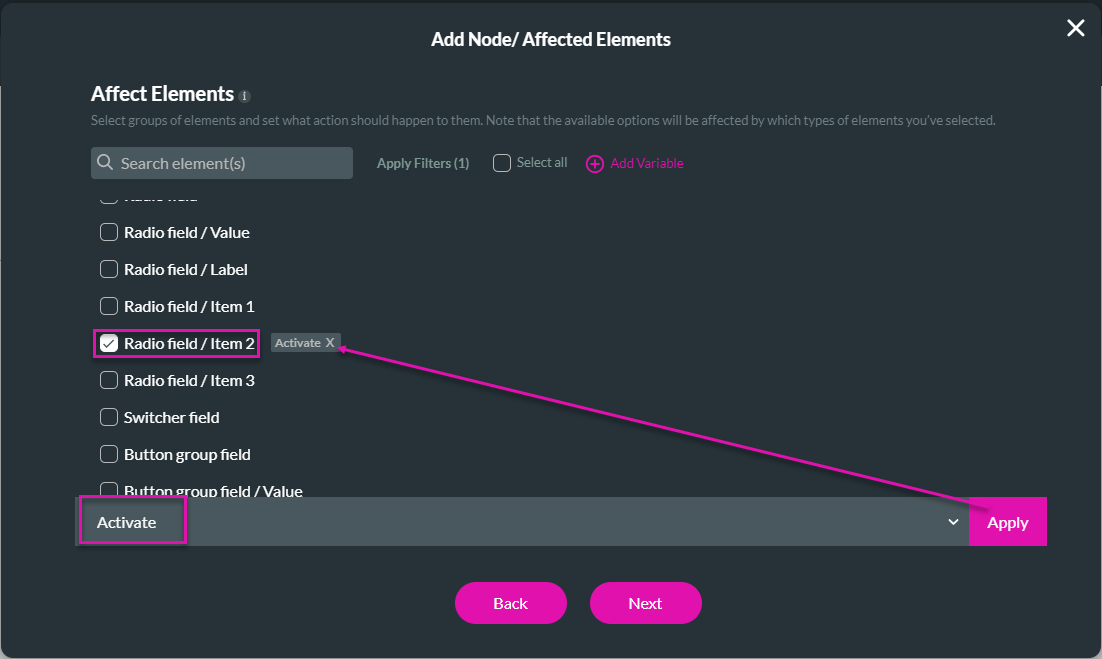
8. Add a tag and click the Insert button. The Node is added to the screen.
9. Click the Apply button.
10. Save and preview the project.
11. Select multiple items.
12. Click the Activate button. Item 2 in the radio field is selected.
1. Select the Activate button on the project and click the On Click Action icon.
2. Click the + icon next to the Start node.
3. Click the Affected Elements option and click the Next button.
4. Click the Radio field/item 2 element.
5. Use the drop-down list to select the Activate option.
6. Click the Apply button.
7. Click the Next button.
8. Add a tag and click the Insert button. The Node is added to the screen.
9. Click the Apply button.
10. Save and preview the project.
11. Select multiple items.
12. Click the Activate button. Item 2 in the radio field is selected.