Action Flow - Orientation (12 min)
Completion requirements
01 Getting Started
In this lesson, we look at an example of conditional logic set up using action flows.
We used a simple form that updates contact details in Salesforce. When the form opens, it is populated with data from Salesforce (as configured using the Actions Flow), and the user can make changes if needed. There is also conditional logic on the radio button: a birthdate can be added if the user is over 18.
If the contact doesn’t have an ID image, the form will allow uploading a file.
The Submit button has conditional logic that will push the data to Salesforce and update any fields where relevant.
The updated data can be viewed in Salesforce.
All these actions can be done by building action flows.
02 Navigate to the Actions Flow
1. Open the Titan Web project.
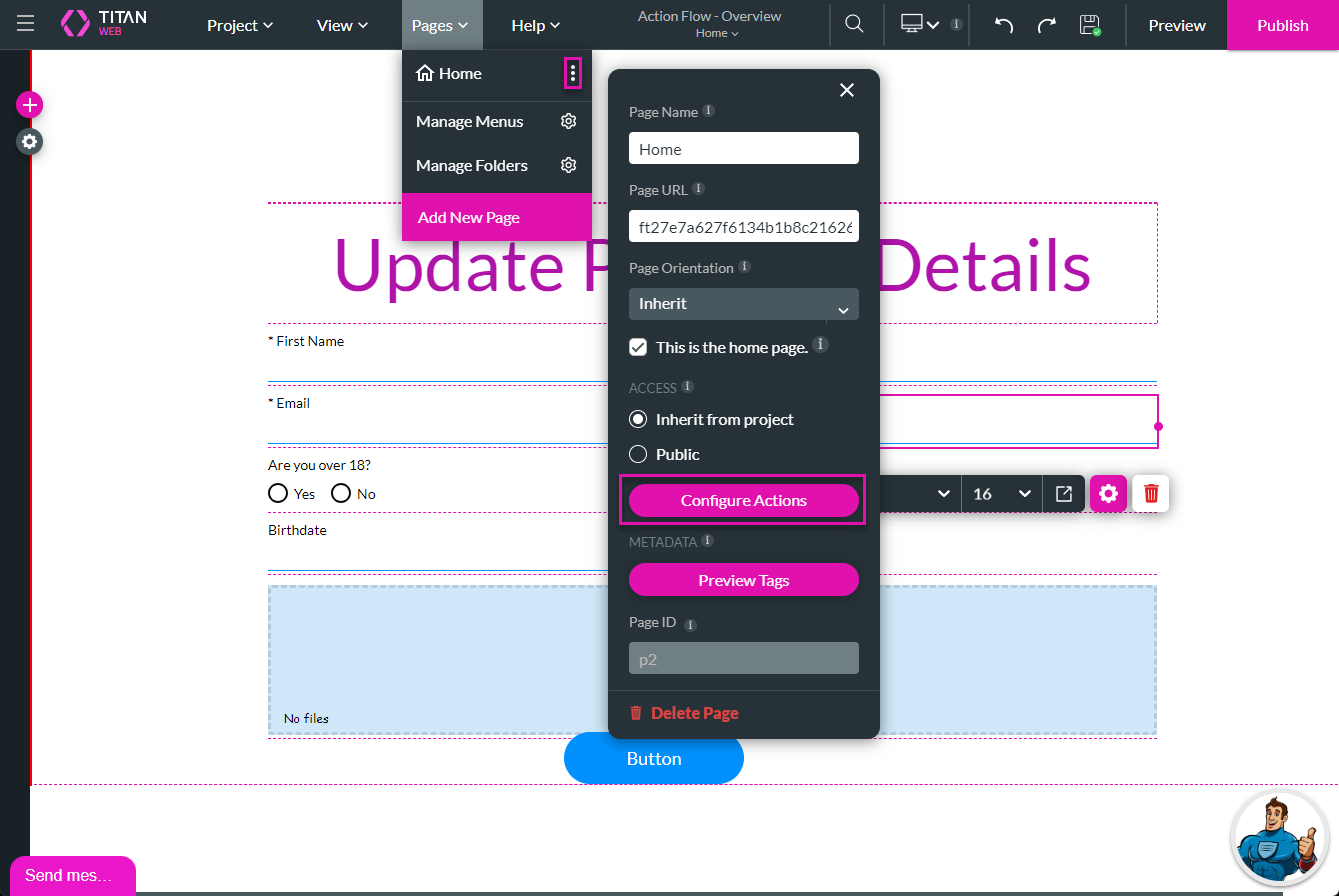
2. Click the Pages drop-down list and the Kebab icon next to Home.
3. Click the Configure Actions button. The Configure Actions screen opens, and you can configure action on the page level.
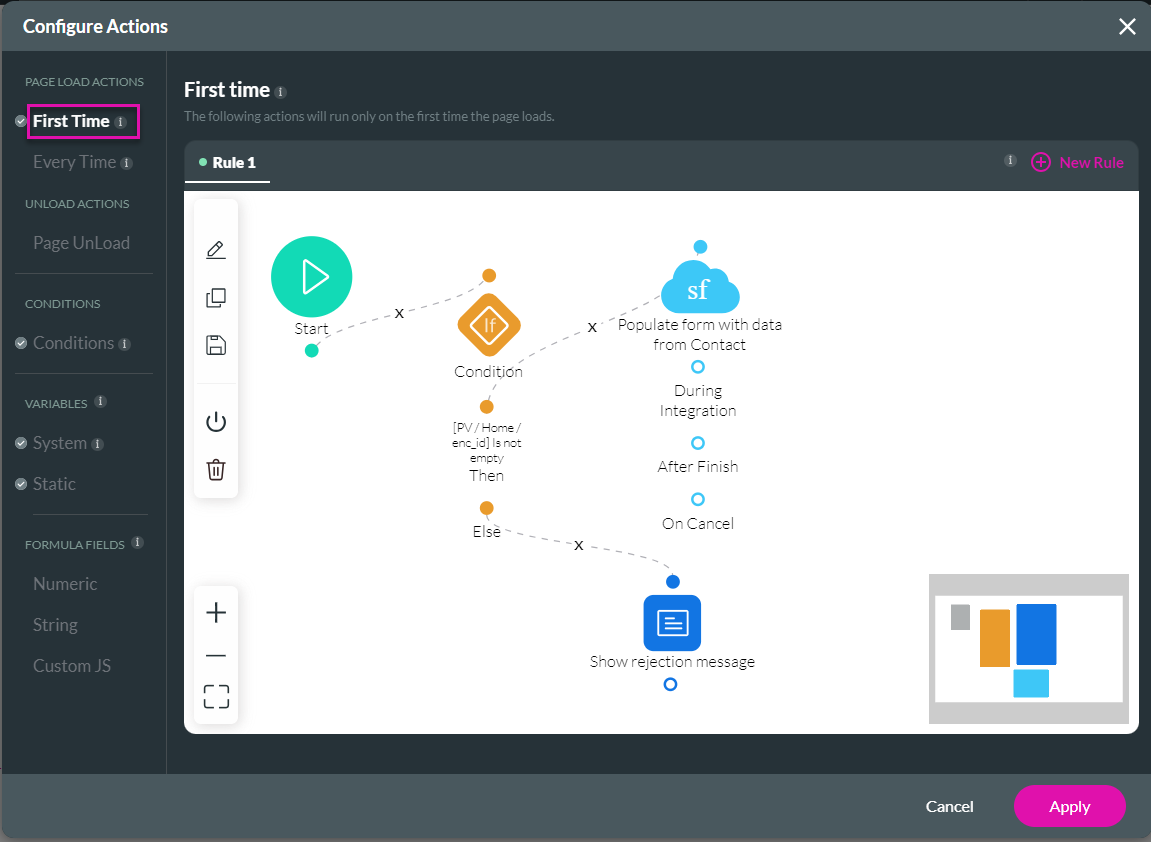
You can configure conditions to run when the page loads for the First Time or Every Time.
In this example, the following were configured for the First Time page load:
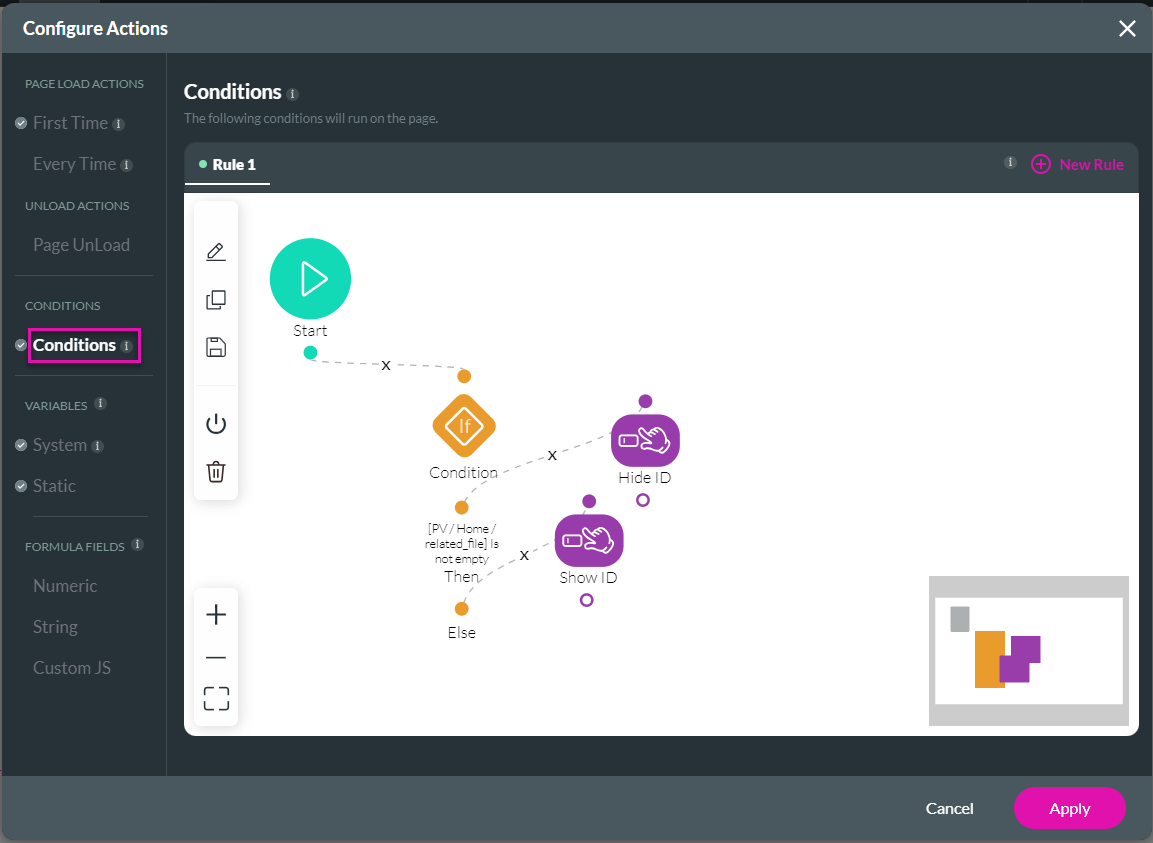
The following Conditions were configured for the page level for any time that the element or variable in the condition is changed or updated:
2. Click the Pages drop-down list and the Kebab icon next to Home.
3. Click the Configure Actions button. The Configure Actions screen opens, and you can configure action on the page level.
You can configure conditions to run when the page loads for the First Time or Every Time.
In this example, the following were configured for the First Time page load:
- A condition
- A Salesforce Get that runs when the condition is met (not empty)
- A message that shows when the condition fails
The following Conditions were configured for the page level for any time that the element or variable in the condition is changed or updated:
- A condition
- An affected elements node for when the condition is true
- An affected elements node for when the condition is false
03 Build an Actions Flow
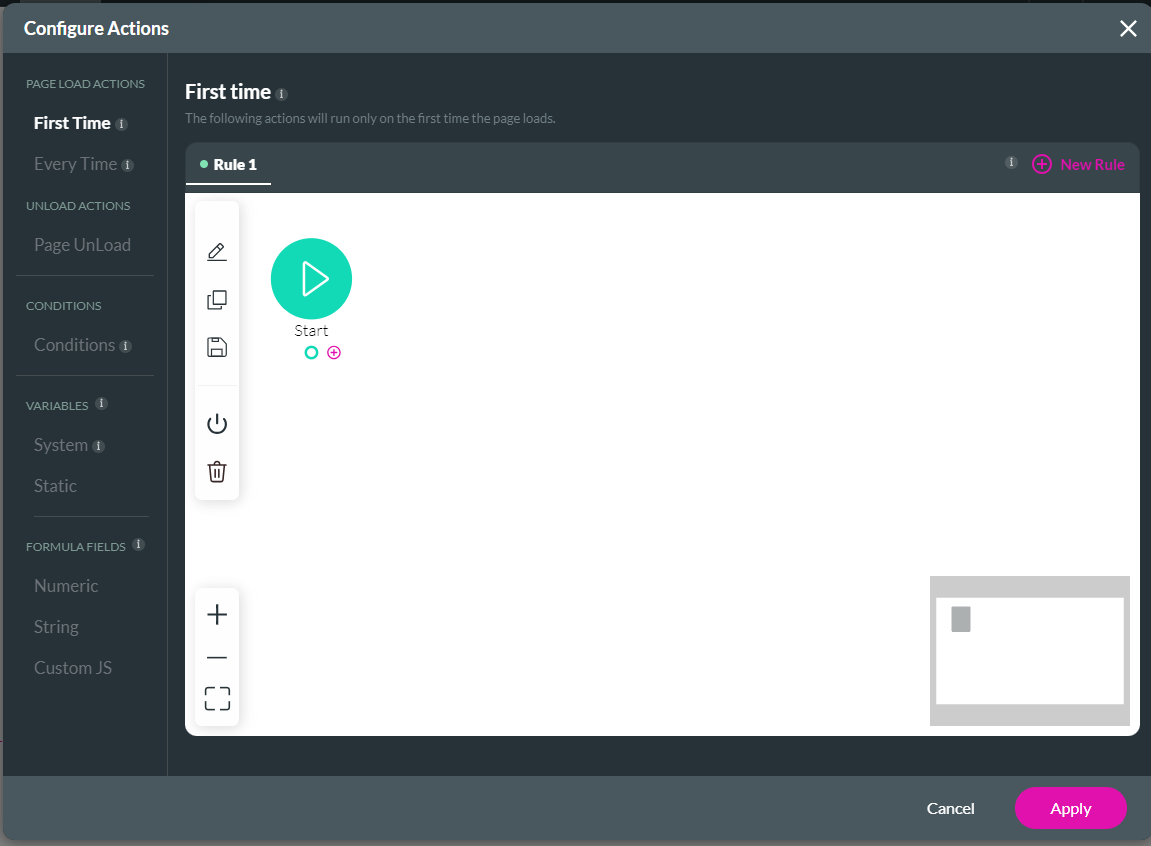
Use the Configure Actions screen to add as many nodes as you need.
1. Hover with your mouse on the Start and click the + icon. The Add Node screen opens.
2. There are many different nodes, actions, and conditions that you can add any of the following:
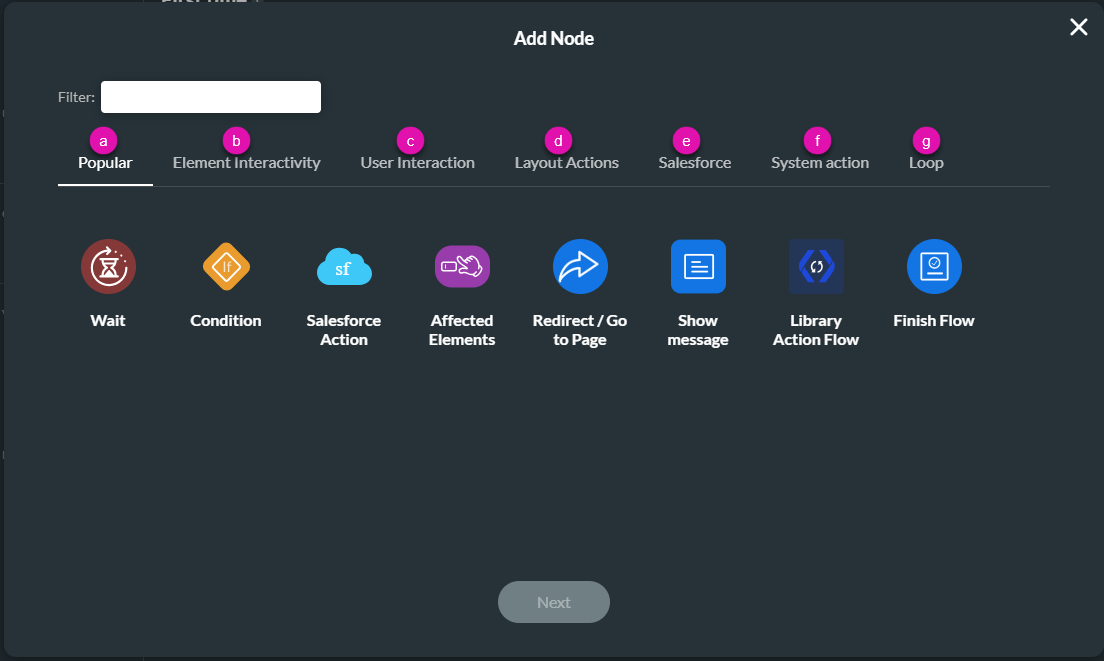
1. Hover with your mouse on the Start and click the + icon. The Add Node screen opens.
2. There are many different nodes, actions, and conditions that you can add any of the following:
- Popular nodes, like Conditions, Salesforce (Pushes and Gets), Affected Elements, Redirect to internal or external pages, or Showing messages.
- Element Interactivity is needed in some aspects of the project.
- User Interactions, like sending emails and generating documents.
- Layout Actions, like Showing messages or opening modals and drawers.
- Salesforce actions.
- System Actions, like JavaScript or posting messages to an embedded parent site.
- Loop actions.
04 Use some Best Practices for Action Flows
1. Name everything in your action flow. This helps you and others using the project understand what the action flow does.
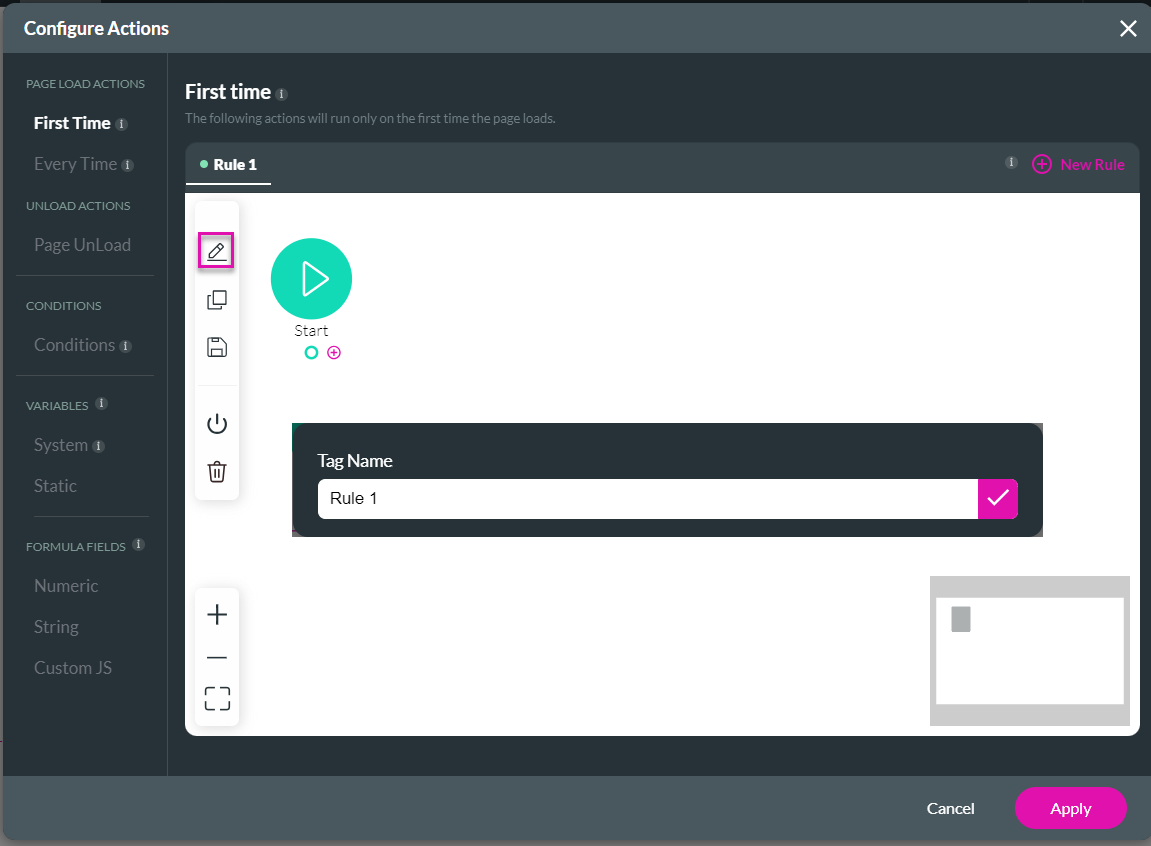
- Name the Rule. If you have multiple rules, give each rule a unique name.
- Click the Edit icon. The Tag Name popup opens.
- Type a name in the field and click the Save icon.
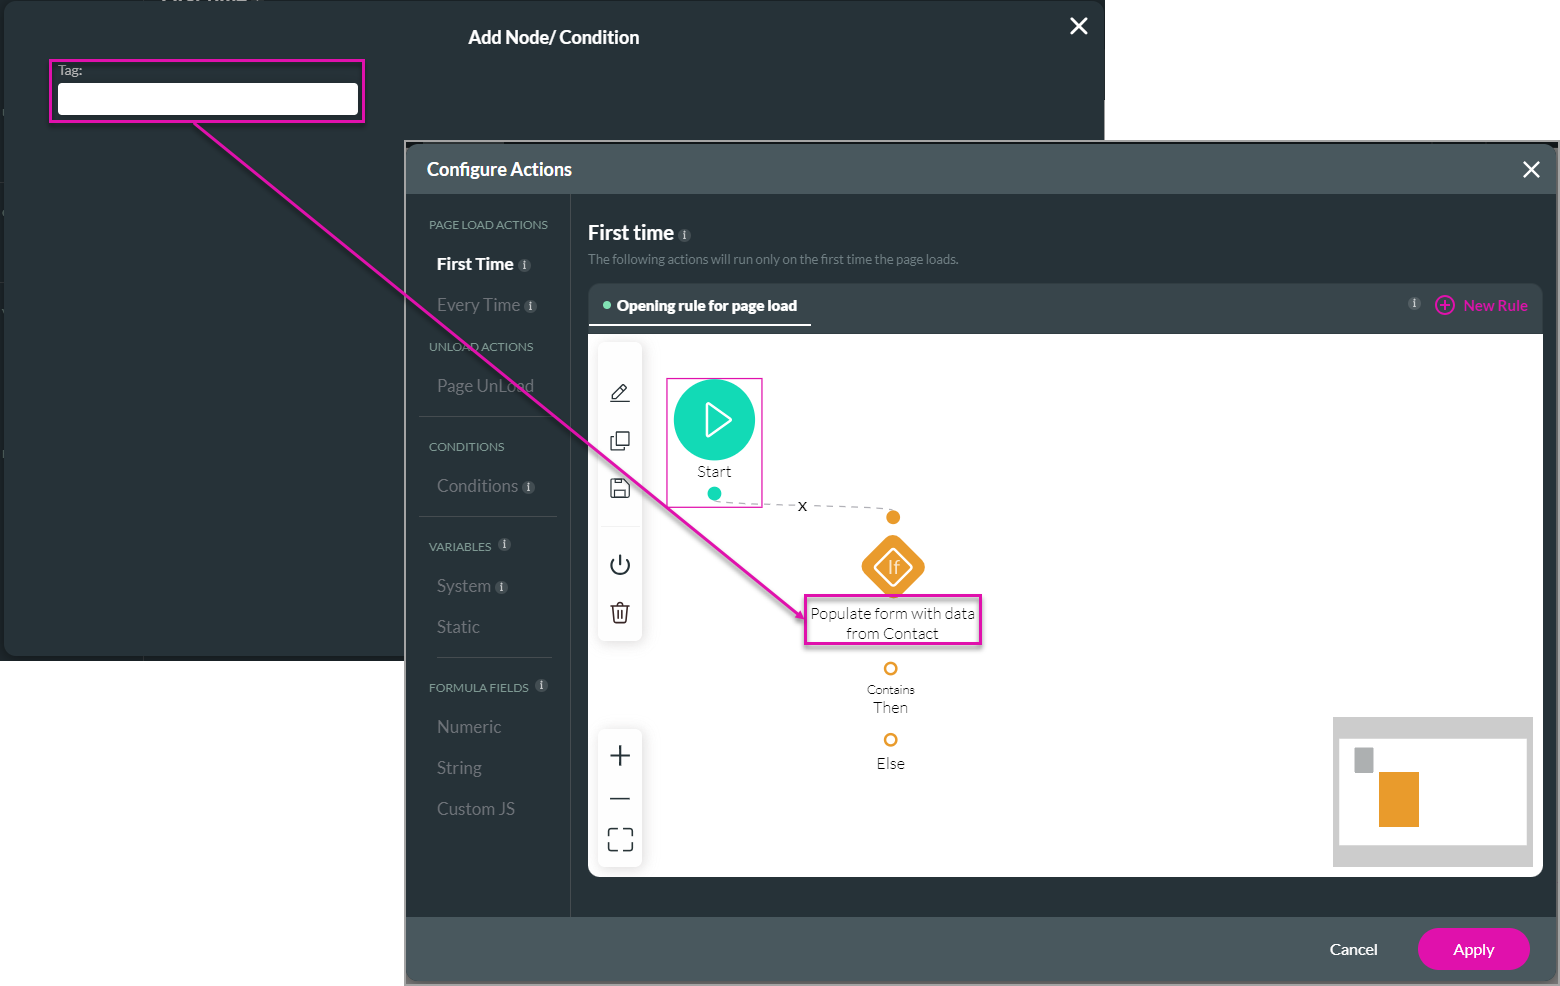
- Name all the nodes in your action flow. When a node is added, there is a Tag screen before you insert the node in the actions flow.
- Type a descriptive name in the Tag field before you click the Insert Button. The name is shown on the node.
05 Understand the Icons on the Configure Actions screen
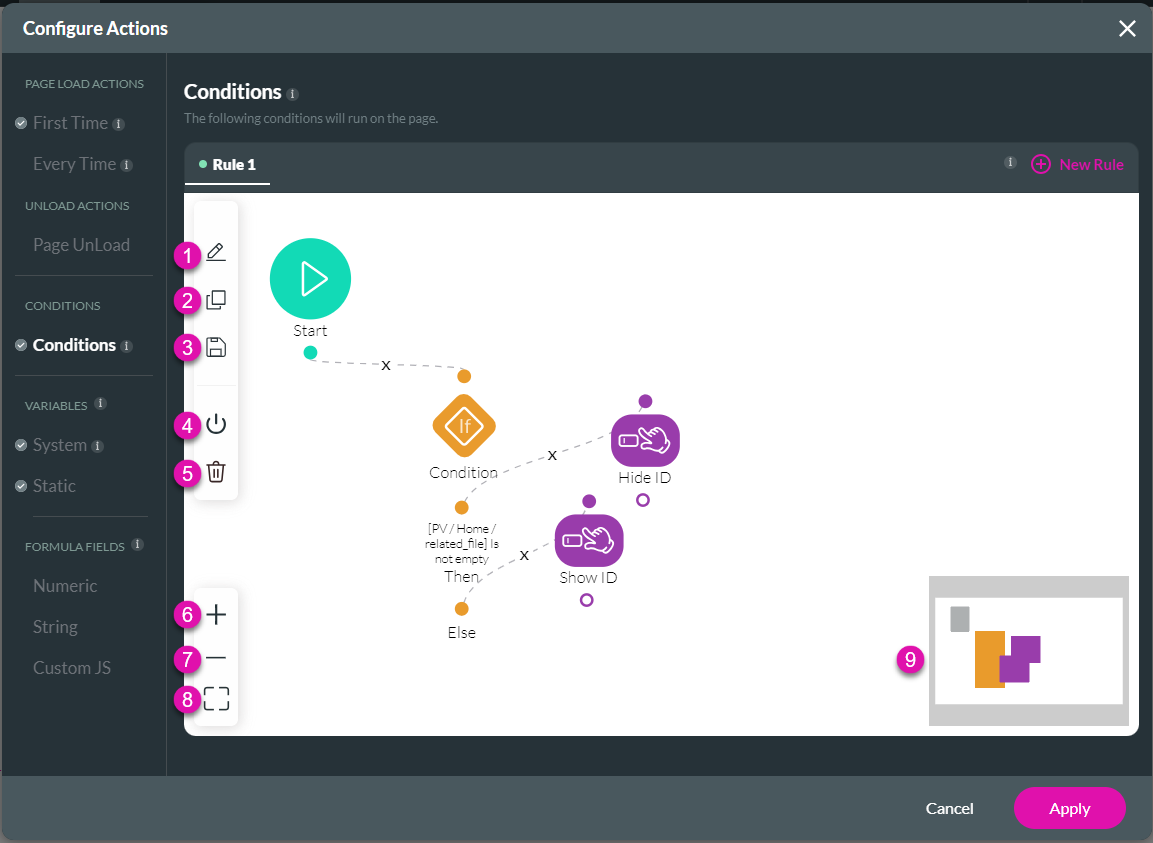
The following icons are available on the Configure Actions screen.
1. Edit: used to edit the rule name.
2. Clone: used to clone a rule.
3. Save: This option saves a rule to the library, requiring a finish action. When saved to the library, the rule can be used in multiple places in the project.

4. Turn Off: used to switch a rule on or off. The rule will not run when it is off.
5. Delete: used to delete a rule.
6. Zoom in. You can also zoom in using the mouse roller ball.
7. Zoom out. You can also zoom out using the mouse roller ball.
8. Fit view: used to fill all the nodes in the view.
9. Map overview: this shows all the nodes on the actions flow in an overview.
1. Edit: used to edit the rule name.
2. Clone: used to clone a rule.
3. Save: This option saves a rule to the library, requiring a finish action. When saved to the library, the rule can be used in multiple places in the project.
- Click the Save icon.
- Type a unique name in the Save Rule Name field and click the Save icon.
4. Turn Off: used to switch a rule on or off. The rule will not run when it is off.
5. Delete: used to delete a rule.
6. Zoom in. You can also zoom in using the mouse roller ball.
7. Zoom out. You can also zoom out using the mouse roller ball.
8. Fit view: used to fill all the nodes in the view.
9. Map overview: this shows all the nodes on the actions flow in an overview.
06 Add a Condition to an Element
You can add an action flow on any element to configure a condition.
1. Select an element, for instance, the radio button element.
2. Click the Gear icon to open the Radio Settings screen and click the Conditions option.
3. Click the Configure Conditions button.
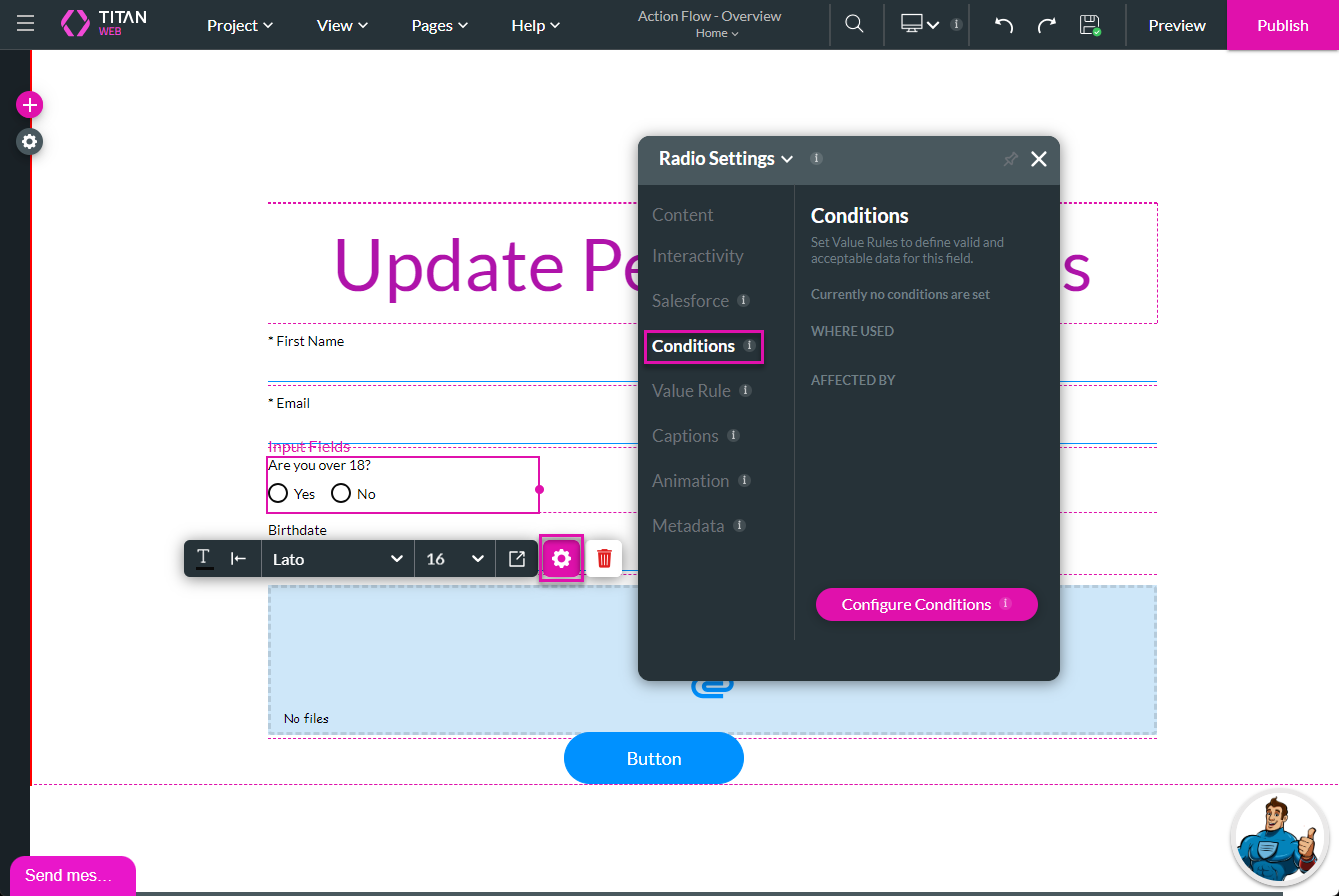
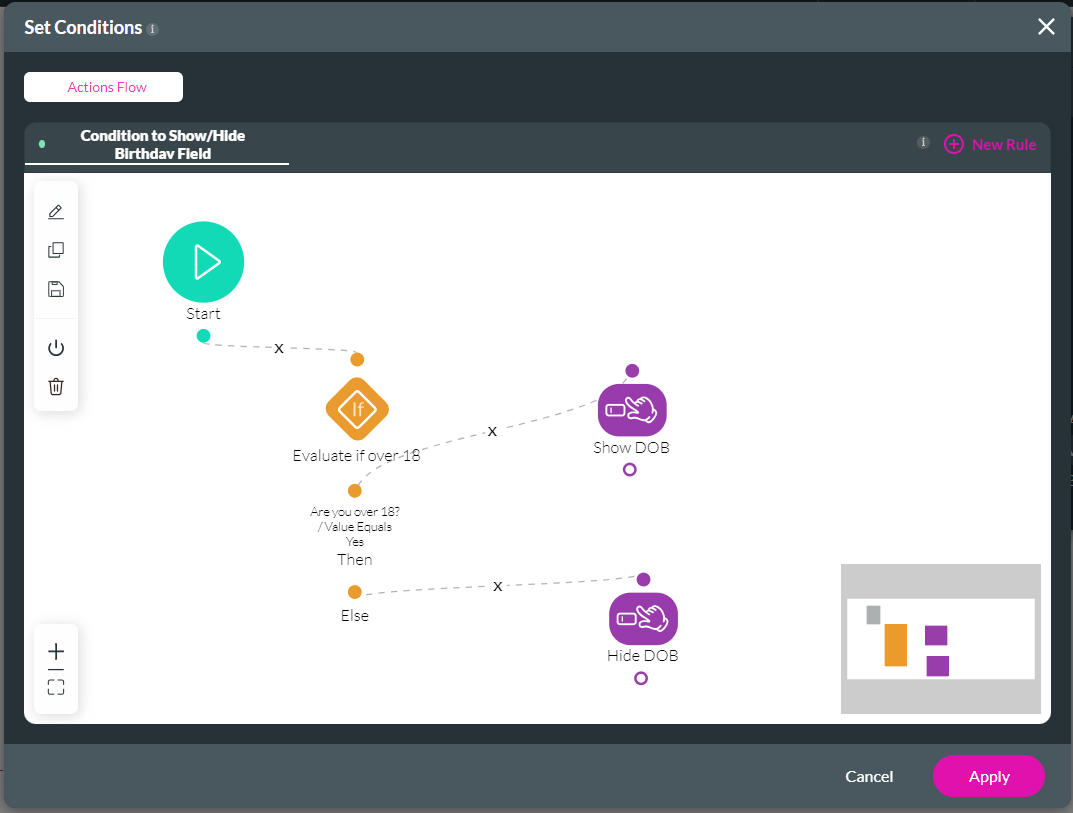
The named condition with the Affected Elements node will show the Birthdate field if it is true or hide it if it is false.
1. Select an element, for instance, the radio button element.
2. Click the Gear icon to open the Radio Settings screen and click the Conditions option.
3. Click the Configure Conditions button.
The named condition with the Affected Elements node will show the Birthdate field if it is true or hide it if it is false.
07 Configure an Actions Flow on an On Click Action
Add actions flow on any element that supports On Click Actions.
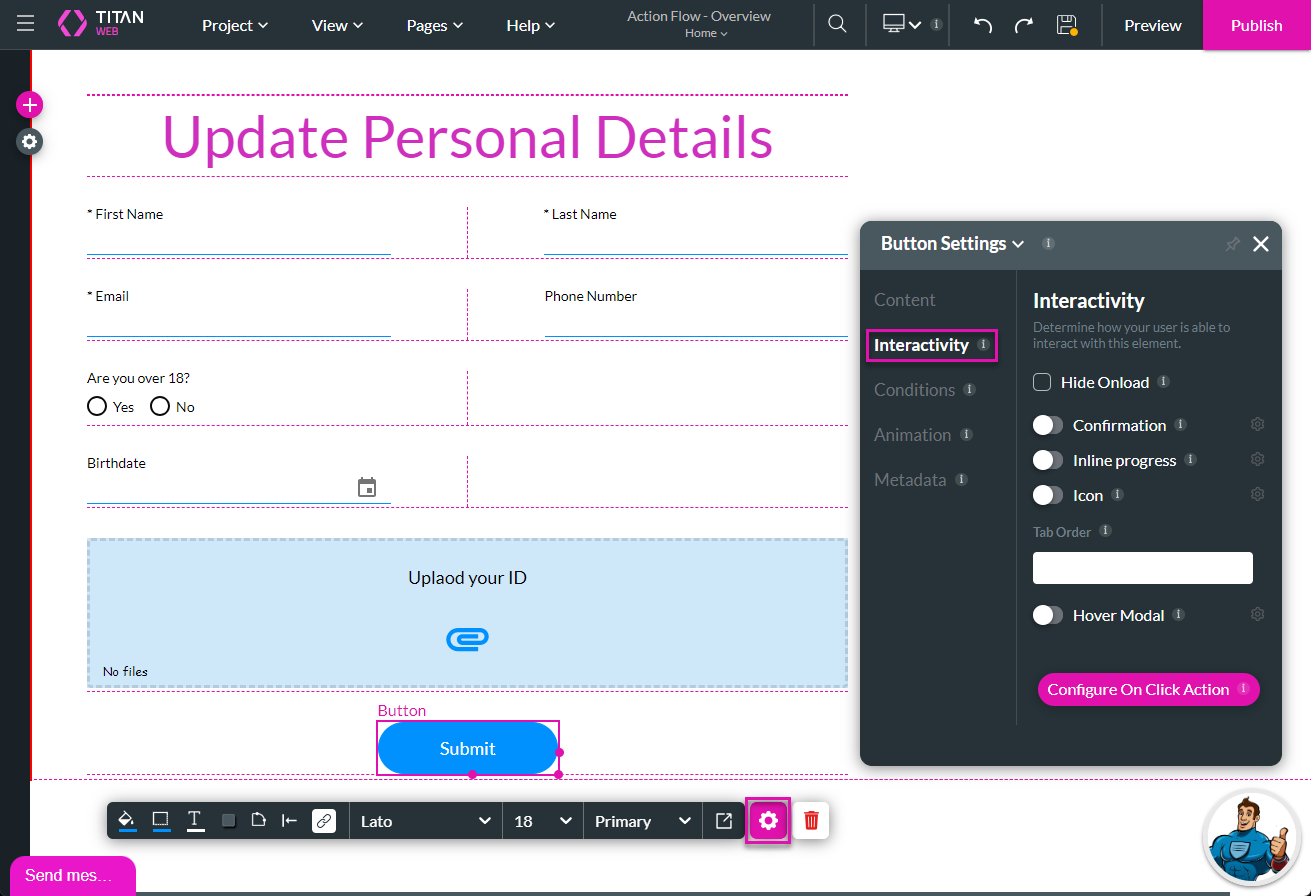
1. Select the button element on the project.
2. Click the gear icon and click the Interactivity option.
3. Click the Configure On Click Action button.
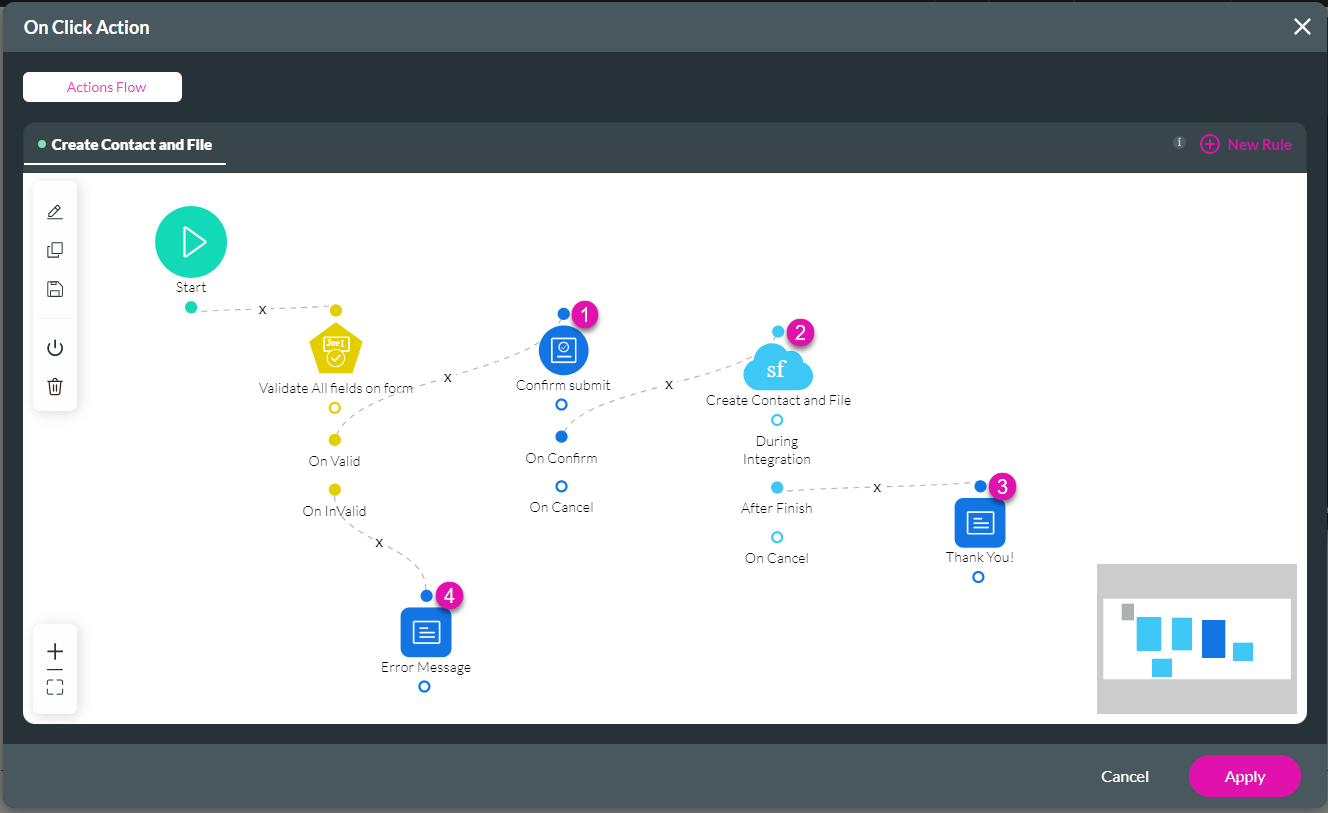
When the button is clicked, and in our example, the form is submitted:
4. When the form is valid, a confirmation message is shown to confirm that the user wants to submit the form.
5. If the user confirms the submission, the data is pushed to Salesforce …
6 … and a Thank You message is shown.
7. An error message is shown if the form is invalid.
1. Select the button element on the project.
2. Click the gear icon and click the Interactivity option.
3. Click the Configure On Click Action button.
When the button is clicked, and in our example, the form is submitted:
4. When the form is valid, a confirmation message is shown to confirm that the user wants to submit the form.
5. If the user confirms the submission, the data is pushed to Salesforce …
6 … and a Thank You message is shown.
7. An error message is shown if the form is invalid.
08 Access the Actions Flow Library
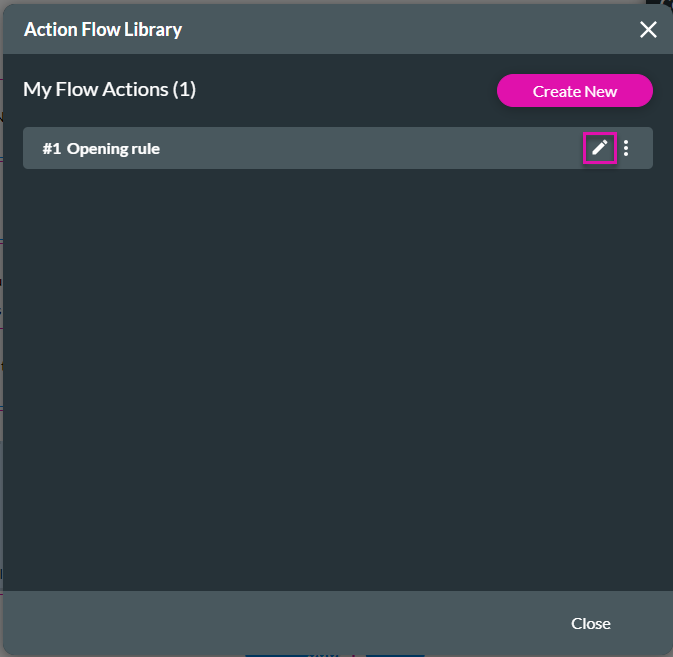
When you save a rule, it will be available in the Action Flow Library.
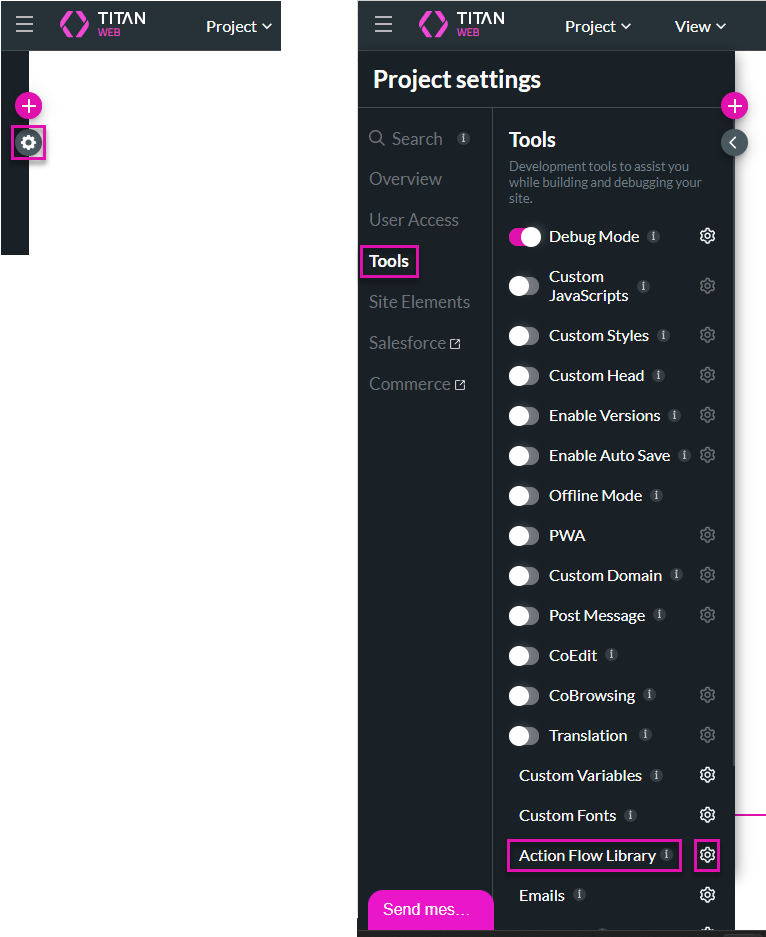
1. Click the Gear icon to open the Project Settings.
2. Click the Tools option and the Action Flow Library Gear icon.
3. Click the Edit icon to edit the rule or click the Create New button to create a new rule.
1. Click the Gear icon to open the Project Settings.
2. Click the Tools option and the Action Flow Library Gear icon.
3. Click the Edit icon to edit the rule or click the Create New button to create a new rule.
09 Create Action Flows on the Project level
These conditions will run on the project level, regardless of the page that you are on.
1. Click the Gear icon to open the Project Settings.
2. Click the Tools option and click the Custom Variables Gear icon.

3. Click the Conditions option.

Here, you can create conditions for the project level, which will be evaluated on any page.
1. Click the Gear icon to open the Project Settings.
2. Click the Tools option and click the Custom Variables Gear icon.
3. Click the Conditions option.
Here, you can create conditions for the project level, which will be evaluated on any page.