Working with Variables (23 min)
Completion requirements
01 Getting Started
This tutorial will teach you how to work with variables in Titan Web. Variables can be used in several ways, such as holding data not presented to the user or running with this data using Salesforce pushes or logic. We will cover the following topics:
- Project variables.
- Page variables.
- Strip variables.
- Static variables.
- System variables.
- Formula fields.
- Map to URL.
- Custom JS.
02 Project Variables
Project Variables or Global Variables are used when you want to access a variable across every page in your project.
1. To navigate to your Project Variables, visit Project Settings > Tools > Custom Variables:

2. Here, you will see types of variables such as System and Static as well as formula fields: Numeric, String, and Custom JS:

Note: In the following sections, we will examine how to work with these variable types closely. Read on to learn more.
1. To navigate to your Project Variables, visit Project Settings > Tools > Custom Variables:

2. Here, you will see types of variables such as System and Static as well as formula fields: Numeric, String, and Custom JS:

Note: In the following sections, we will examine how to work with these variable types closely. Read on to learn more.
03 Page Variables
Page Variables are similar to Project Variables but are specific to a particular page and are irrelevant and inaccessible when you visit a different page.
1. To define Page Variables, visit the Pages menu at the top of the screen, navigate to the kebab menu of your relevant page (here it is the Home page), and click Configure Actions:

2. Next, variables will be displayed on the screen's left side. As you can see, the variable types are consistent with those shown in the Project Variables section:

3. Navigate to a different page to see how variables can be set page-by-page. Below, we have chosen to leave the Home page and click on Page 2:

4. After navigating to Page 2, select its kebab menu, go to Configure Actions, and select a variable type of your choice. Below, we have decided to add Static Variables by clicking "Add a static variable" and pressing the Apply button:

5. After saving your project, navigate to your home page, visit the Configure Actions window, and open Static Variables.

1. To define Page Variables, visit the Pages menu at the top of the screen, navigate to the kebab menu of your relevant page (here it is the Home page), and click Configure Actions:

2. Next, variables will be displayed on the screen's left side. As you can see, the variable types are consistent with those shown in the Project Variables section:

3. Navigate to a different page to see how variables can be set page-by-page. Below, we have chosen to leave the Home page and click on Page 2:

4. After navigating to Page 2, select its kebab menu, go to Configure Actions, and select a variable type of your choice. Below, we have decided to add Static Variables by clicking "Add a static variable" and pressing the Apply button:

5. After saving your project, navigate to your home page, visit the Configure Actions window, and open Static Variables.
- You will see the section is empty.
- The variables you created on Page 2 were not applied to any other pages:

04 Repeated Strip or Column
Another place you will come across variables is on your repeated strips or columns.
1. Click your column or strip settings, and once you opt to repeat your strip, Custom Variables will appear:

2. Clicking on the Custom Variables gear icon will take you to the panel where you can set up variables for your repeated strip or column. This enables you to have different variables and values per strip or column.

3. Clicking on the Conditions option will give you the ability to write conditions for your strip or column:

Note: we will go into more detail on how to write conditions later in this guide.
1. Click your column or strip settings, and once you opt to repeat your strip, Custom Variables will appear:

2. Clicking on the Custom Variables gear icon will take you to the panel where you can set up variables for your repeated strip or column. This enables you to have different variables and values per strip or column.
- Below, you can see sections for System, Static, Numeric, String, and Custom JS values, just as for Project and Page Variables:

3. Clicking on the Conditions option will give you the ability to write conditions for your strip or column:

Note: we will go into more detail on how to write conditions later in this guide.
05 Static Variables
Use a Static variable whenever you want a variable to assign values through a condition or URL. A Static Variable will accept any value you configure. Below, we have chosen to insert a URL, a number, and a string:

Note: Static Variables are available for Project, Page, and Repeated Strip/ Column variables.

Note: Static Variables are available for Project, Page, and Repeated Strip/ Column variables.
06 System Variables
System Variables enable you to collect information Titan provides by default, such as language, browser information, device type, and more:

You cannot apply your value to a system value. Whatever you select is the value it will hold.
Note: System Variables are available for Project, Page, and Repeated Strip/ Column variables.

You cannot apply your value to a system value. Whatever you select is the value it will hold.
Note: System Variables are available for Project, Page, and Repeated Strip/ Column variables.
07 Numeric (Formula Field)
Formula Fields combine data to create formulas dynamically. The Numeric formula field enables you to do just this.
1. To use the Numeric formula field, click “Add a Numeric Variable” and then Configure:

2. In the numeric formula provided in this variable, you can create additions, multiplications, and more. You can choose from a range of fields to work with:

3. You can choose to map your value to another variable, as seen below:

Note: The Numeric Formula Field is available for Project, Page, and Repeated Strip/ Column variables.
1. To use the Numeric formula field, click “Add a Numeric Variable” and then Configure:

2. In the numeric formula provided in this variable, you can create additions, multiplications, and more. You can choose from a range of fields to work with:

3. You can choose to map your value to another variable, as seen below:

Note: The Numeric Formula Field is available for Project, Page, and Repeated Strip/ Column variables.
08 String (Formula Field)
A String formula field concatenates formula fields. You can concatenate any formula fields on your page or project. Below, we show you an example of concatenating two text fields:
1. In the Configure Actions window (for a Page, Project, or Strip/Column variable), click “Add a String Variable” and “Configure”. Be sure to give your string variable a name:

2. We have chosen “Text field 1” and “Text field 2” fields for this example. Once you have selected your values to work with, click apply:

3. Next, enable Debug mode to see your values on the screen. Enable Debug mode by visiting Project Settings > Tools:

4. After enabling Debug mode, you can see your variables via preview. To do so, click the Preview button on the top-right of the screen, and once in preview mode, click Debug:

5. Upon entering Debug Project, you will see your string field displayed; at this stage, it is empty:

6. Exit Debug Project, and in Preview mode, enter values into Text fields 1 and 2:

7. Now, click on Debug again, and you will see your concatenation:

8. This data can be mapped to any field in your project, for example, to Text field three below:

9. In preview mode, your concatenation will be visible:

Note: You can also do calculations like this with the Numeric Formula Field. The String Value is available for Project, Page, and Repeated Strip/ Column variables.
1. In the Configure Actions window (for a Page, Project, or Strip/Column variable), click “Add a String Variable” and “Configure”. Be sure to give your string variable a name:

2. We have chosen “Text field 1” and “Text field 2” fields for this example. Once you have selected your values to work with, click apply:

3. Next, enable Debug mode to see your values on the screen. Enable Debug mode by visiting Project Settings > Tools:

4. After enabling Debug mode, you can see your variables via preview. To do so, click the Preview button on the top-right of the screen, and once in preview mode, click Debug:

5. Upon entering Debug Project, you will see your string field displayed; at this stage, it is empty:

6. Exit Debug Project, and in Preview mode, enter values into Text fields 1 and 2:

7. Now, click on Debug again, and you will see your concatenation:

8. This data can be mapped to any field in your project, for example, to Text field three below:

9. In preview mode, your concatenation will be visible:

Note: You can also do calculations like this with the Numeric Formula Field. The String Value is available for Project, Page, and Repeated Strip/ Column variables.
09 Custom JS (Formula Field)
Custom JS enables you to map any values from the project into custom JavaScript.
1. For example, select Custom JS on the Custom Variables panel. Click Add a Custom JS Variable and then Configure:

2. Next, for example, you can choose to map the parameters of your Global Variable to Text Field 1:

Using Custom JS, you can return any value or calculations, work with any logic, set conditions, and map any variables you choose. Note: Custom JS is available for Project, Page, and Repeated Column/ Strip variables.
1. For example, select Custom JS on the Custom Variables panel. Click Add a Custom JS Variable and then Configure:

2. Next, for example, you can choose to map the parameters of your Global Variable to Text Field 1:

Using Custom JS, you can return any value or calculations, work with any logic, set conditions, and map any variables you choose. Note: Custom JS is available for Project, Page, and Repeated Column/ Strip variables.
10 How to tell What Type of Variable your Working with?
You can easily and quickly tell the kind of variable you are working with by setting up a simple Salesforce Get or Push.
1. Navigate to Project Settings > Salesforce > Create New:

2. Map to your Chosen Salesforce object:

3. Under Conditions, you can view your available variables under “Params.” Note that page variables have the annotation PV and also provide page information, for example, Home or Page 2:

4. You can also clearly see which variables are global. So, for example, you can click on the settings of one of your text fields, navigate to Conditions, and click Configure Conditions:

5. Click the pink plus sign on your condition, and then select Affected Elements in the Add Node section:

6. Under Affect Elements, you will be able to see Global or Project Variables marked with “GV”:

Note: This will only display the variables of the page you are on.
1. Navigate to Project Settings > Salesforce > Create New:

2. Map to your Chosen Salesforce object:

3. Under Conditions, you can view your available variables under “Params.” Note that page variables have the annotation PV and also provide page information, for example, Home or Page 2:

4. You can also clearly see which variables are global. So, for example, you can click on the settings of one of your text fields, navigate to Conditions, and click Configure Conditions:

5. Click the pink plus sign on your condition, and then select Affected Elements in the Add Node section:

6. Under Affect Elements, you will be able to see Global or Project Variables marked with “GV”:

Note: This will only display the variables of the page you are on.
11 Variable Options
There are several variable options to take note of.
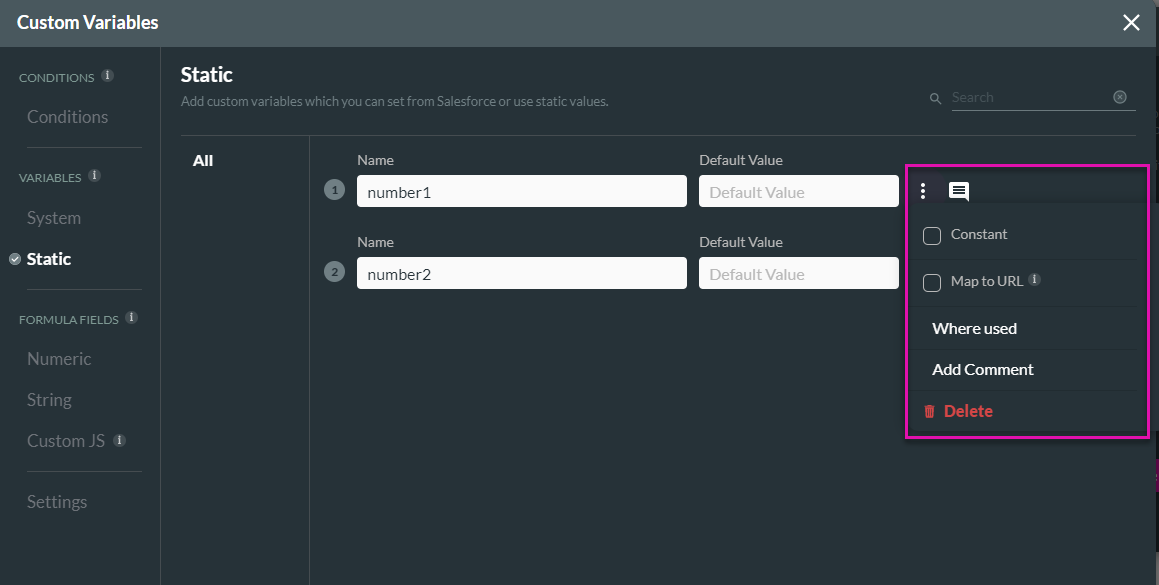
1. Start by navigating back to your Global Variables and clicking the kebab menu. A list of options will then appear.
2. To use the Map to URL option, you must first map a variable from a URL. To do so, ensure your variable is named:

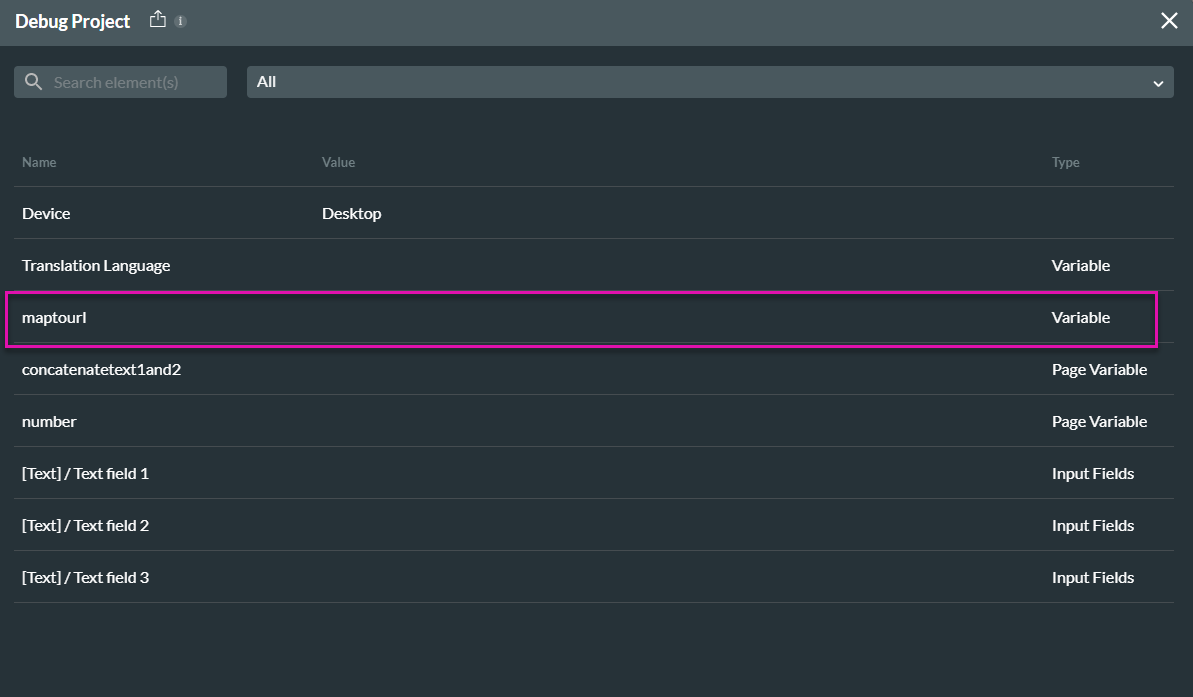
3. Next, under Preview mode, when visiting Debug, you will see your variable appear. At this stage, it is empty:
4. To populate this variable, navigate to the URL in your preview. You already have the query string, so fill in an “&,” enter your URL, and give it a value:

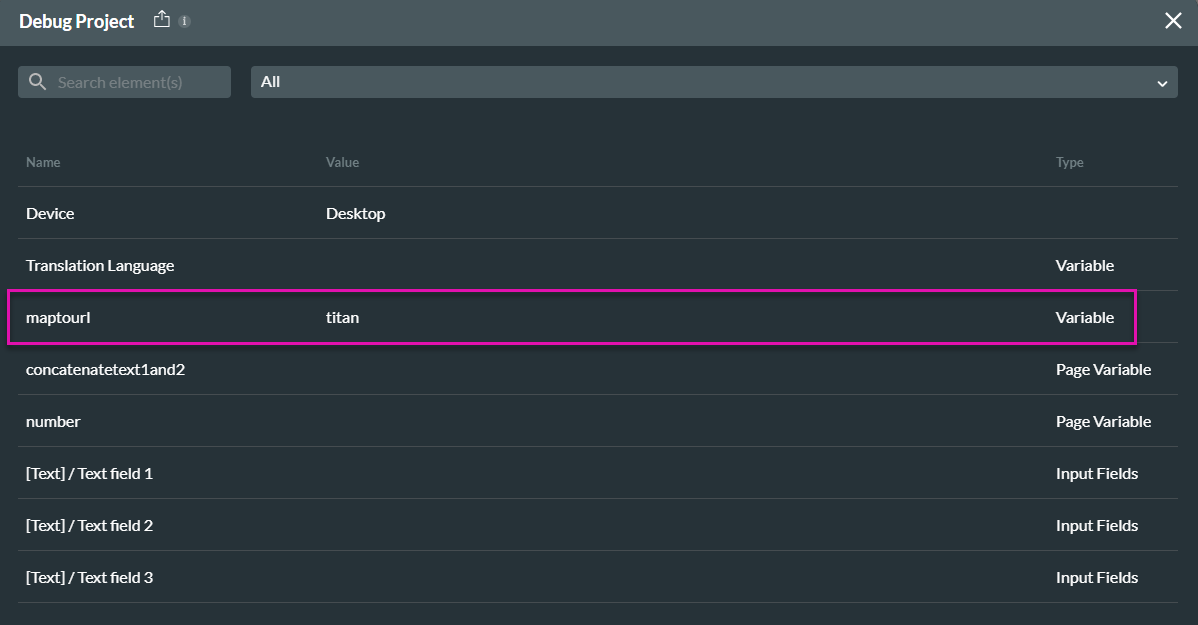
5. Refresh the page, click Debug, and you will see that your variable has been populated:
6. The only problem is that you will lose your URL parameter if you refresh the page or navigate away from it.
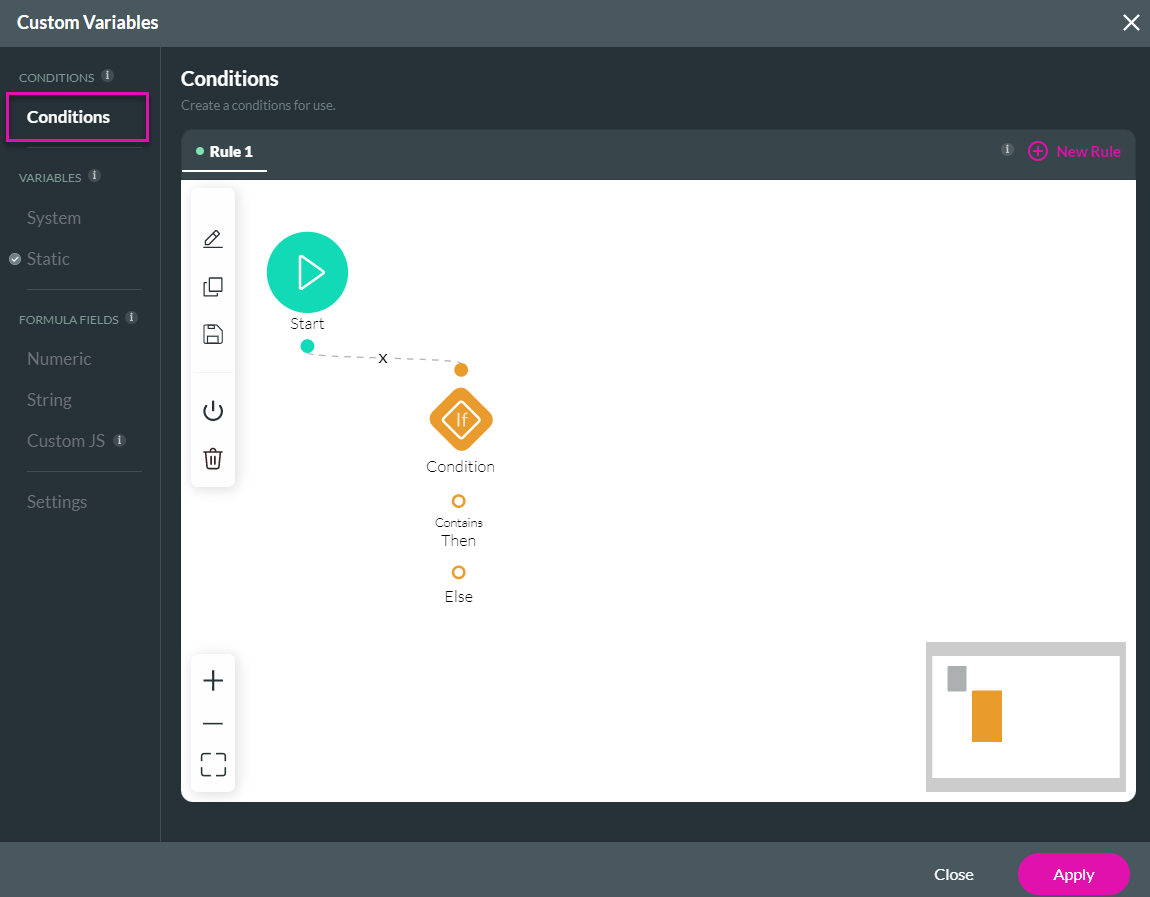
7. When you want to write a condition on a variable, you can navigate to Conditions:
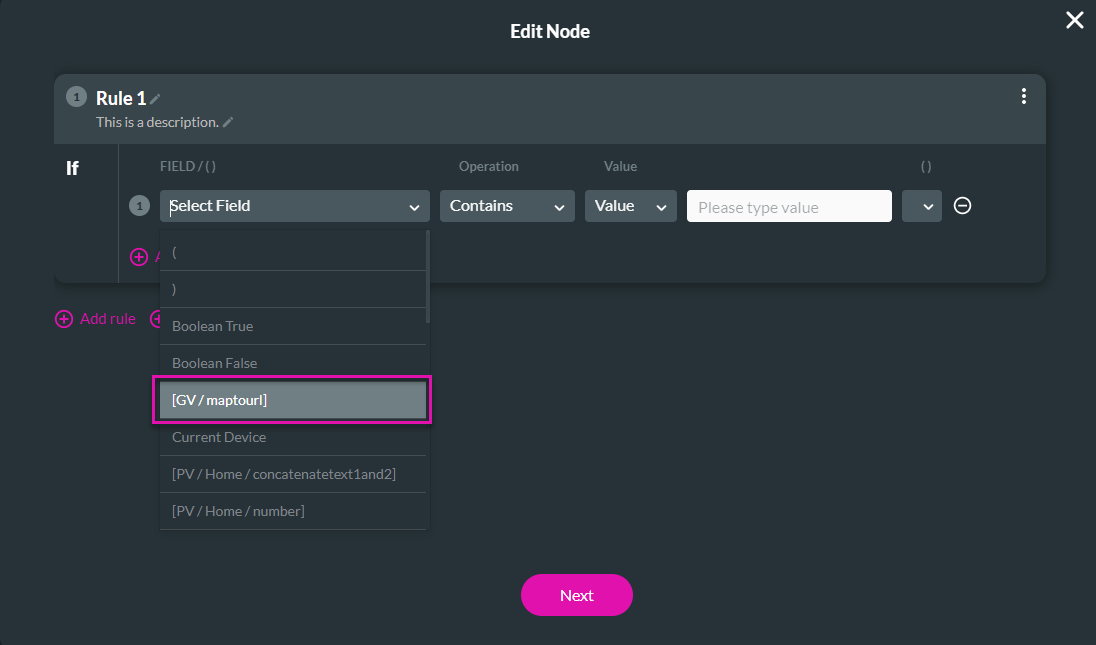
8. Click your condition to open up the Edit Node panel. In this instance, we have been working with Global or Project variables, so it makes sense to write a condition to a Global Variable:
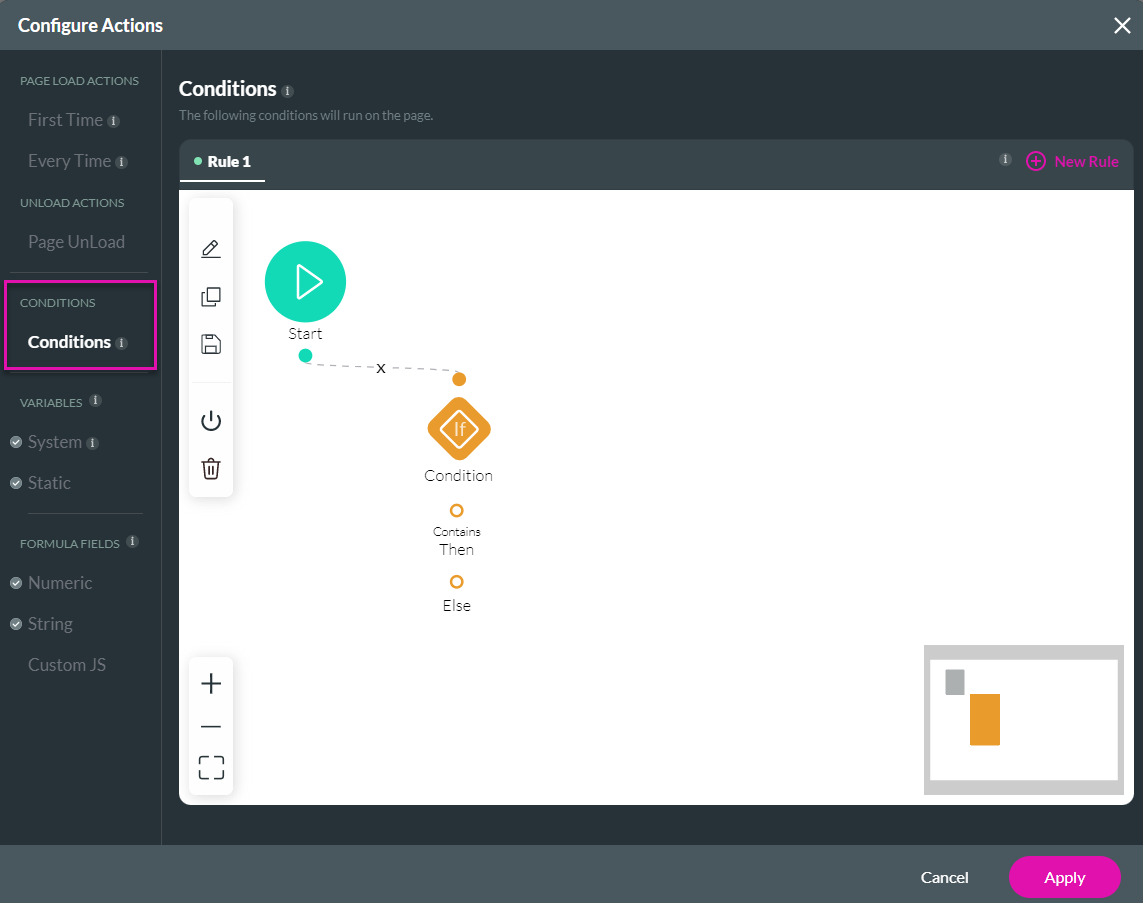
9. You can do the same thing for your Page Variable. Navigate back to your selected page, and under Configure Actions, open up the Conditions option:
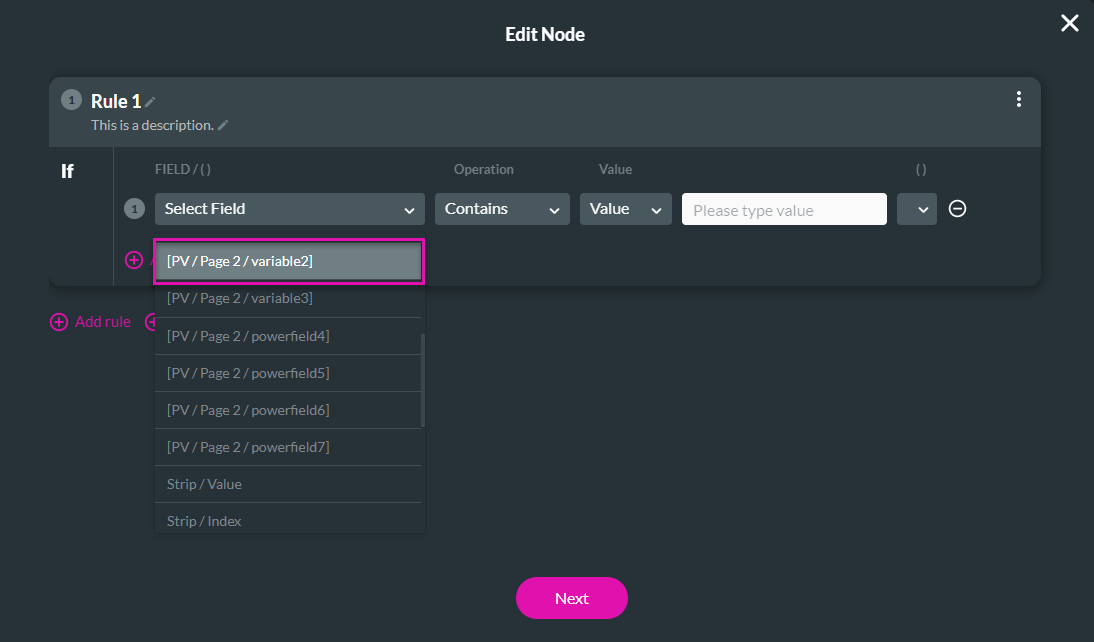
10. Select the Condition and choose to write a condition for one of your Page Variables:
1. Start by navigating back to your Global Variables and clicking the kebab menu. A list of options will then appear.
- Constant means that after the first time the value is mapped, it won’t be able to change in any way. This is useful for Record IDs that you don’t want to alter.

2. To use the Map to URL option, you must first map a variable from a URL. To do so, ensure your variable is named:

3. Next, under Preview mode, when visiting Debug, you will see your variable appear. At this stage, it is empty:

4. To populate this variable, navigate to the URL in your preview. You already have the query string, so fill in an “&,” enter your URL, and give it a value:

5. Refresh the page, click Debug, and you will see that your variable has been populated:

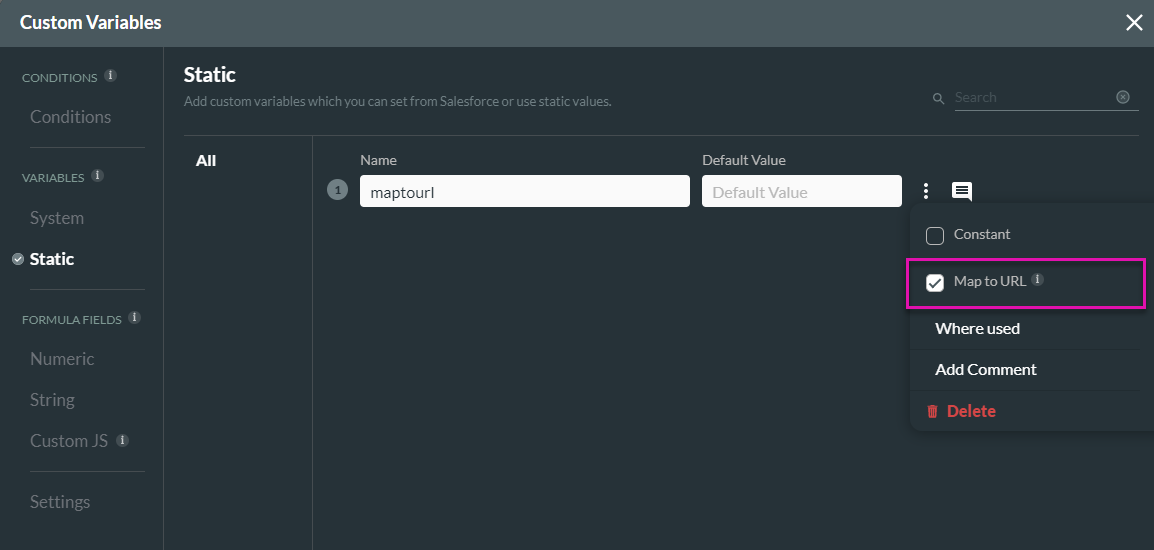
6. The only problem is that you will lose your URL parameter if you refresh the page or navigate away from it.
- To avoid this, navigate back to your Global Variable configuration.
- Checking Map to URL on your kebab menu ensures that Titan passes your URL whenever you navigate from one page to another or refresh your page.
- This way, you can re-use this variable:

7. When you want to write a condition on a variable, you can navigate to Conditions:

8. Click your condition to open up the Edit Node panel. In this instance, we have been working with Global or Project variables, so it makes sense to write a condition to a Global Variable:

9. You can do the same thing for your Page Variable. Navigate back to your selected page, and under Configure Actions, open up the Conditions option:

10. Select the Condition and choose to write a condition for one of your Page Variables:
