Repeat Data (19 min)
Completion requirements
01 Getting Started
In this tutorial, we cover how to deal with Repeat data for multiple records from Salesforce, pull data from Salesforce into your projects, and push data from your projects to Salesforce.
02 Initial Setup
In this example, we show you how to import multiple records from Salesforce into your project, such as numerous contacts under an account, using a Lookup element and a Button.
03 Add a Lookup Field
1. Search for a Lookup field in the Elements list.
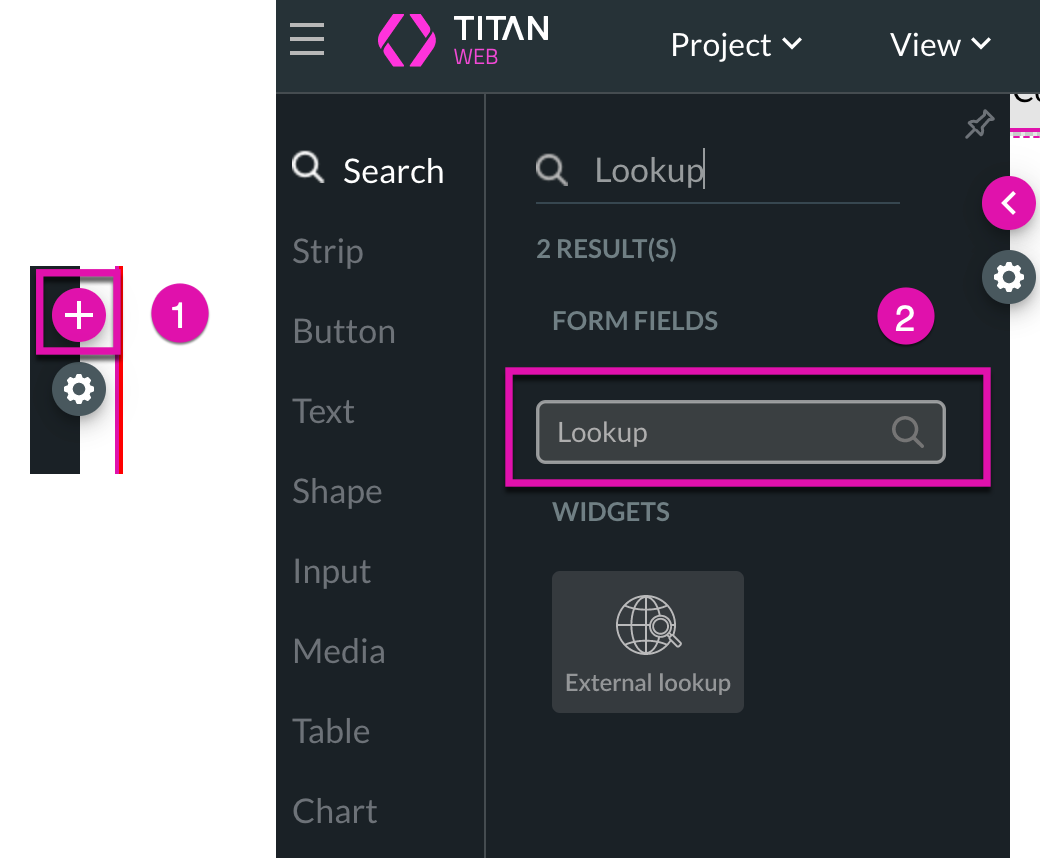
2. Drag the element to your project and configure the Lookup.
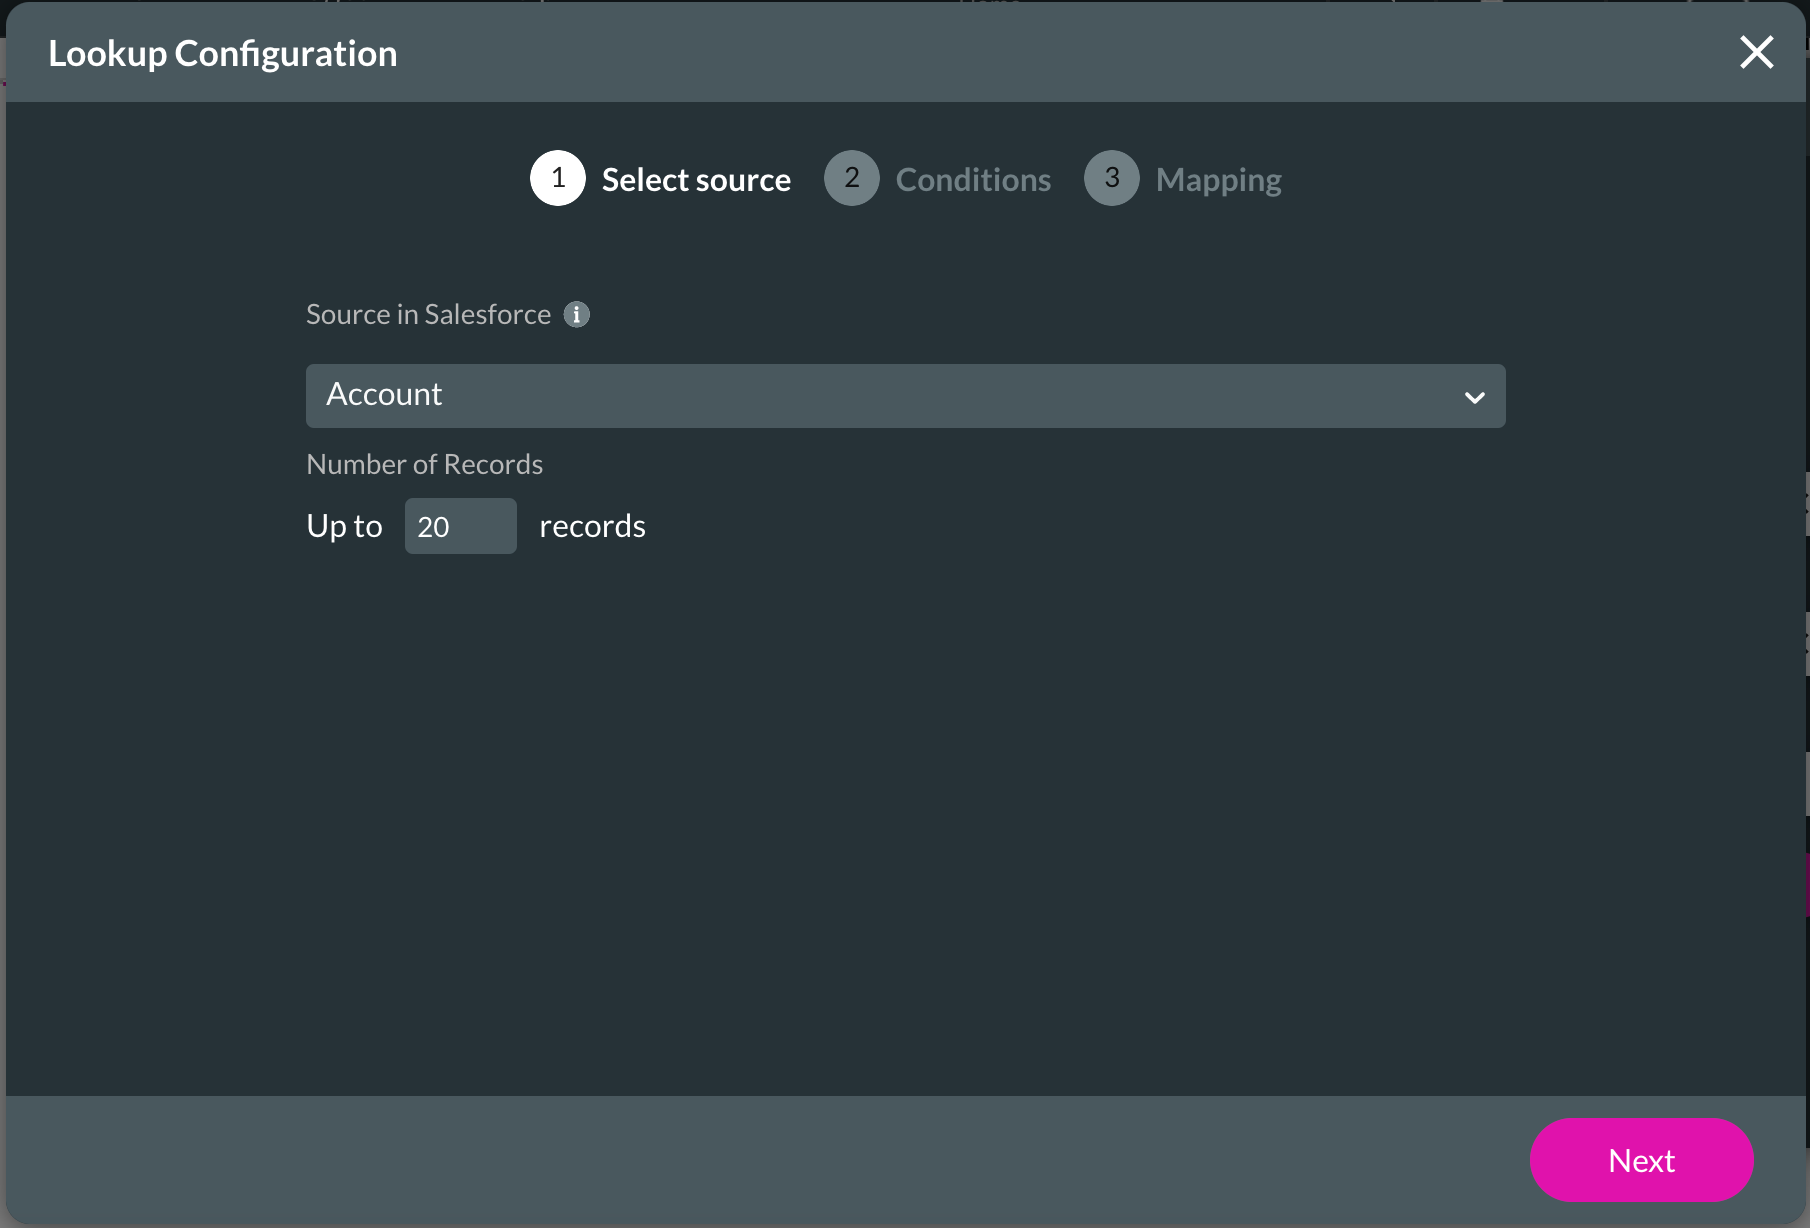
3. Start configuring the Lookup by selecting a source from the drop-down list and then clicking the Next button.
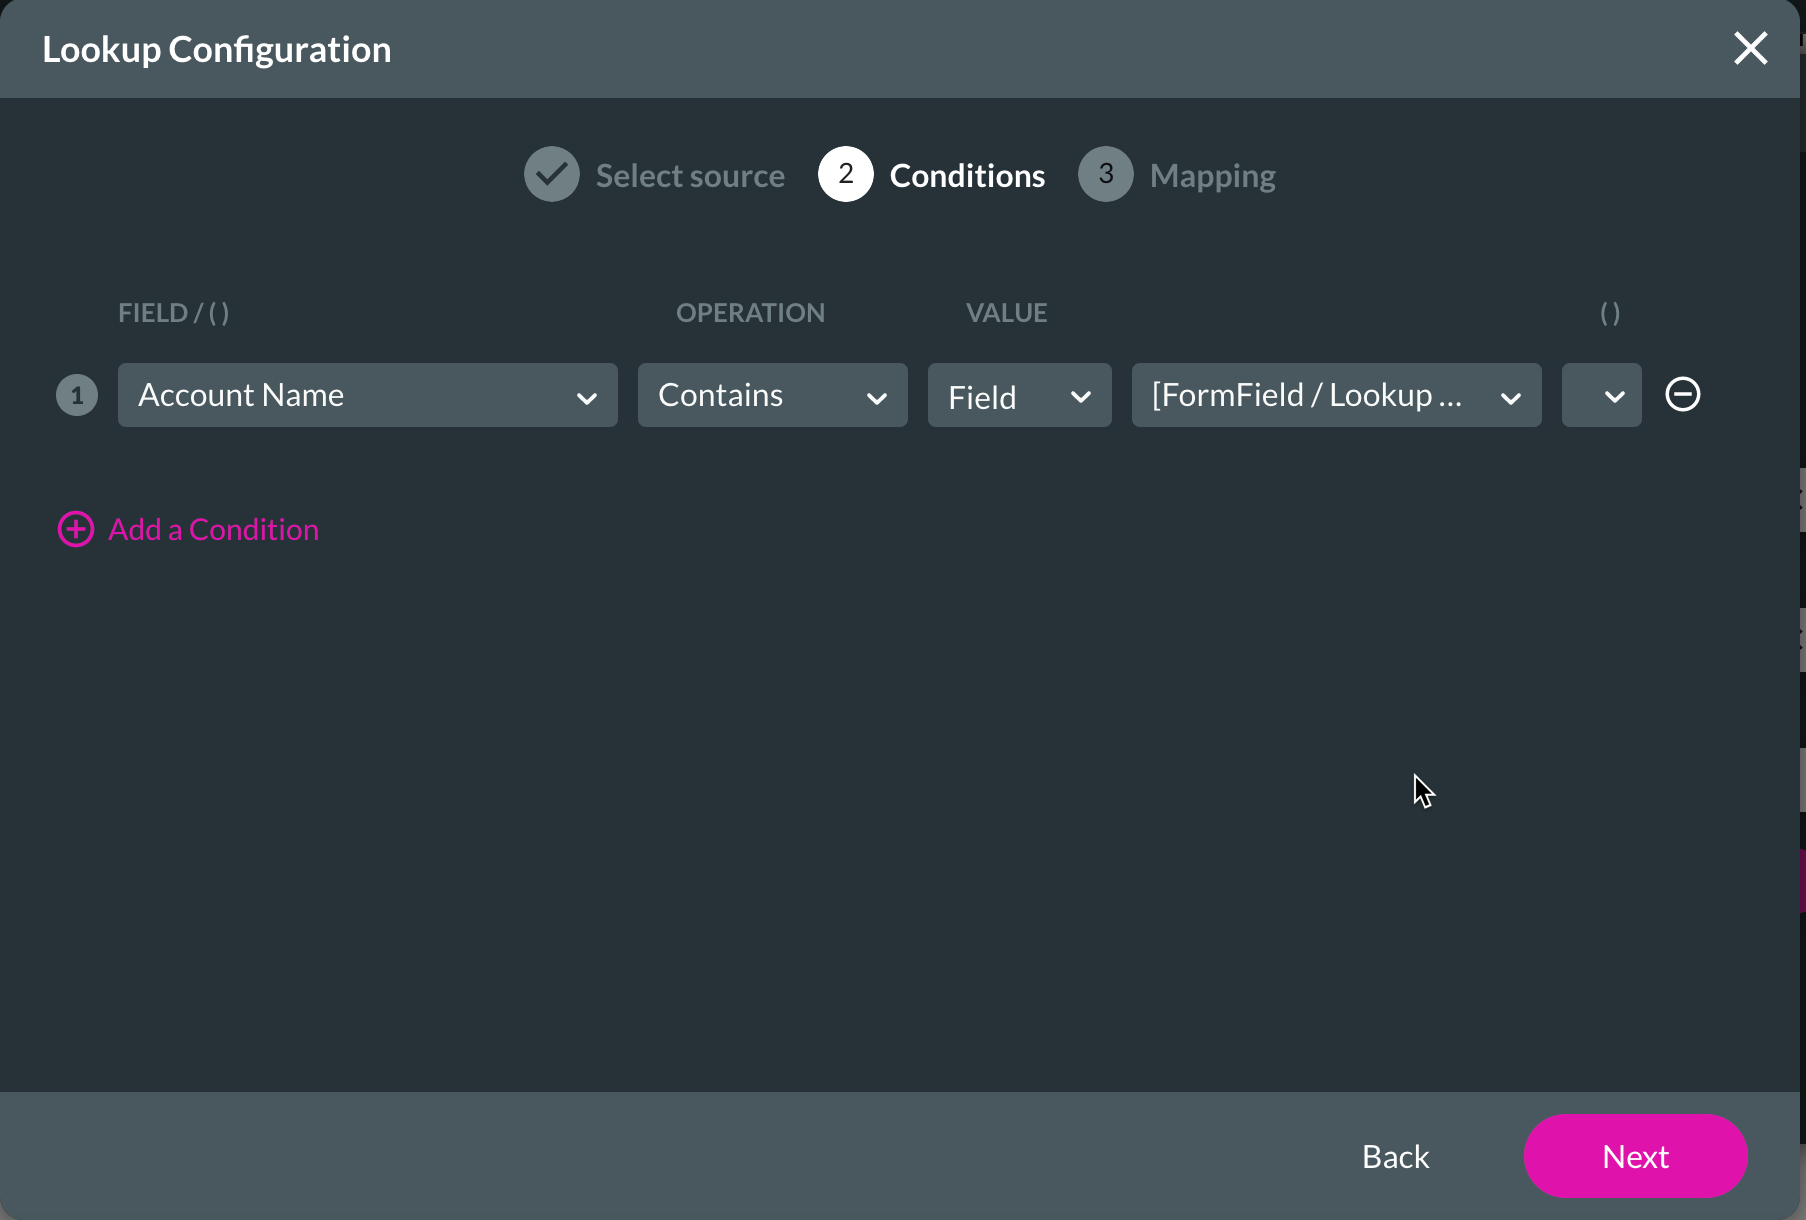
4. Configure your conditions for the Lookup and click on the Next button.
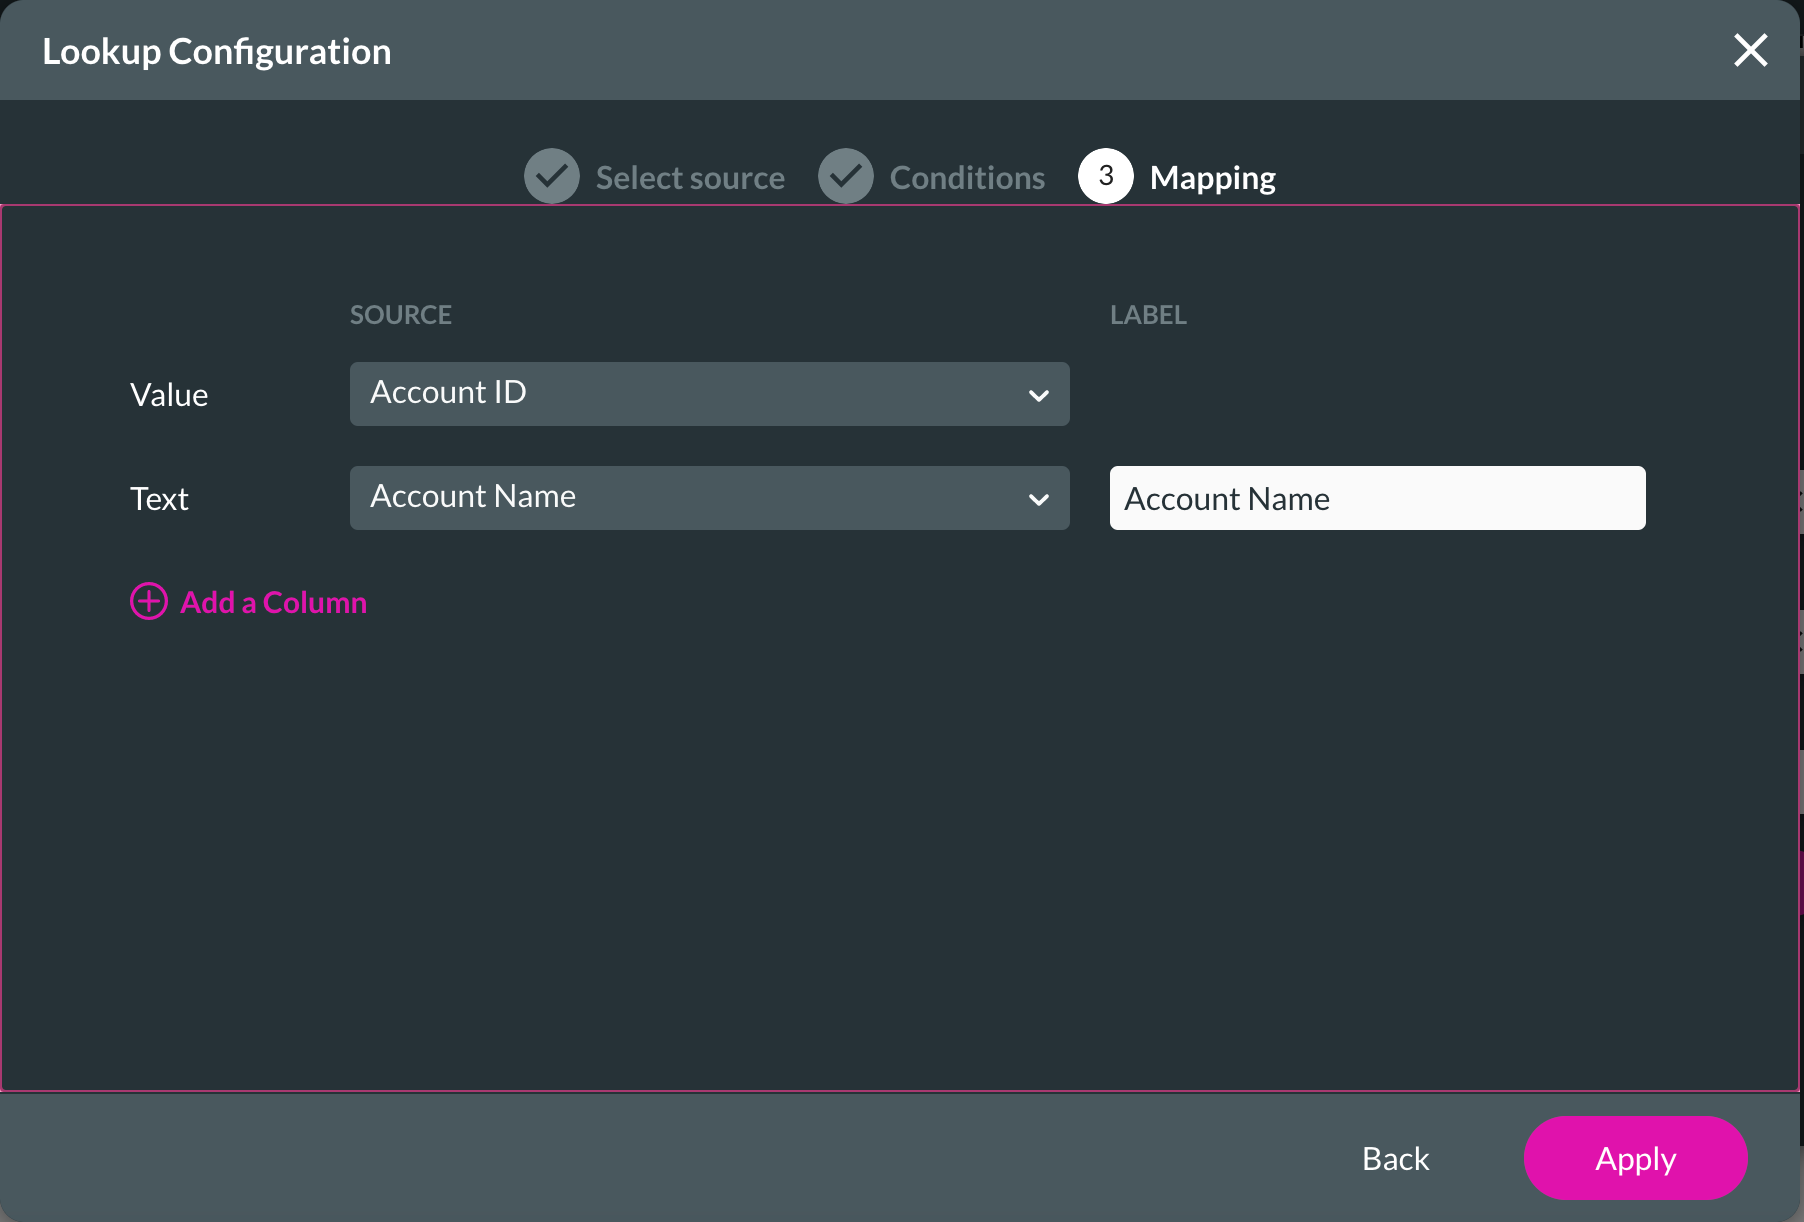
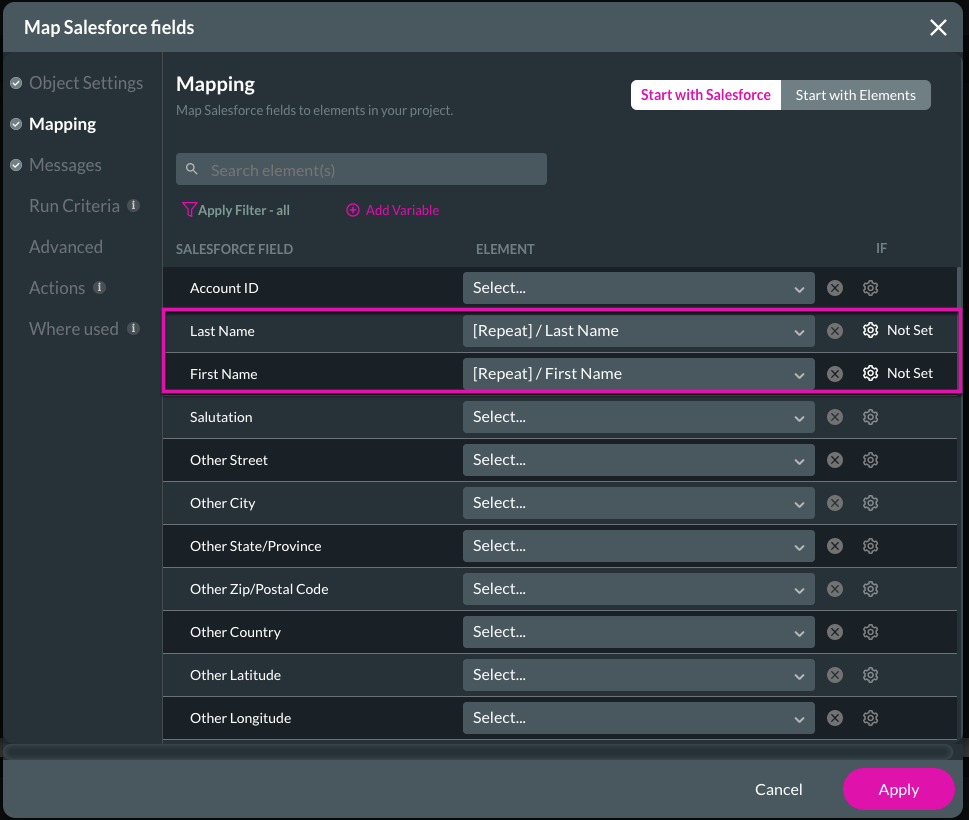
5. Map your Lookup field and then click on the Apply button.
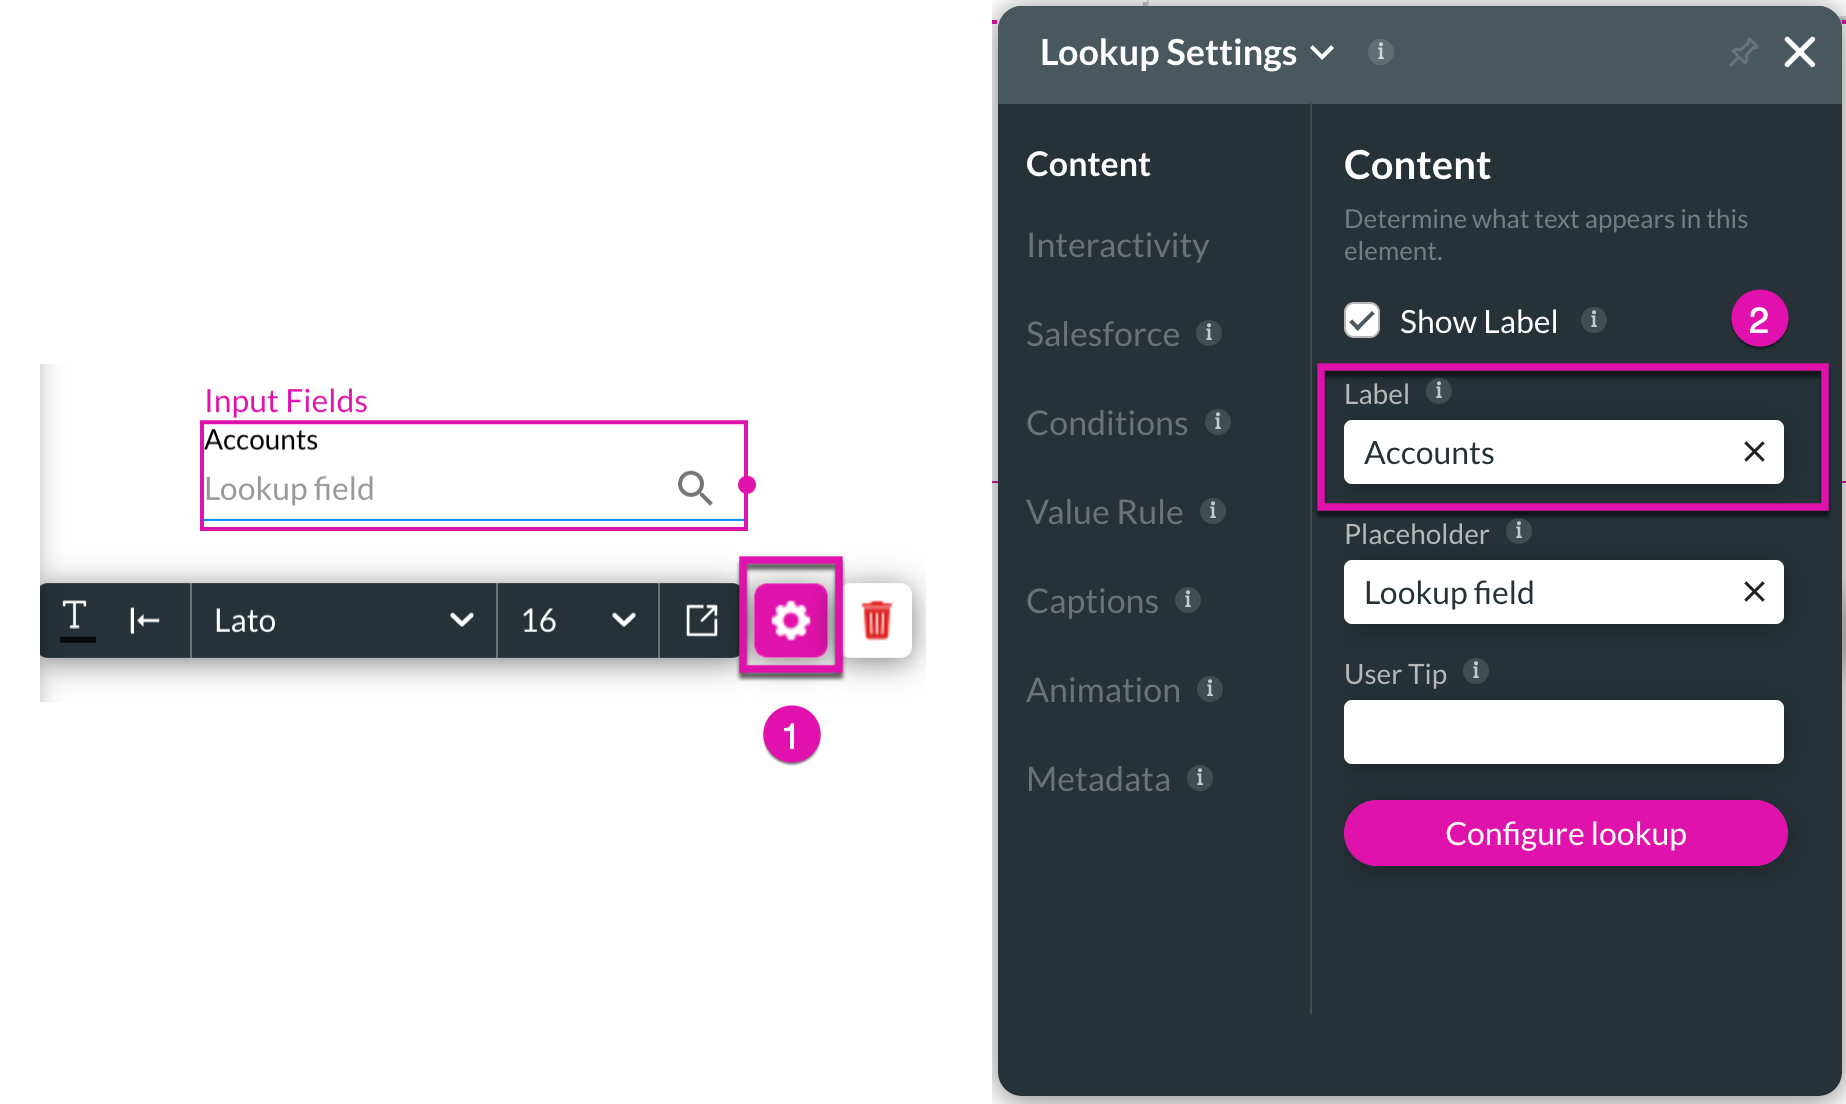
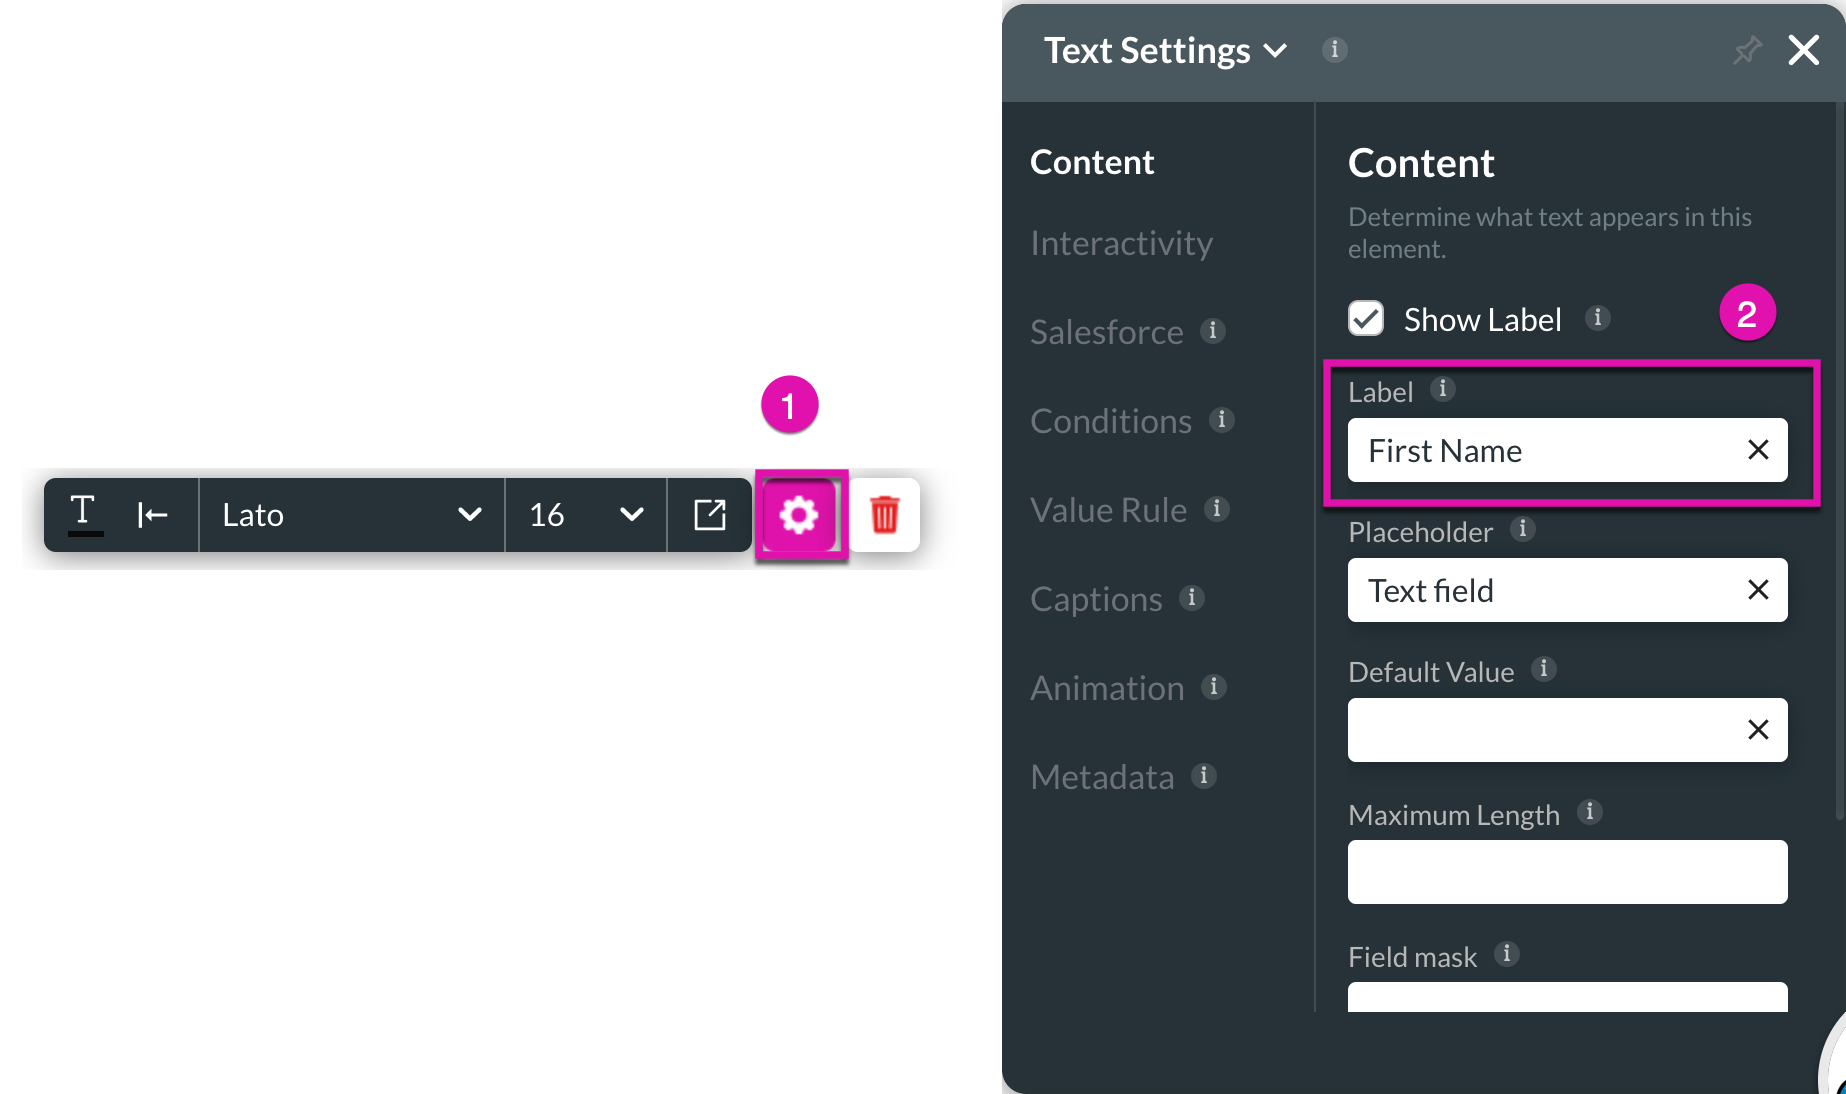
6. Change the label under Content in your LookUp Settings. The Lookup Settings can be accessed through the Gear icon on the element.
2. Drag the element to your project and configure the Lookup.
3. Start configuring the Lookup by selecting a source from the drop-down list and then clicking the Next button.
4. Configure your conditions for the Lookup and click on the Next button.
5. Map your Lookup field and then click on the Apply button.
6. Change the label under Content in your LookUp Settings. The Lookup Settings can be accessed through the Gear icon on the element.
04 Add a Text Input Field
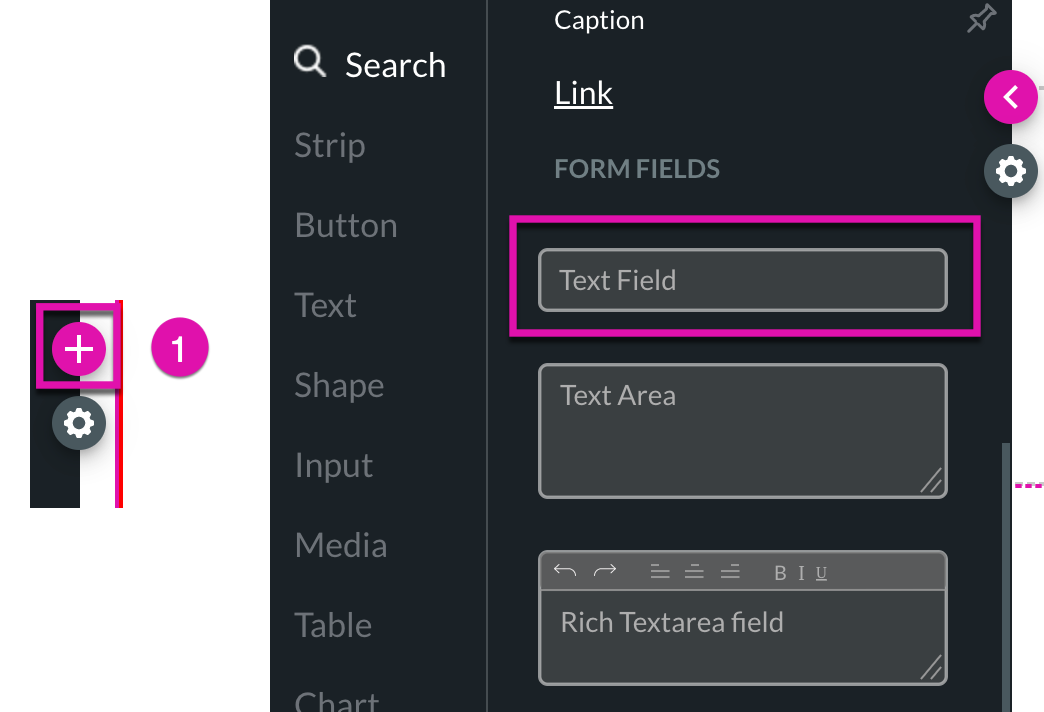
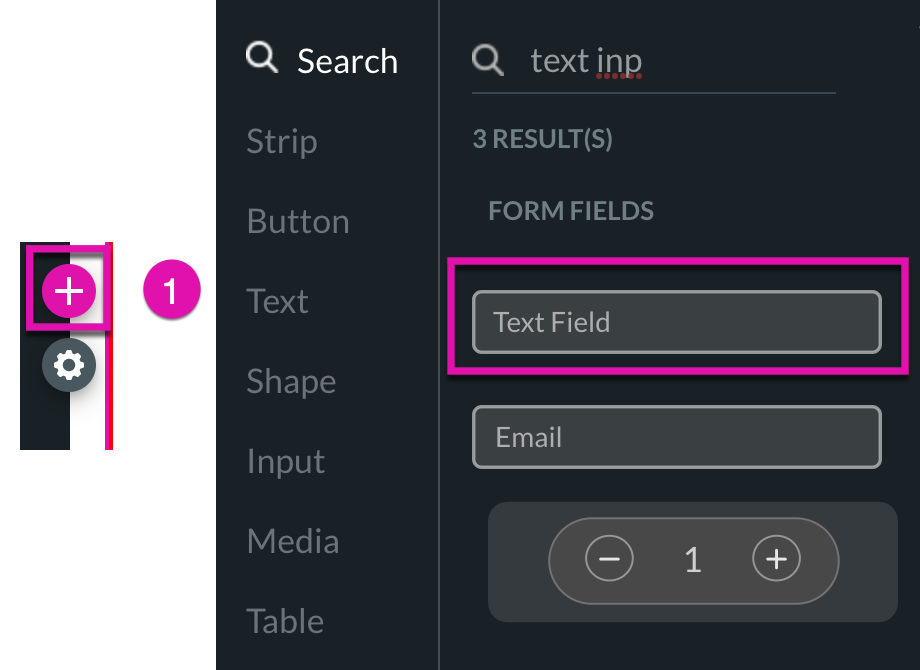
1. Find a text field in your Elements list by clicking the + button and dragging your element into your project.
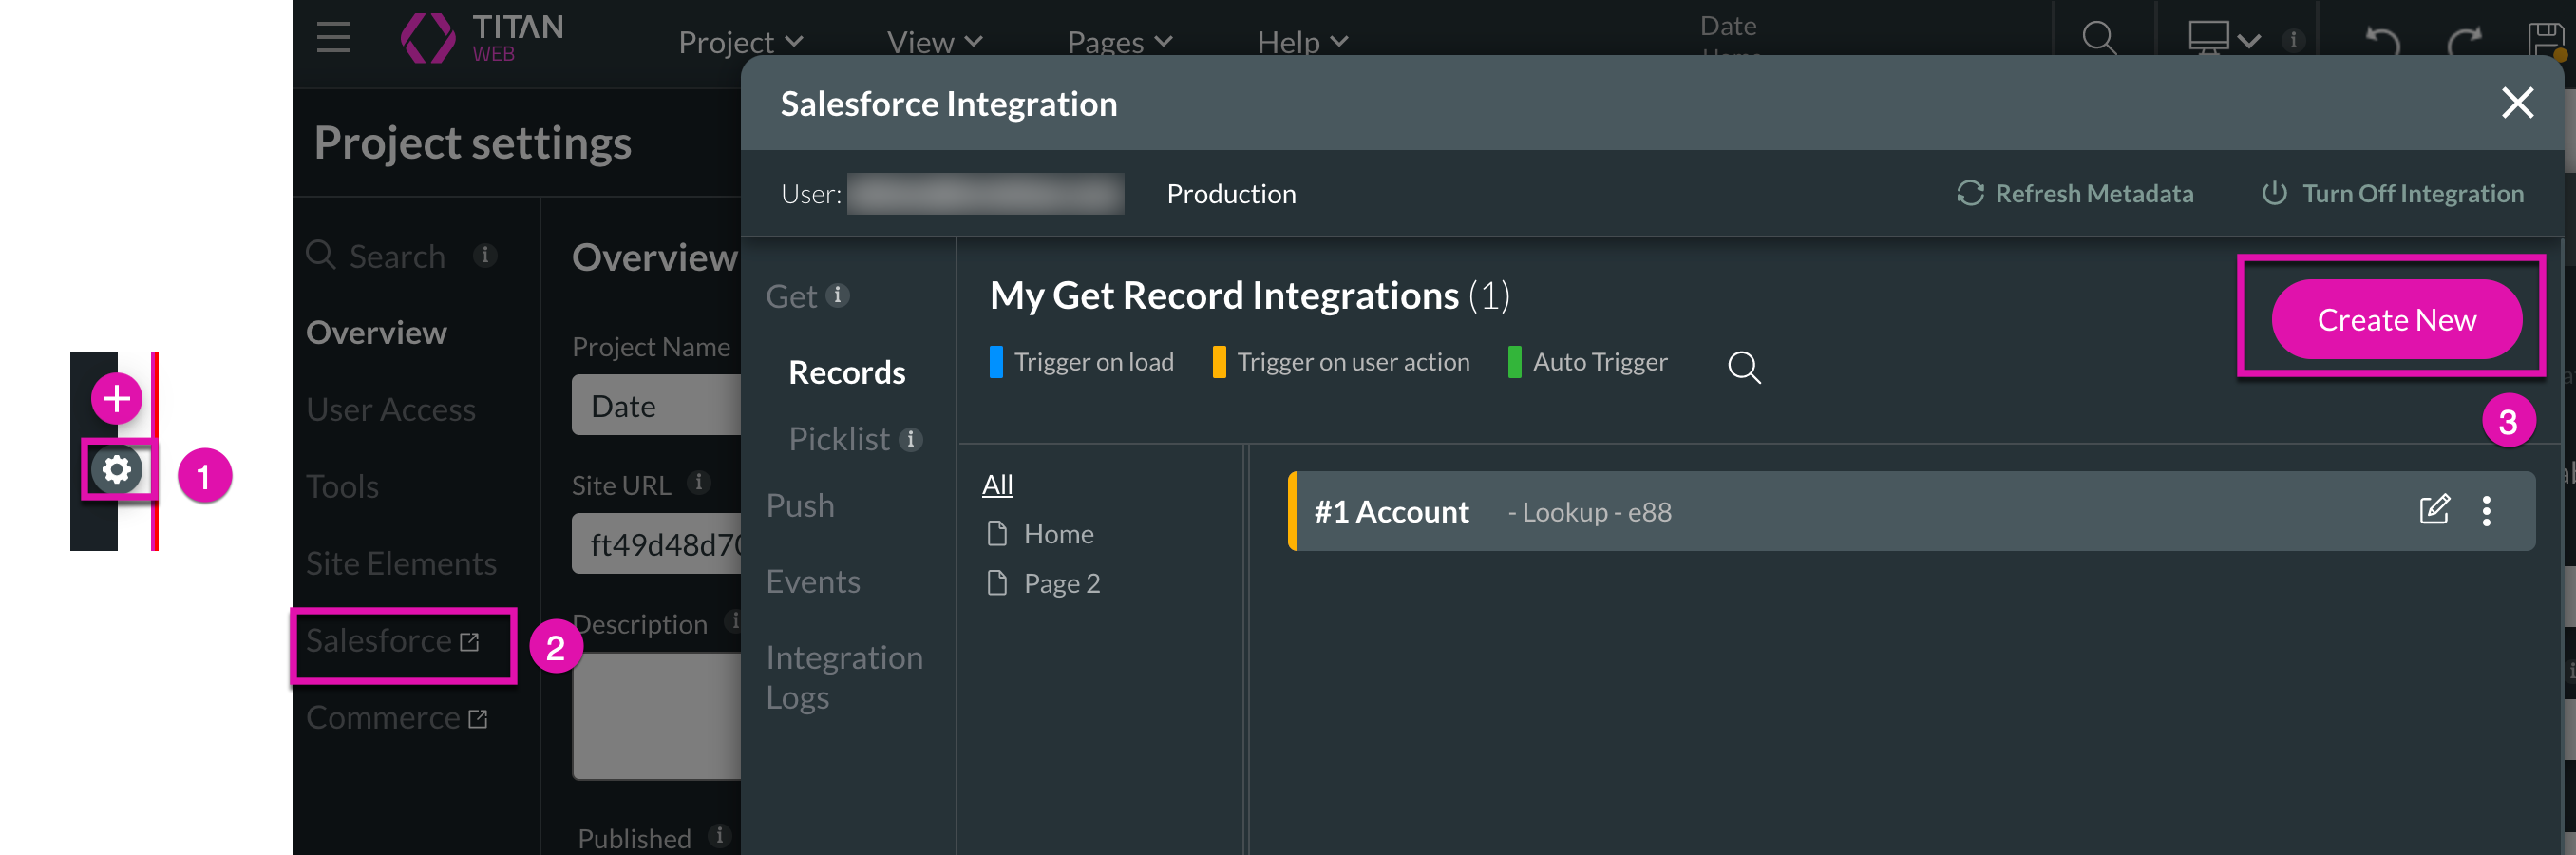
2. Run a Get on your text field by clicking the Gear icon and selecting the Salesforce option in the sidebar menu.
3. Click on the Create New button.
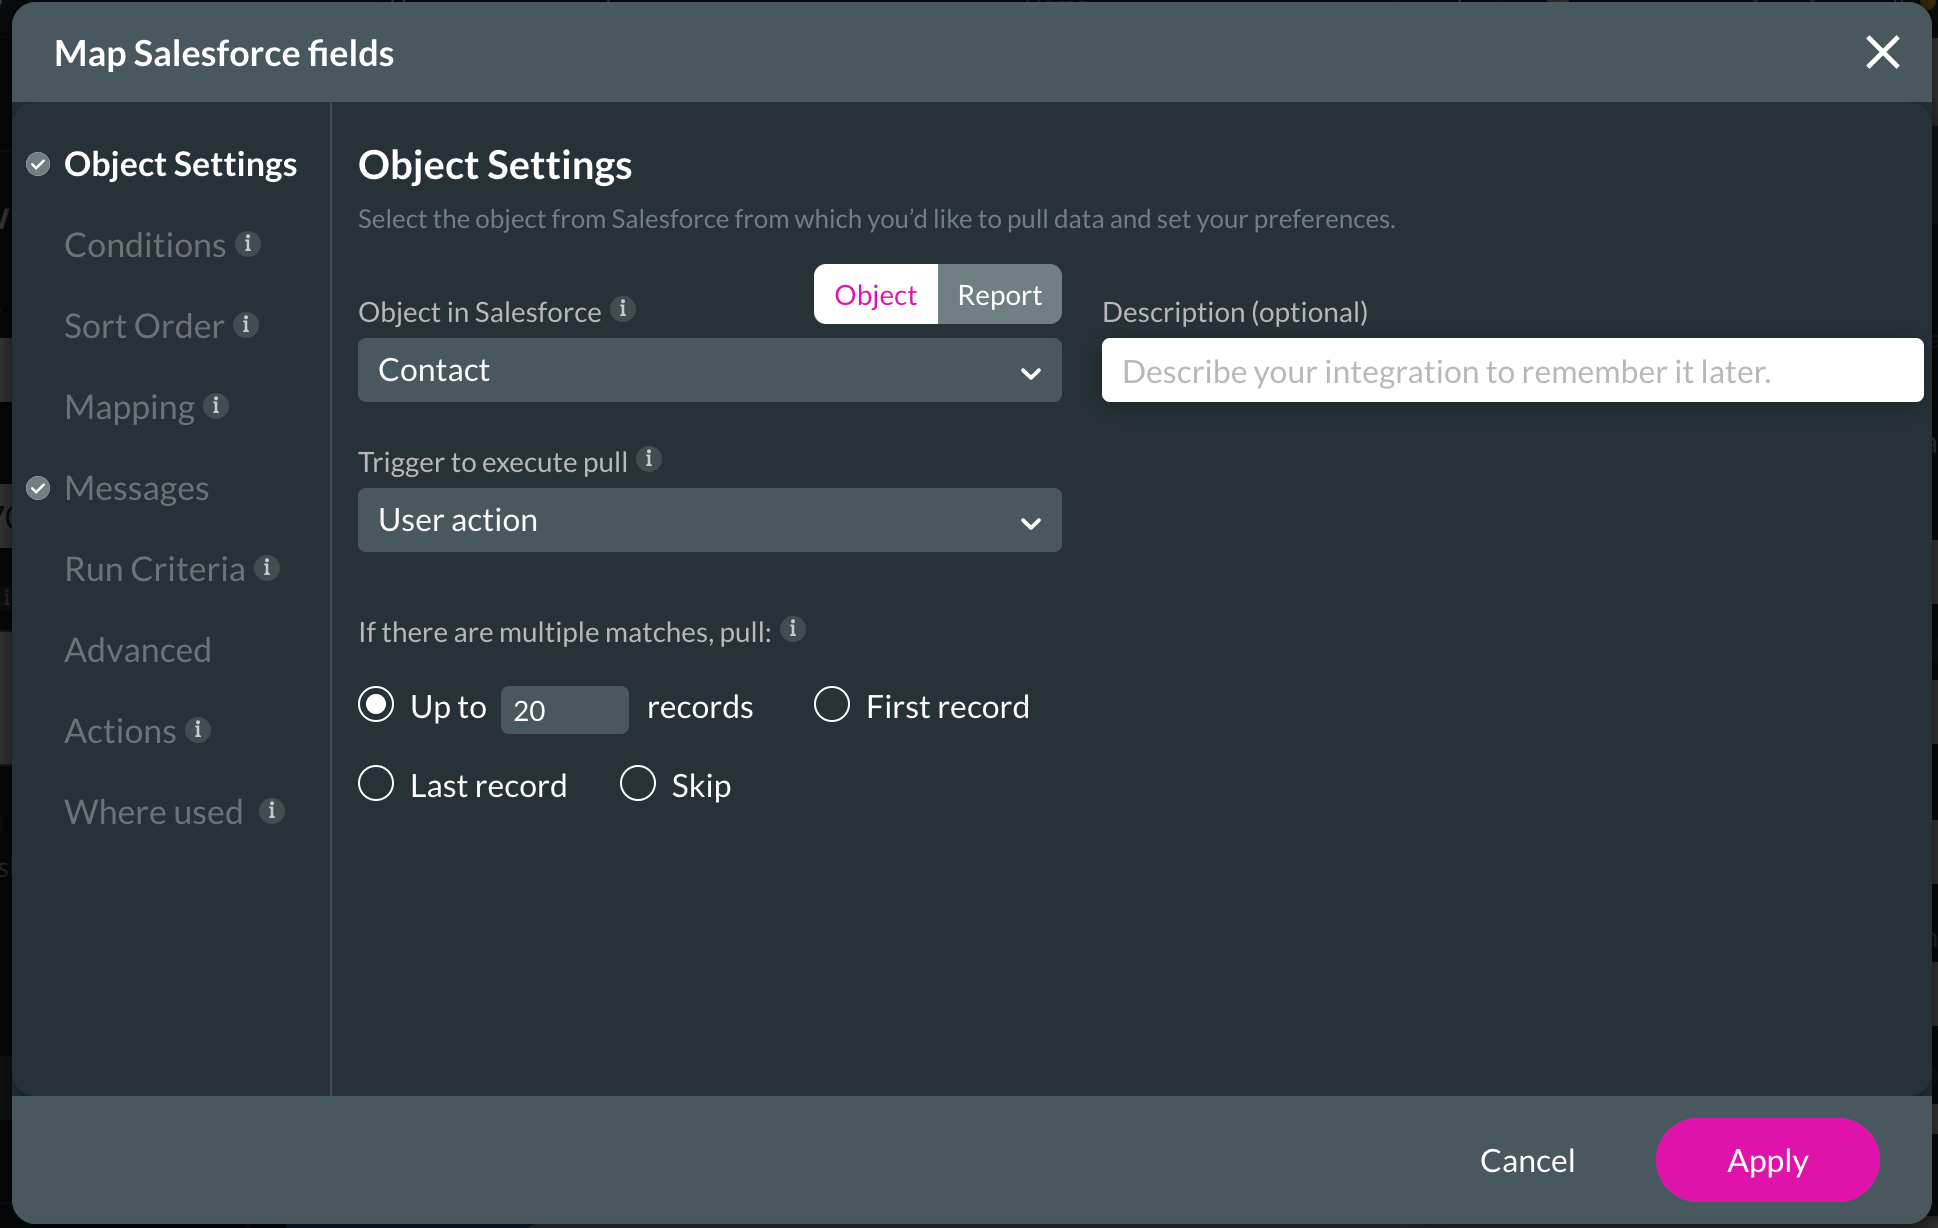
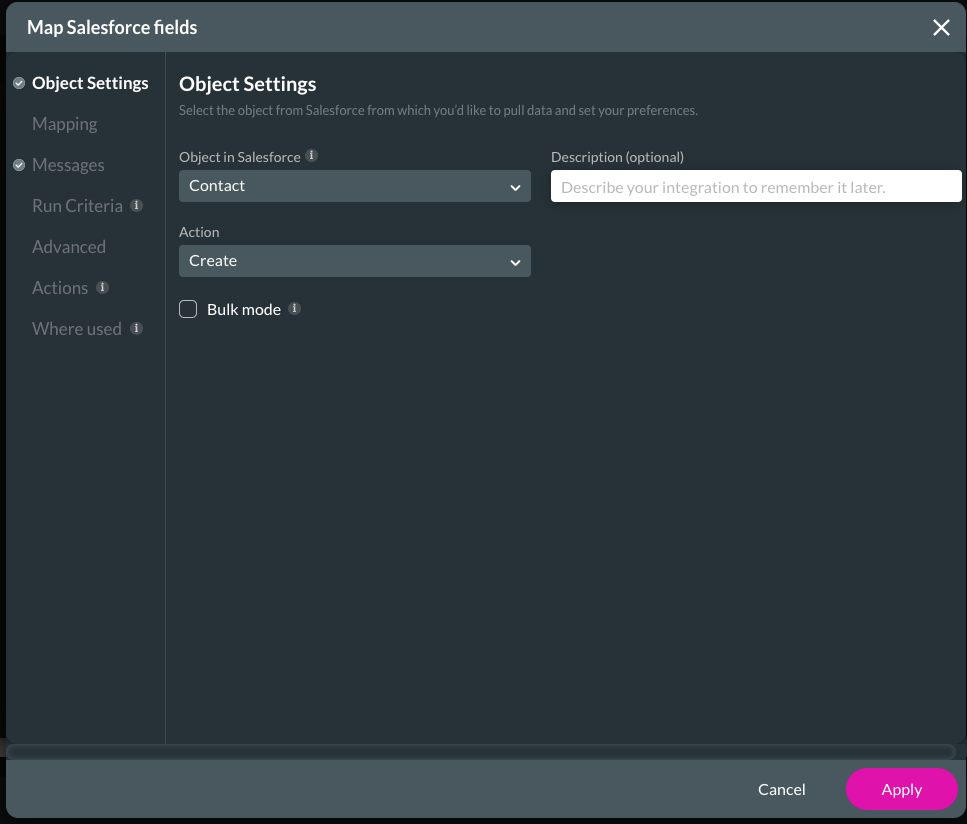
4. Configure your object settings. For this tutorial, we have chosen to use Contact and User Action from the drop-down lists.
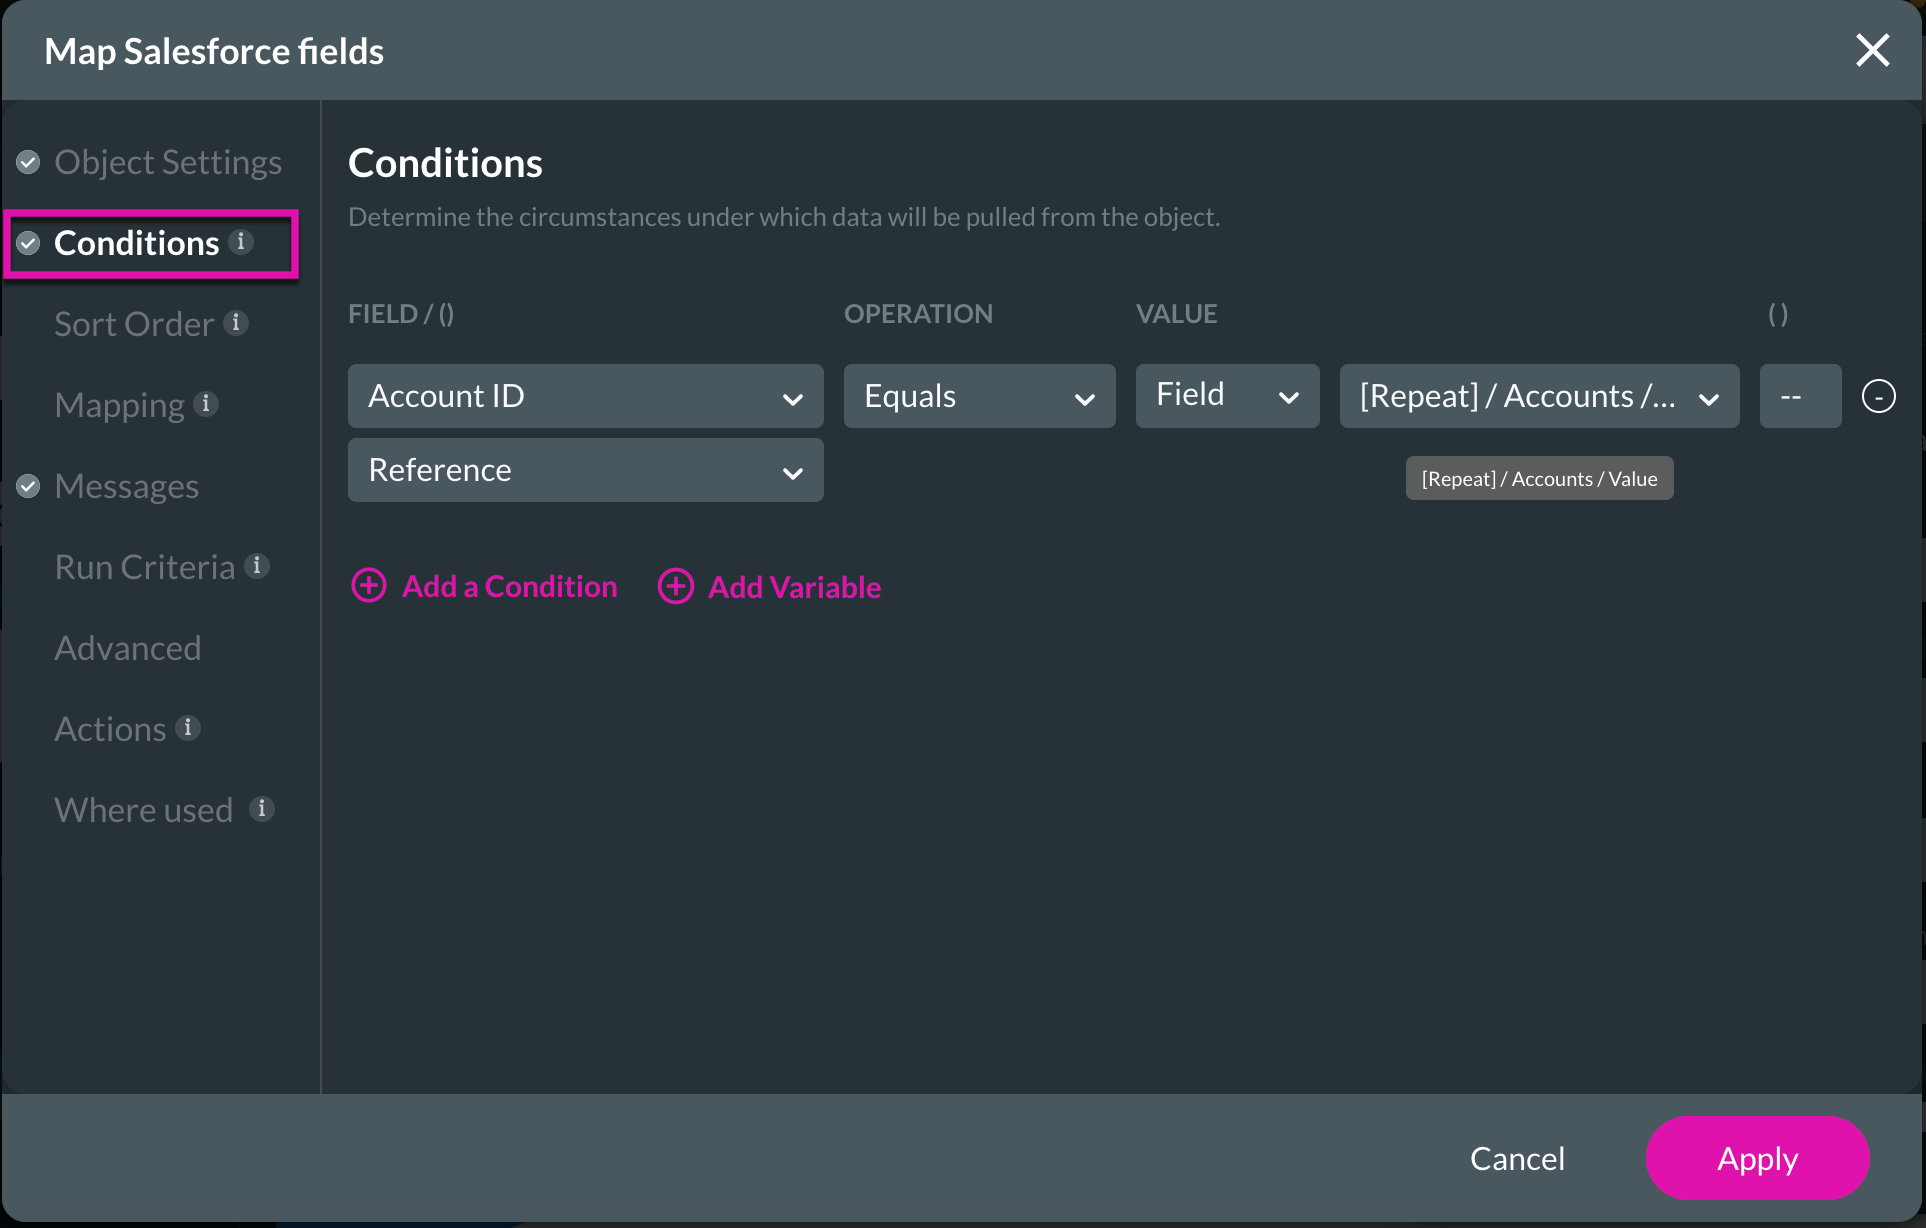
5. Set your conditions by clicking in the Conditions section. We have used Account ID > Equals > Field > Accounts/Value.
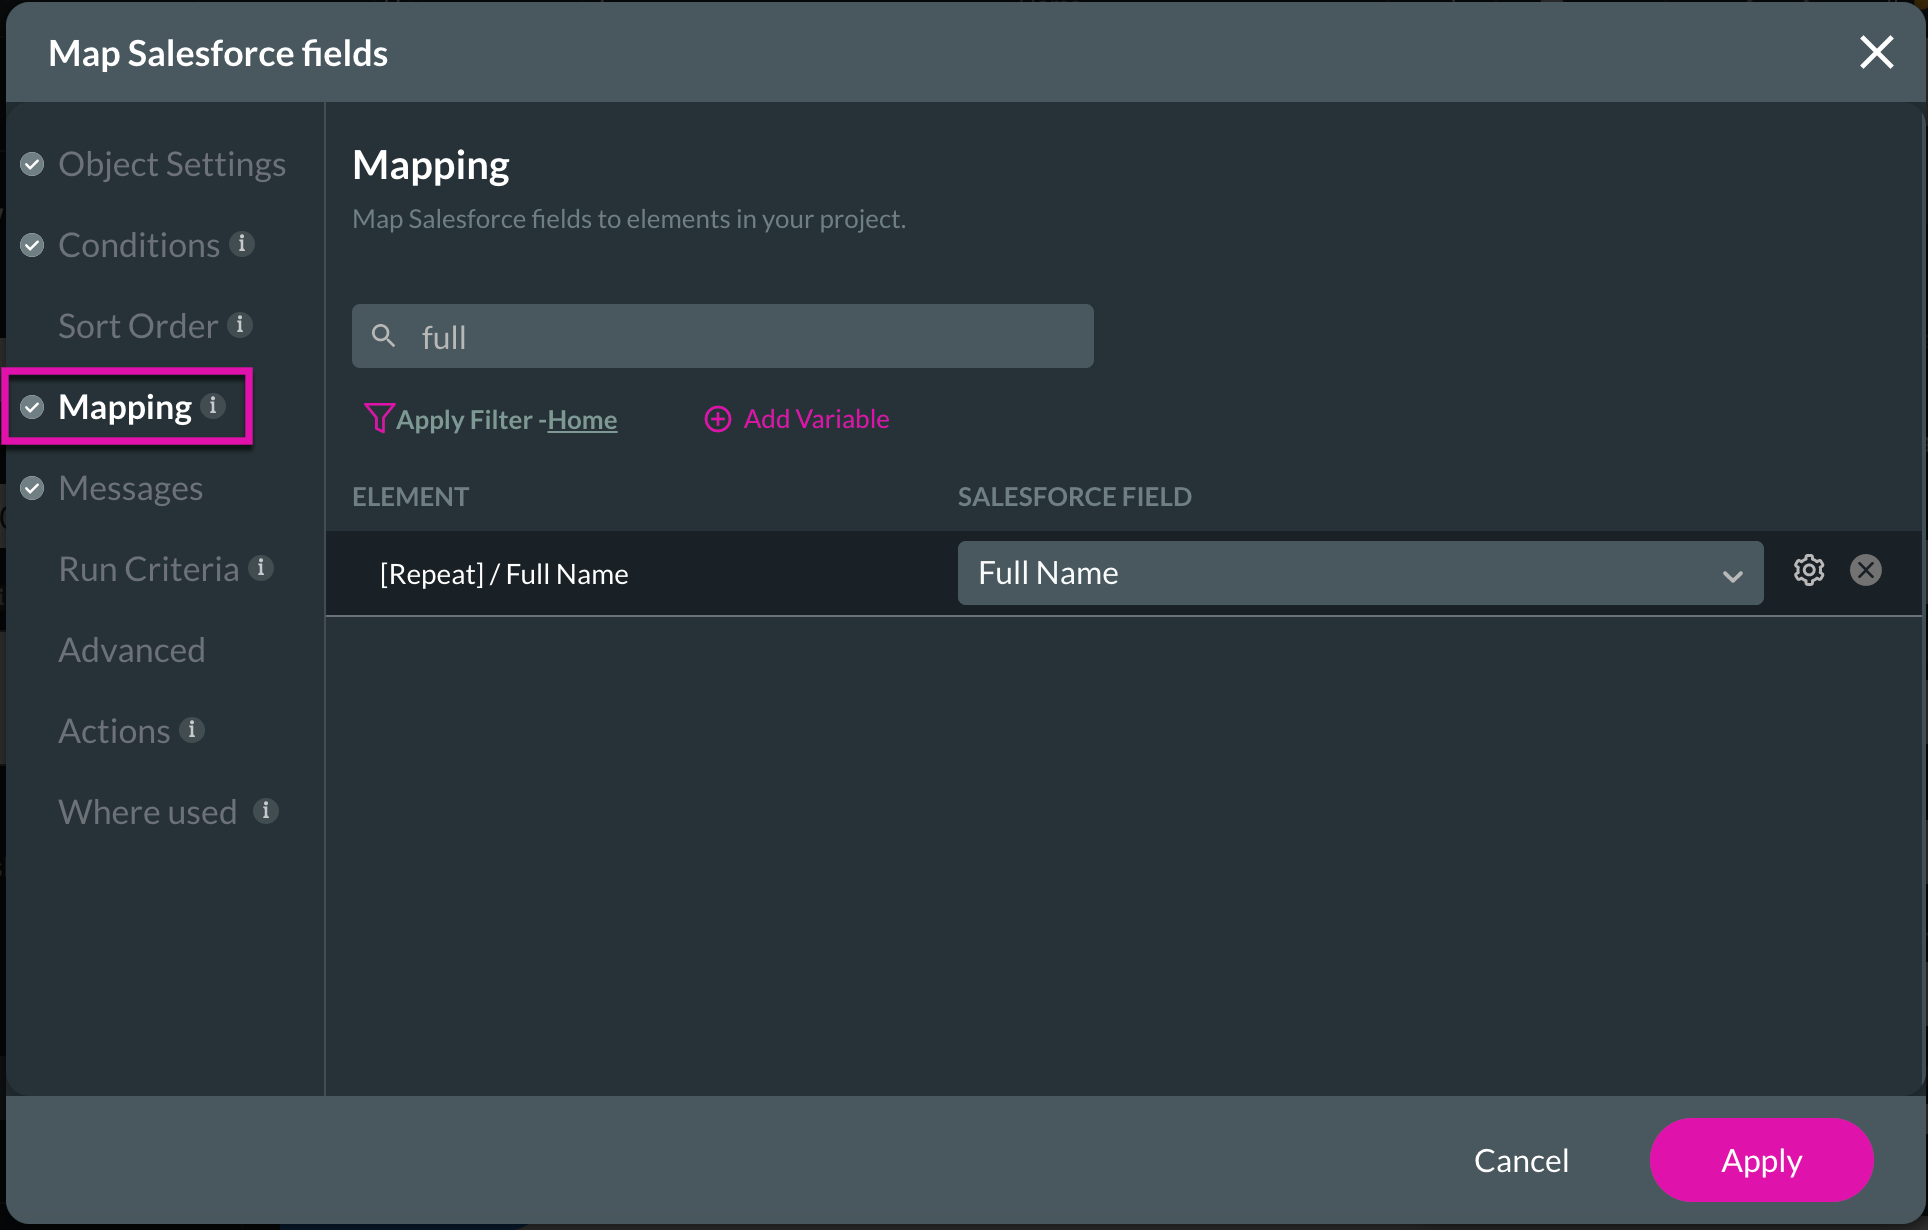
6. Map the Full Name of contacts to the Full Name field in the Mapping section and click Apply.
2. Run a Get on your text field by clicking the Gear icon and selecting the Salesforce option in the sidebar menu.
3. Click on the Create New button.
4. Configure your object settings. For this tutorial, we have chosen to use Contact and User Action from the drop-down lists.
5. Set your conditions by clicking in the Conditions section. We have used Account ID > Equals > Field > Accounts/Value.
6. Map the Full Name of contacts to the Full Name field in the Mapping section and click Apply.
05 Add a Button
Add a button to trigger a Get action to bring a contact into your web project.
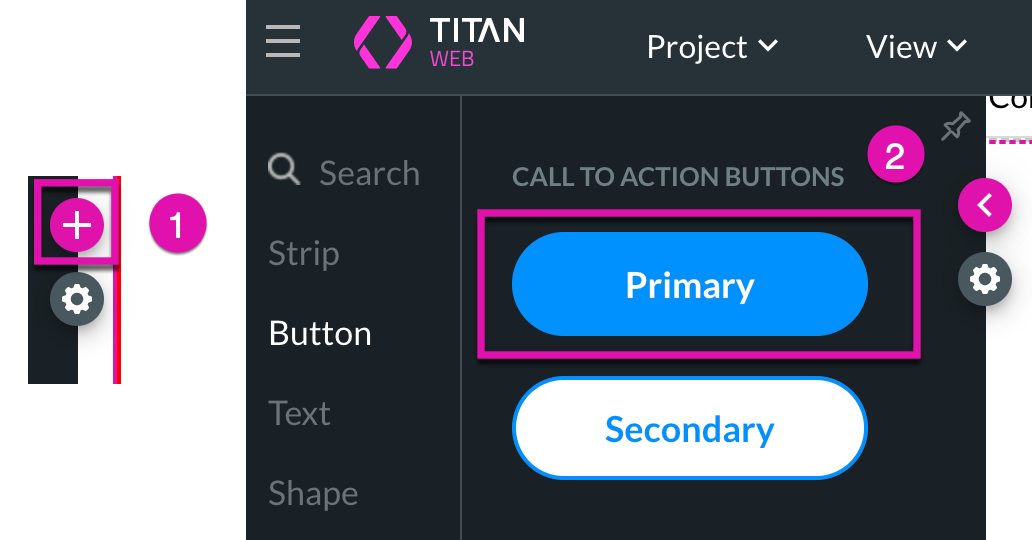
1. Find a button in your Elements list by clicking the + button and then drag your element into your project.
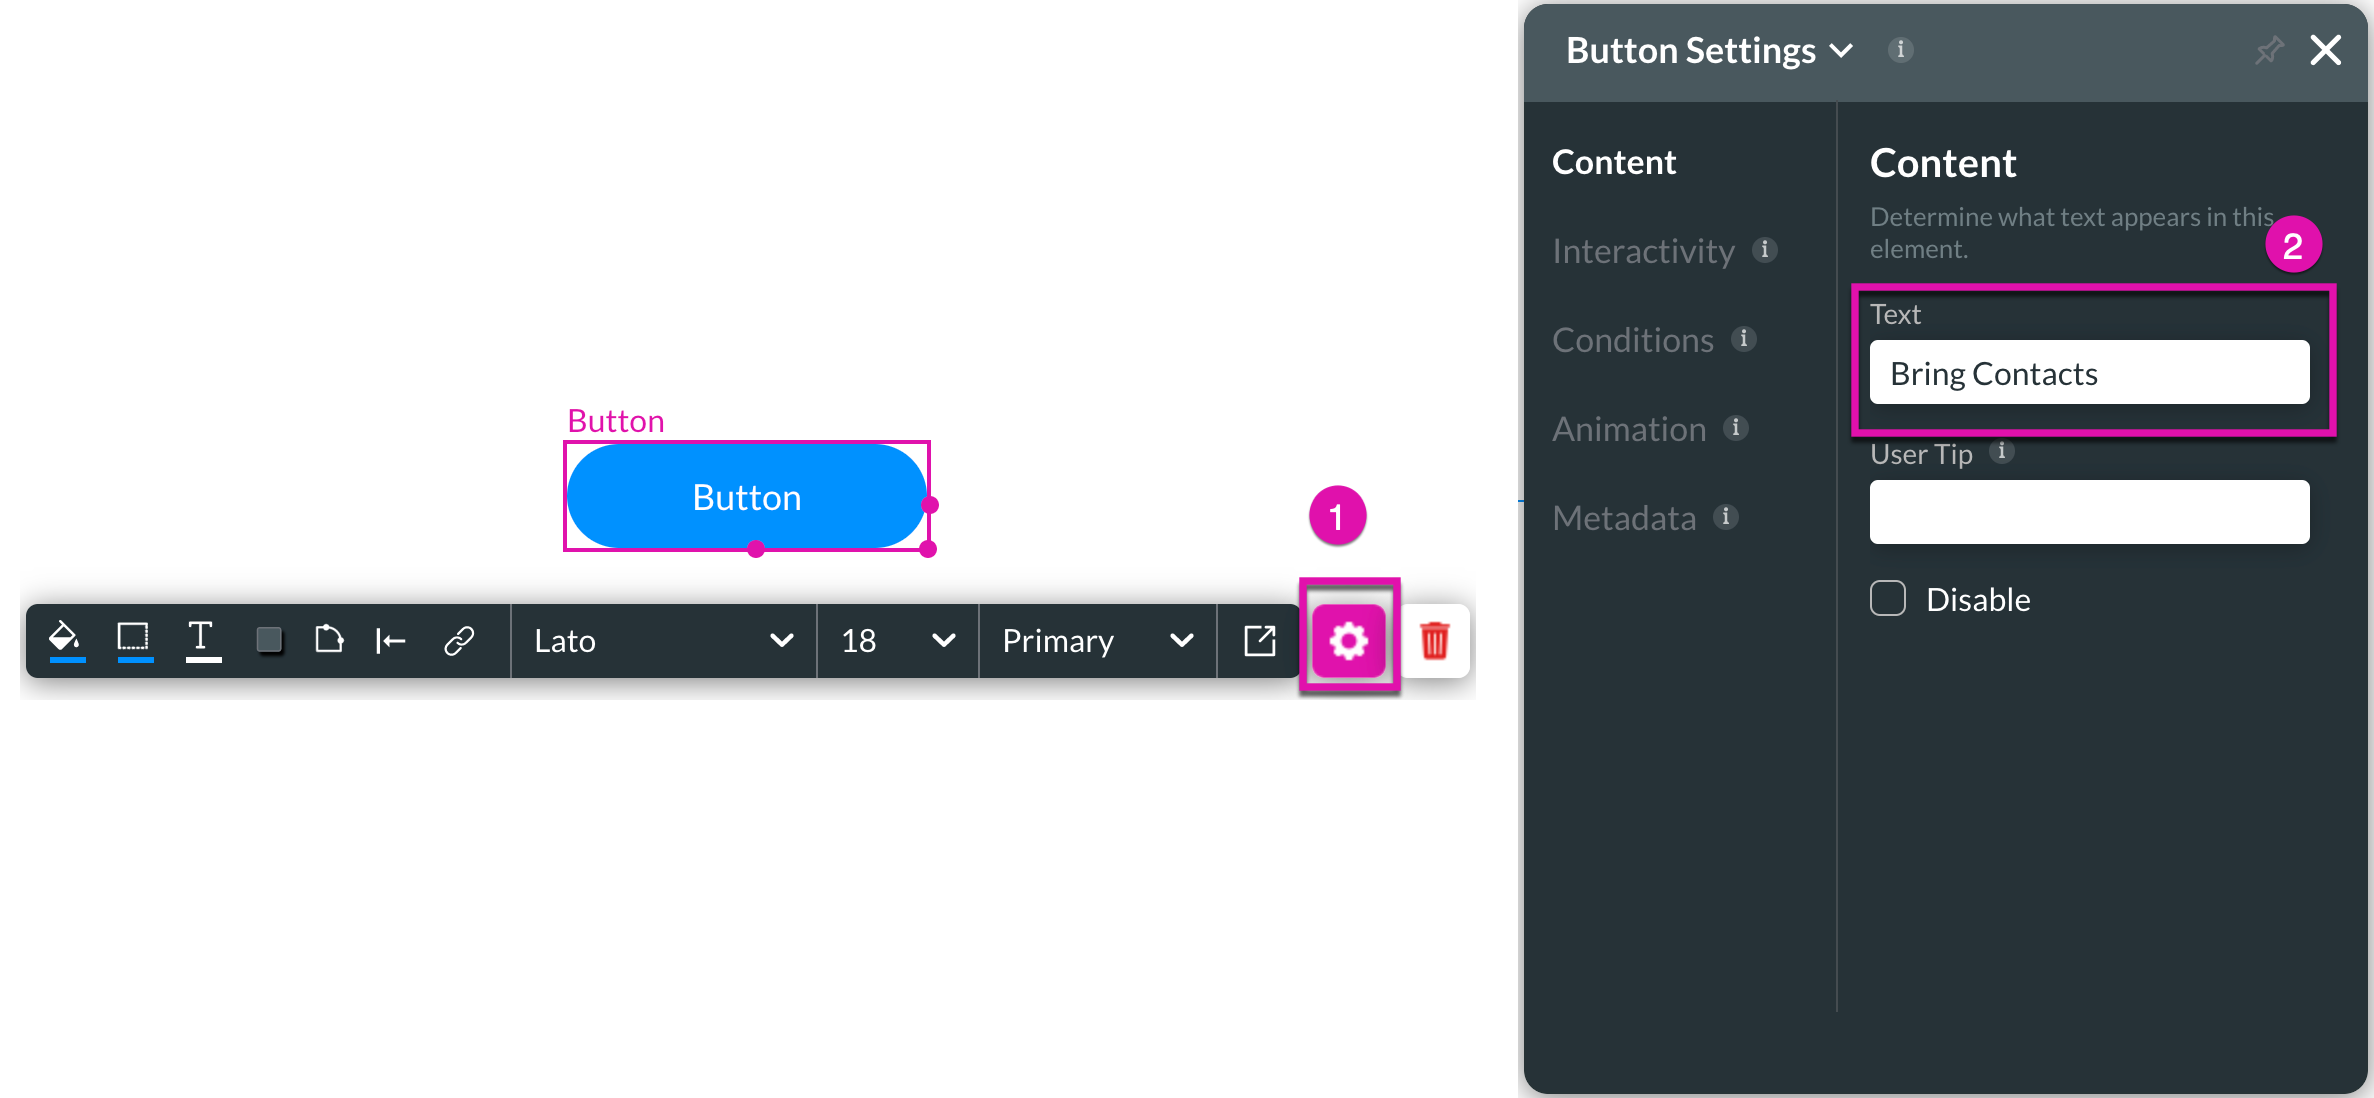
2. Open your button settings by clicking the Gear icon and change the Button text by updating the Text field under Content settings.
3. Click the link button to add a Get to the button with an on-click action.
4. Select the Start button and choose an action.
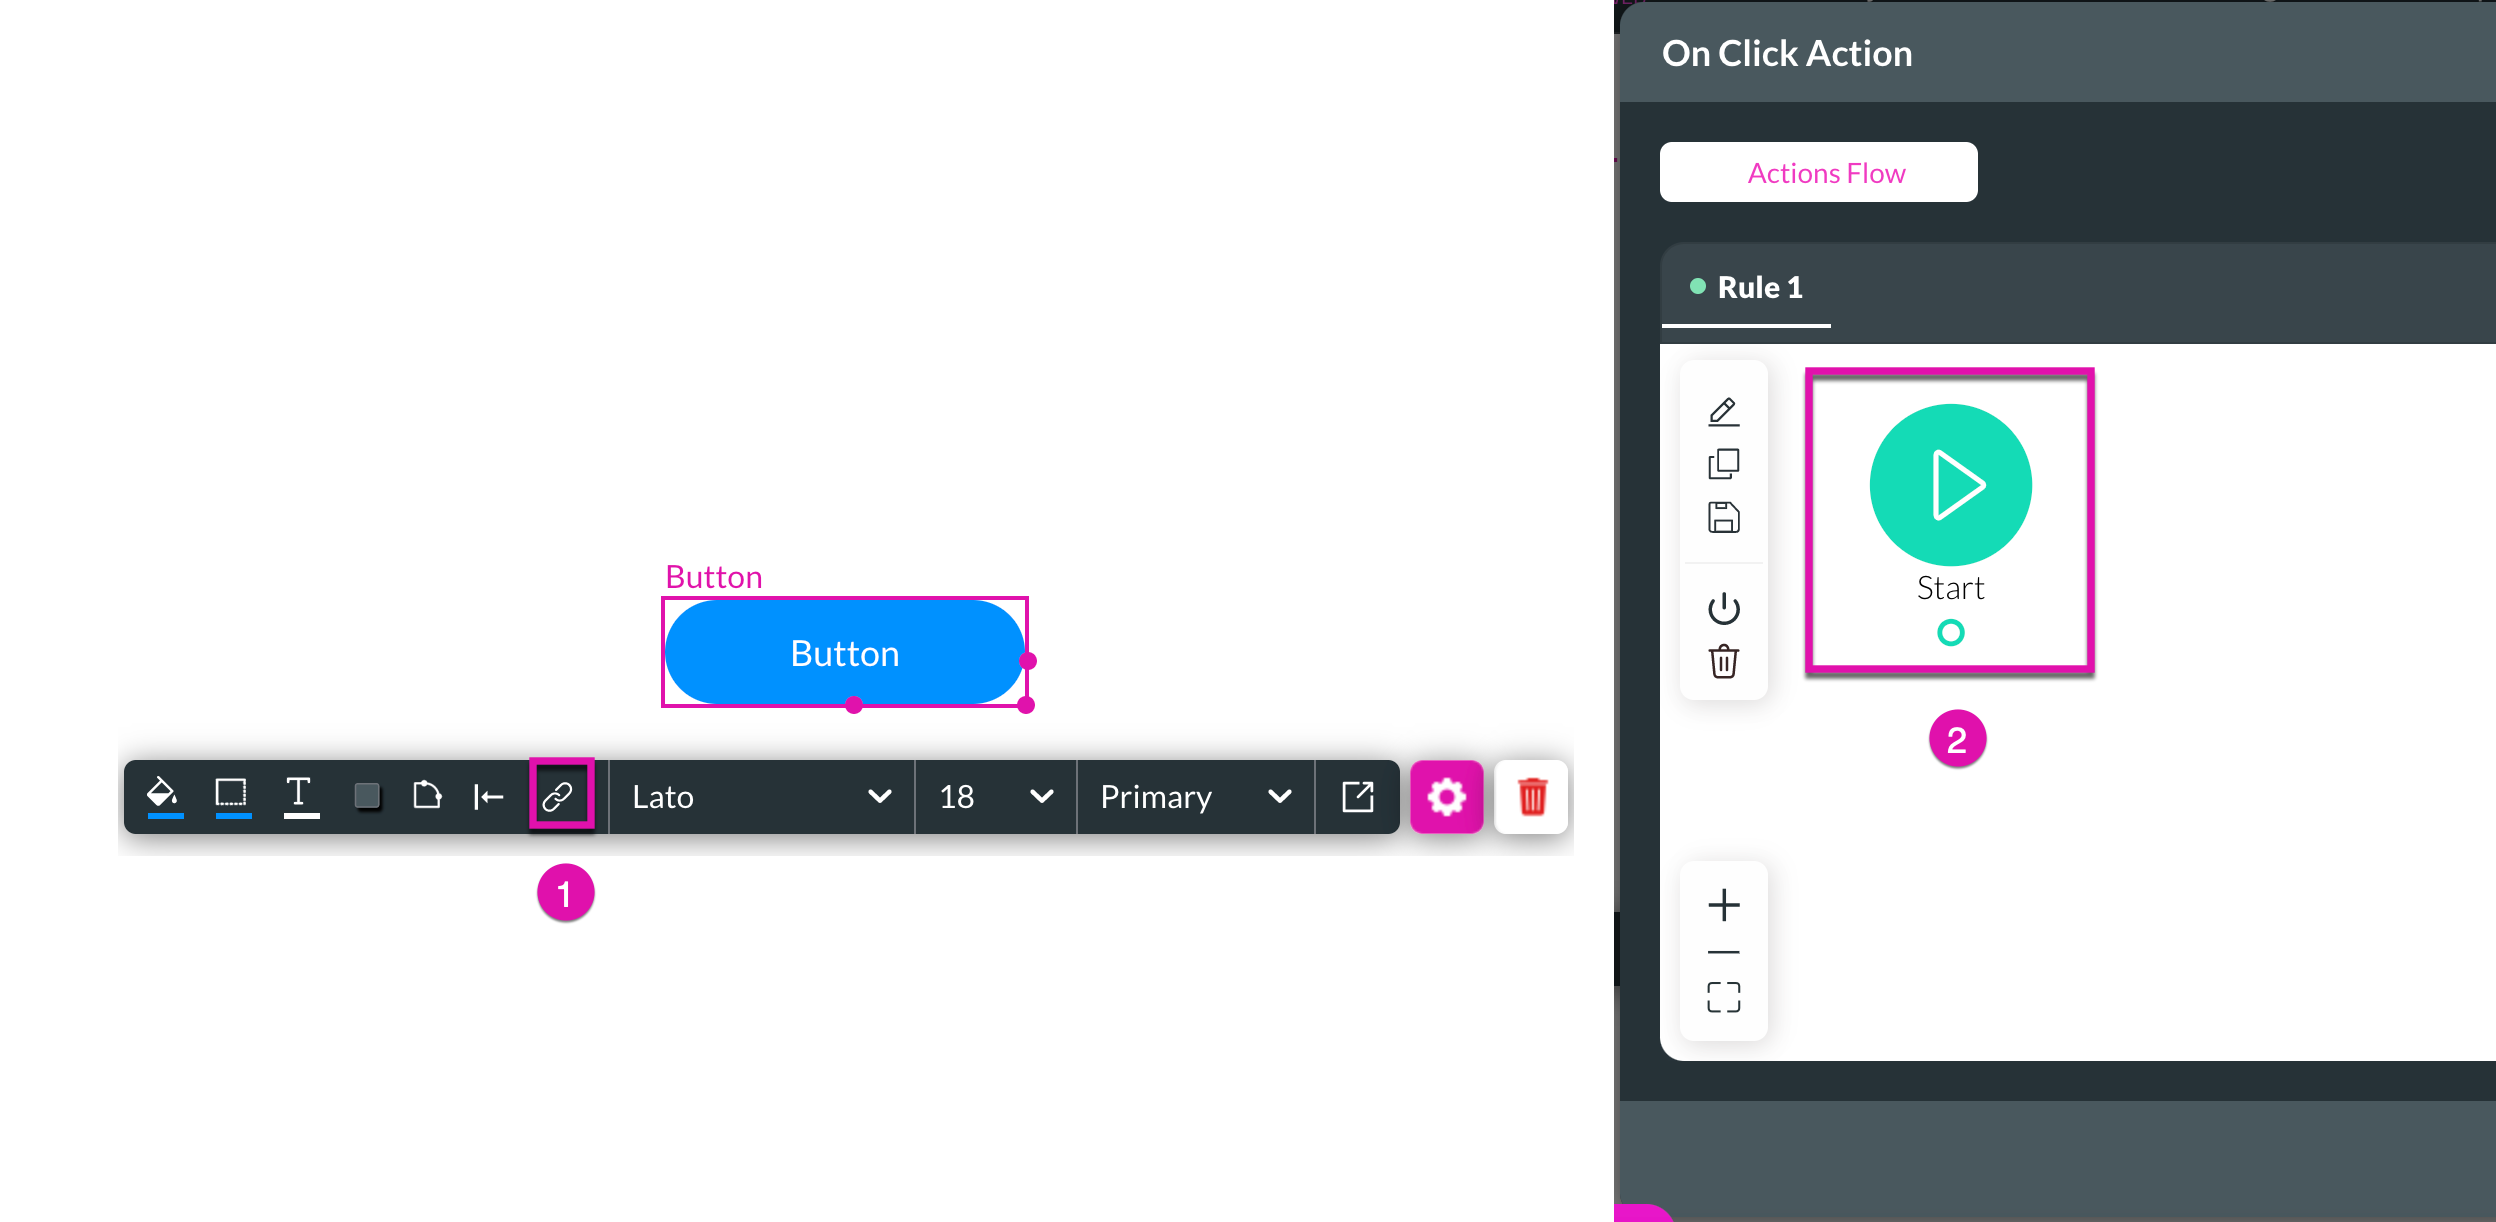
5. Choose Salesforce action from the list and click the Next button.
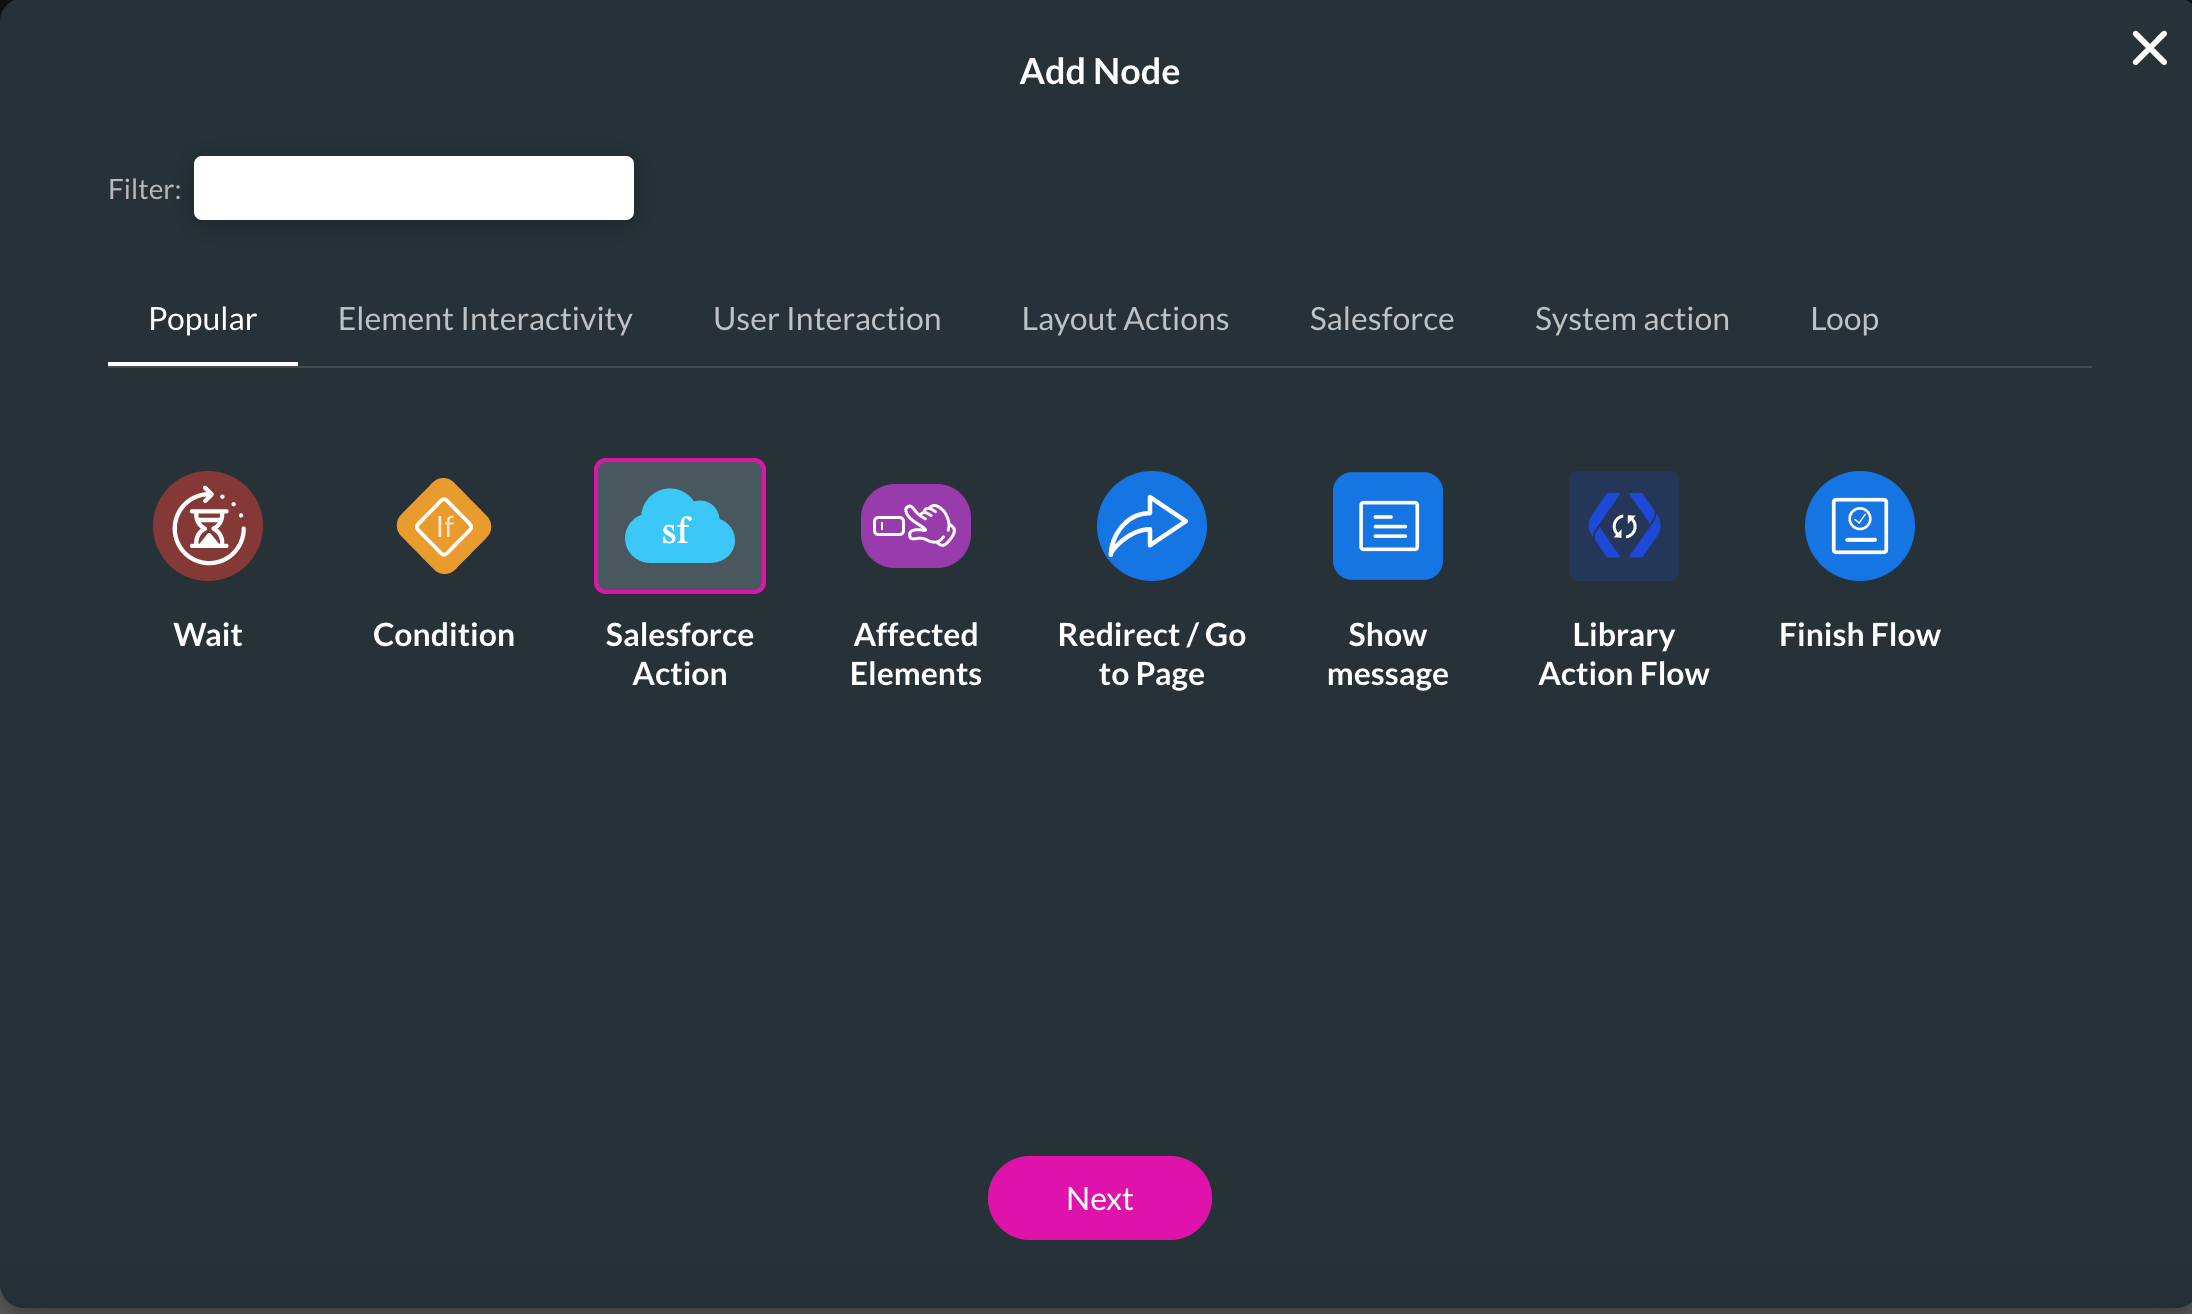
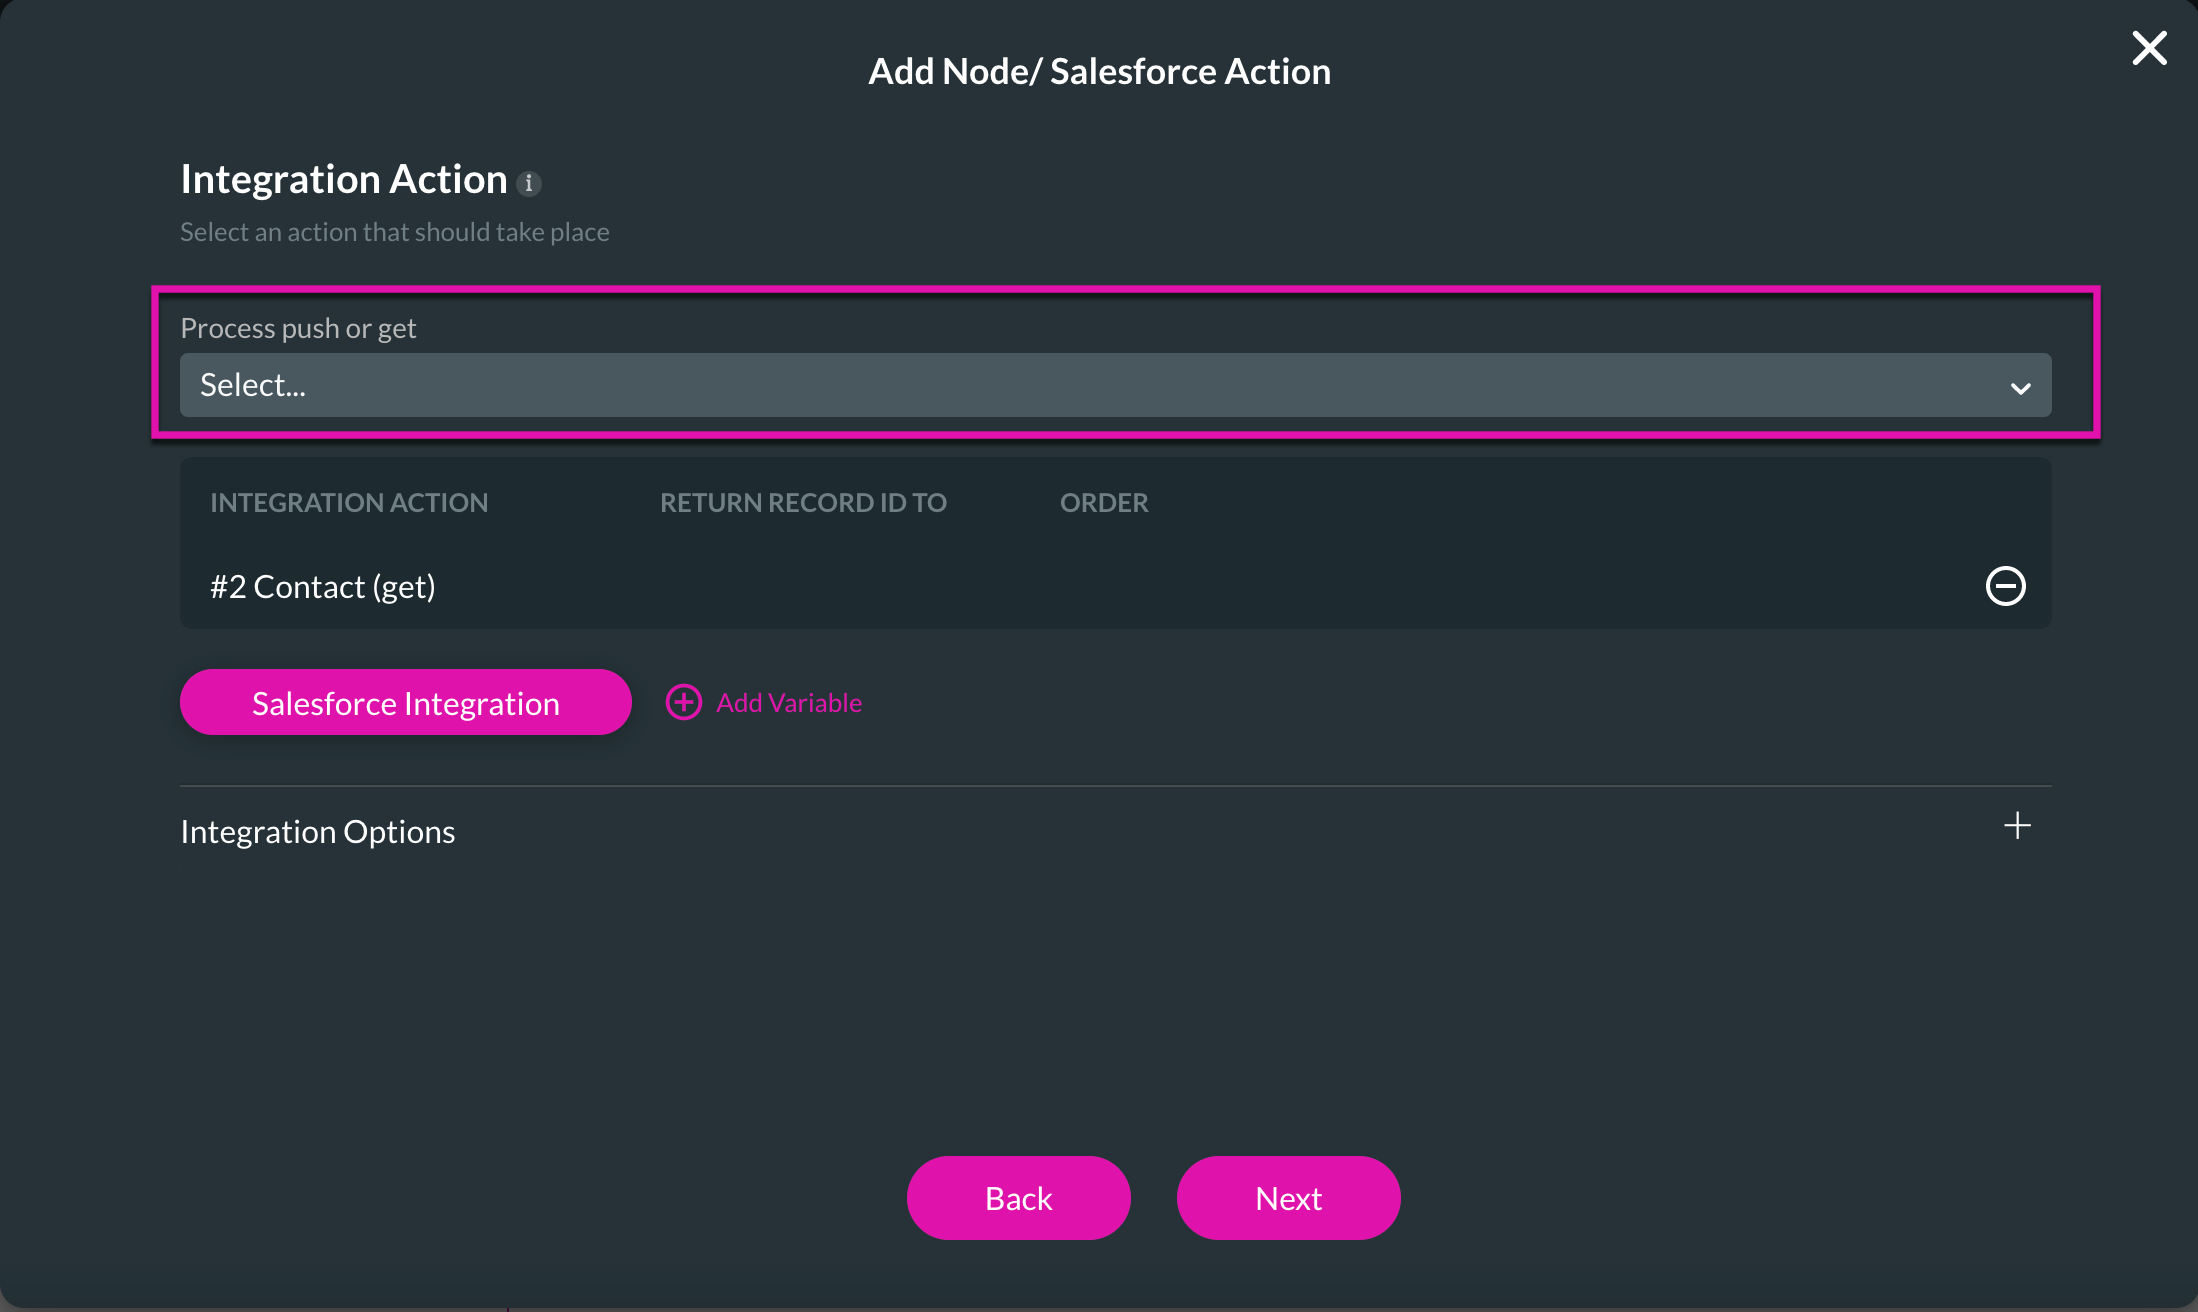
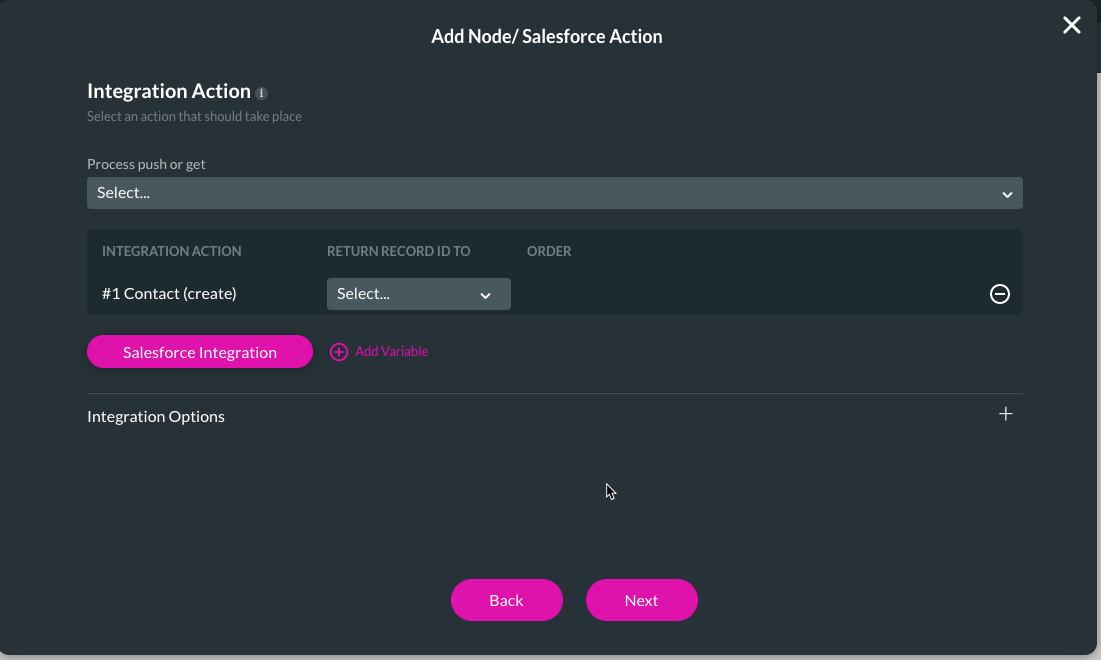
6. Add your Get to the Process push or get drop-down list, which will be added to the Integration Action list below.
1. Find a button in your Elements list by clicking the + button and then drag your element into your project.
2. Open your button settings by clicking the Gear icon and change the Button text by updating the Text field under Content settings.
3. Click the link button to add a Get to the button with an on-click action.
4. Select the Start button and choose an action.
5. Choose Salesforce action from the list and click the Next button.
6. Add your Get to the Process push or get drop-down list, which will be added to the Integration Action list below.
06 How to Create a Repeat Strip for Data
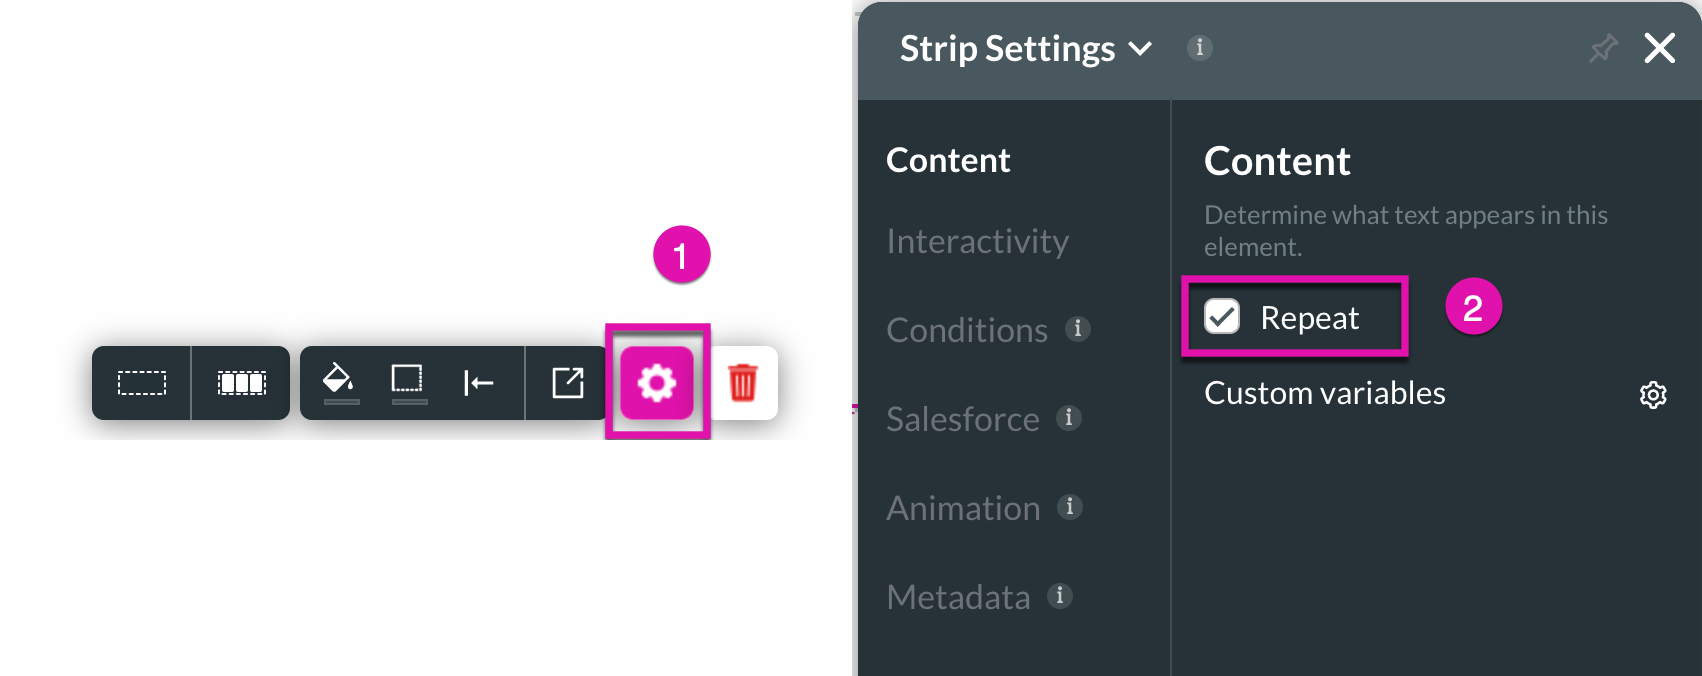
1. Select your strip and open its settings by clicking the Gear icon.
2. Select the Repeat checkbox under Content.
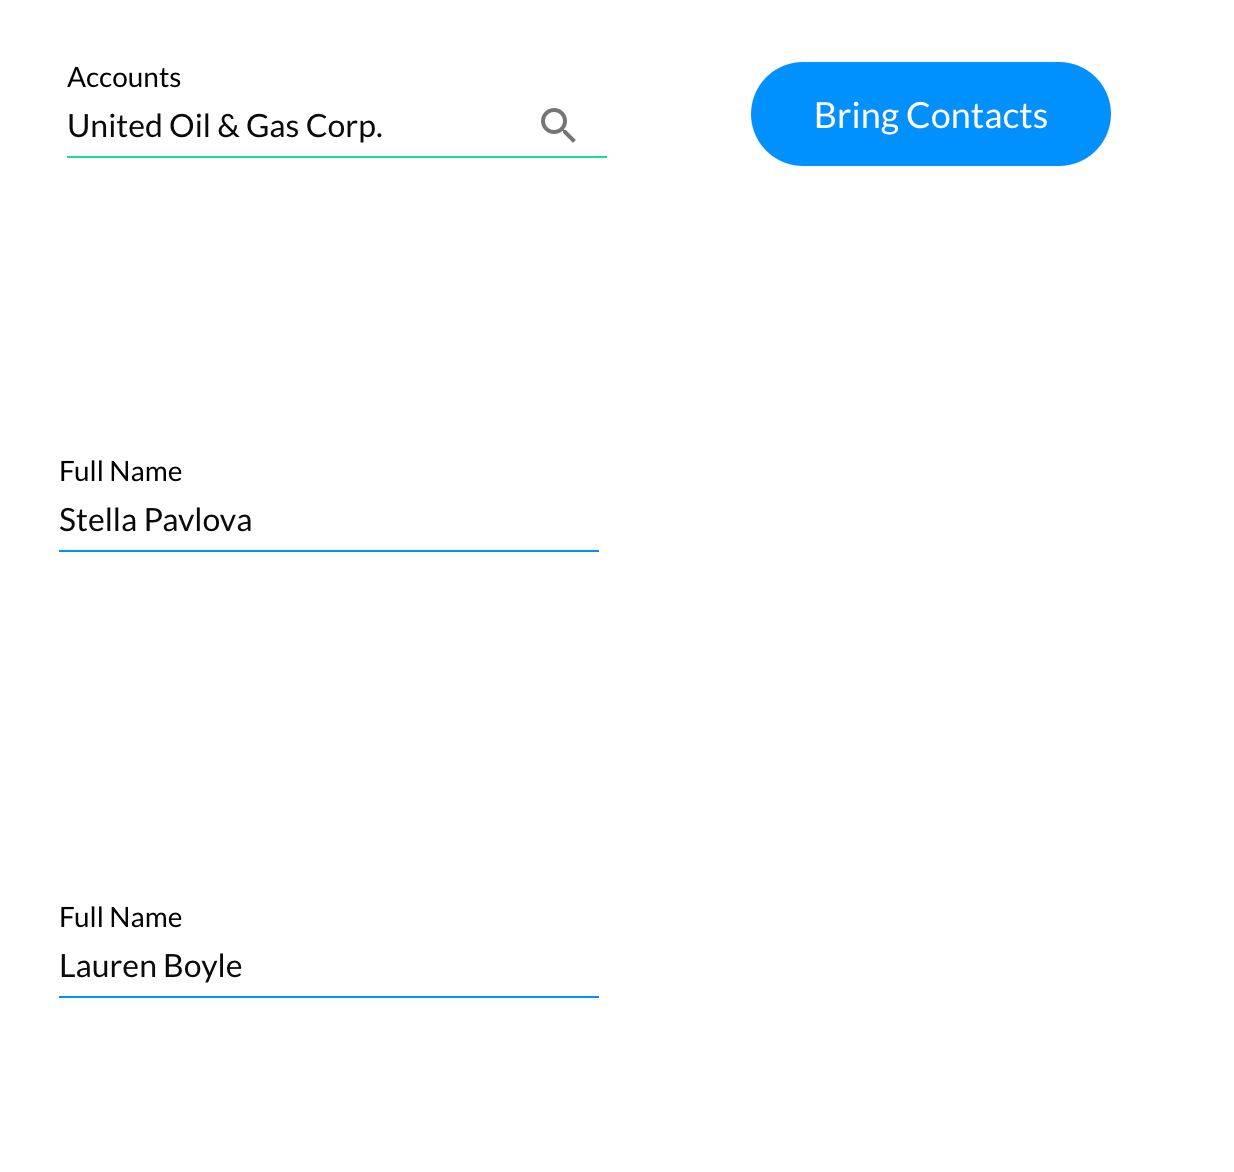
3. Click the Save and Preview buttons to view your data from a Lookup.
4. When previewing your Lookup data, notice that the data is called to your project automatically in strips for easy viewing based on the number of contacts returned.
2. Select the Repeat checkbox under Content.
3. Click the Save and Preview buttons to view your data from a Lookup.
4. When previewing your Lookup data, notice that the data is called to your project automatically in strips for easy viewing based on the number of contacts returned.
07 How to Create a Repeat Column for Data
We can use repeated columns to display the data in a slightly different way.
1. Click on your repeat strip and select the icon to change it to a repeat column. You can toggle between your strip and column by clicking these icons.
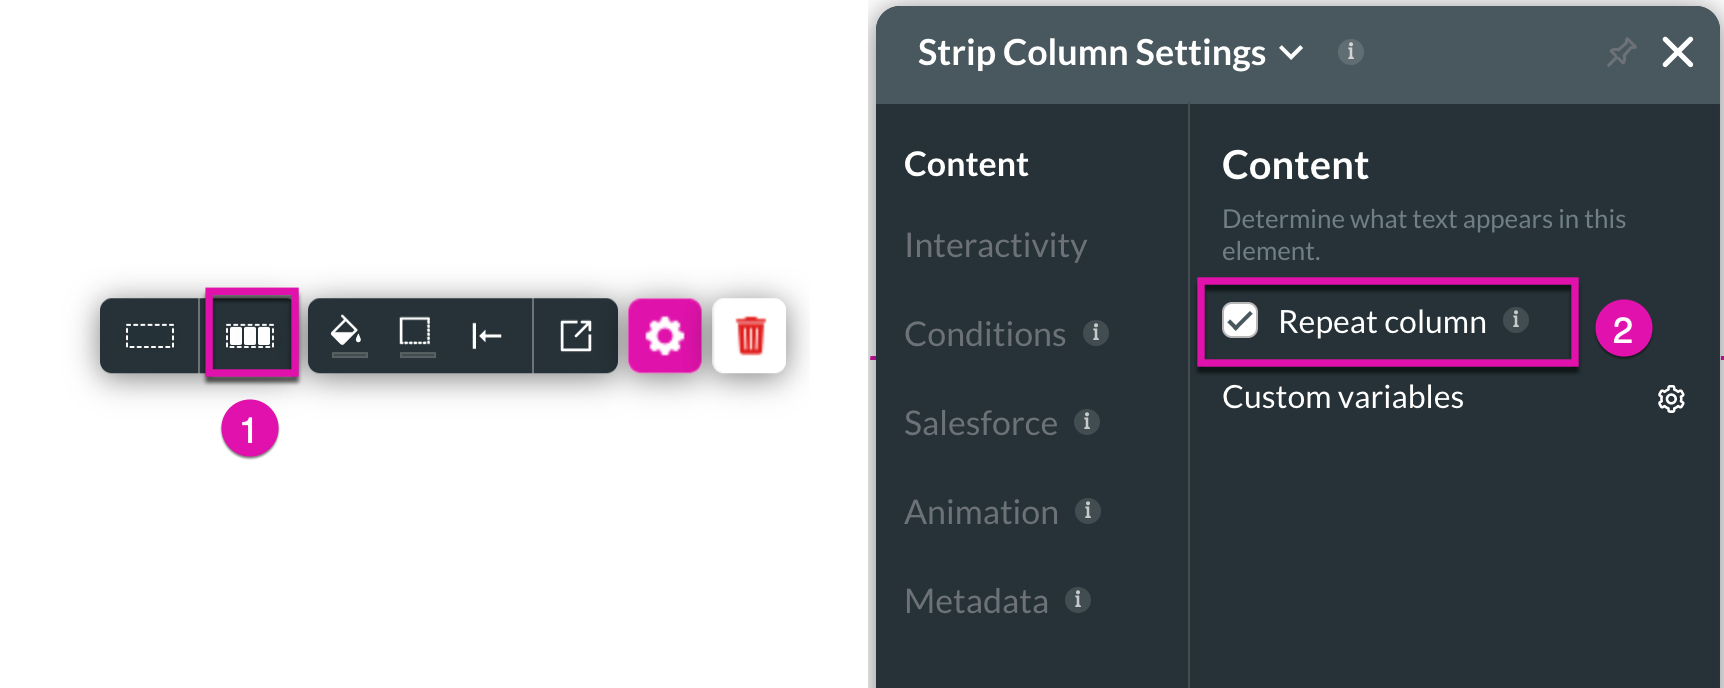
2. Check the Repeat Column checkbox in your Strip Column settings.
3. Click the Save and Preview buttons to view your data from the Lookup.
4. When previewing your Lookup data, notice that the data is called to your project automatically in repeated columns for easy viewing based on the number of contacts returned.
1. Click on your repeat strip and select the icon to change it to a repeat column. You can toggle between your strip and column by clicking these icons.
2. Check the Repeat Column checkbox in your Strip Column settings.
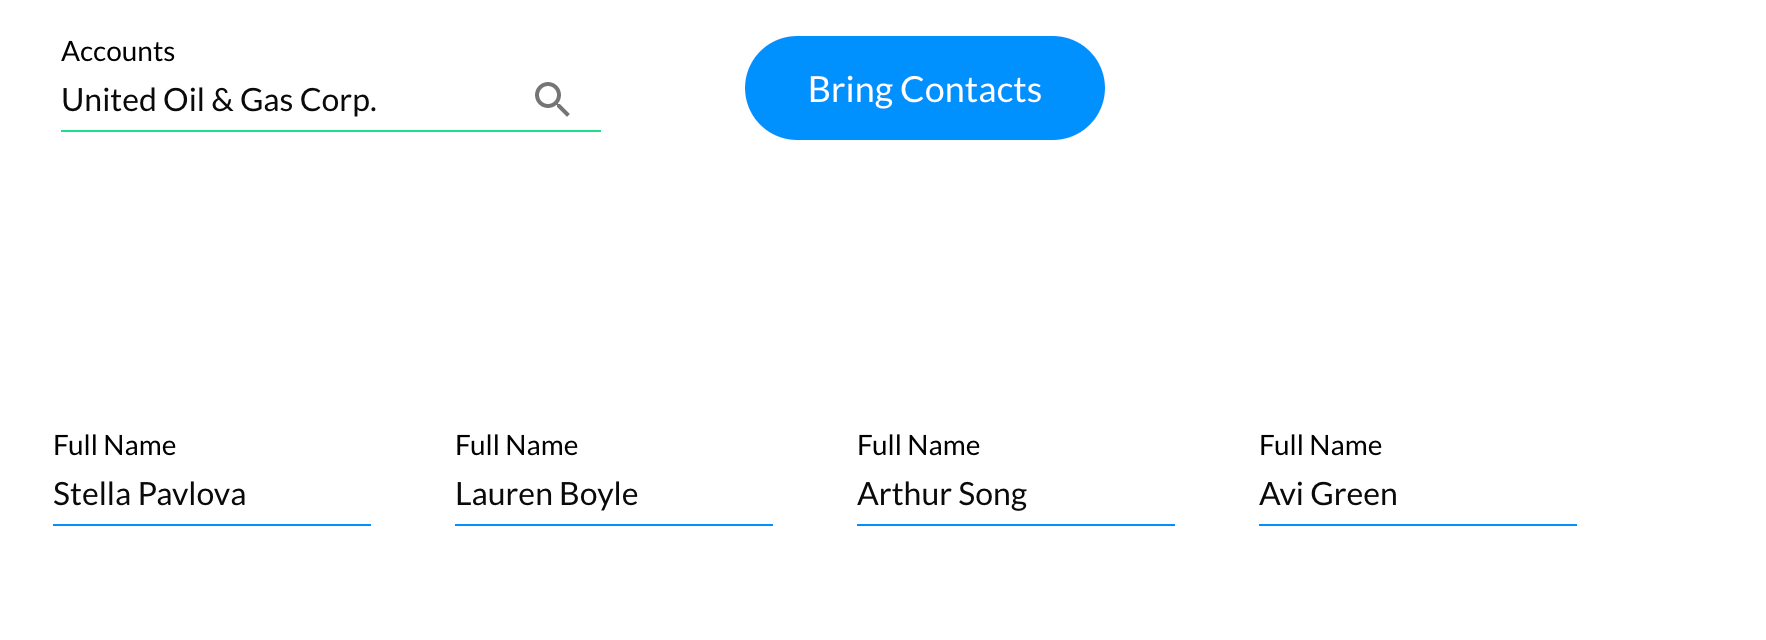
3. Click the Save and Preview buttons to view your data from the Lookup.
4. When previewing your Lookup data, notice that the data is called to your project automatically in repeated columns for easy viewing based on the number of contacts returned.
08 How to Create a Repeat Container for Data
Another way to repeat data is to use a repeat container.
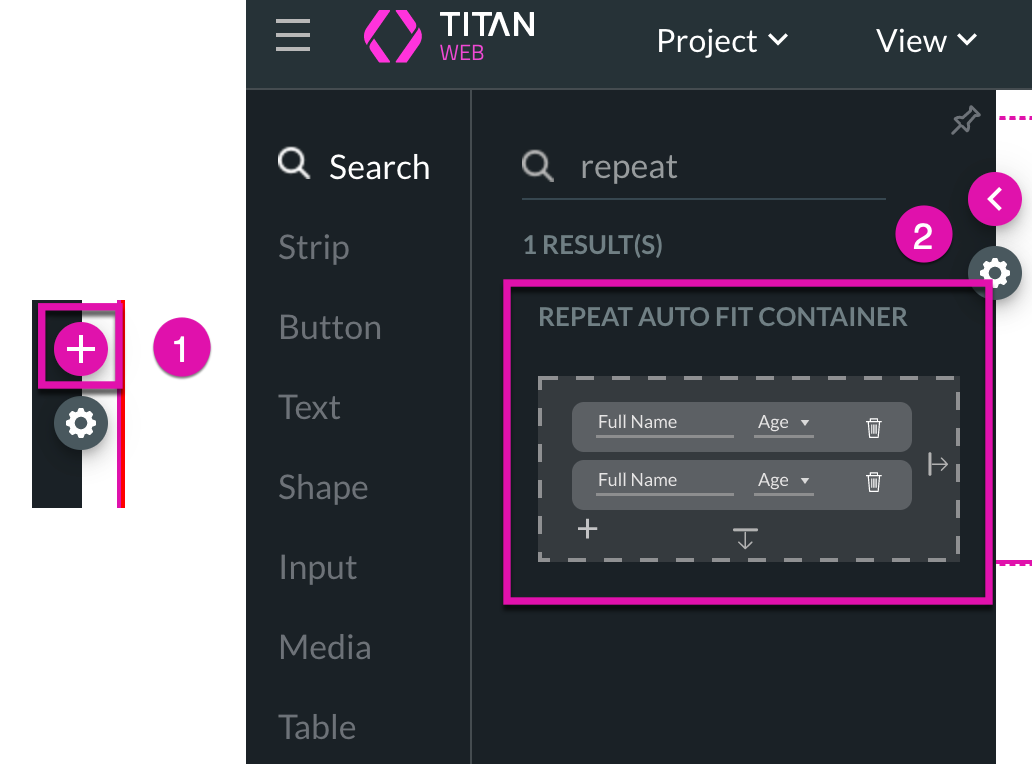
1. Click the + button to add a Repeat Auto Fit Container from the Elements list to your web project.
2. Add a Text Input field to the Repeat Auto Fit Container.
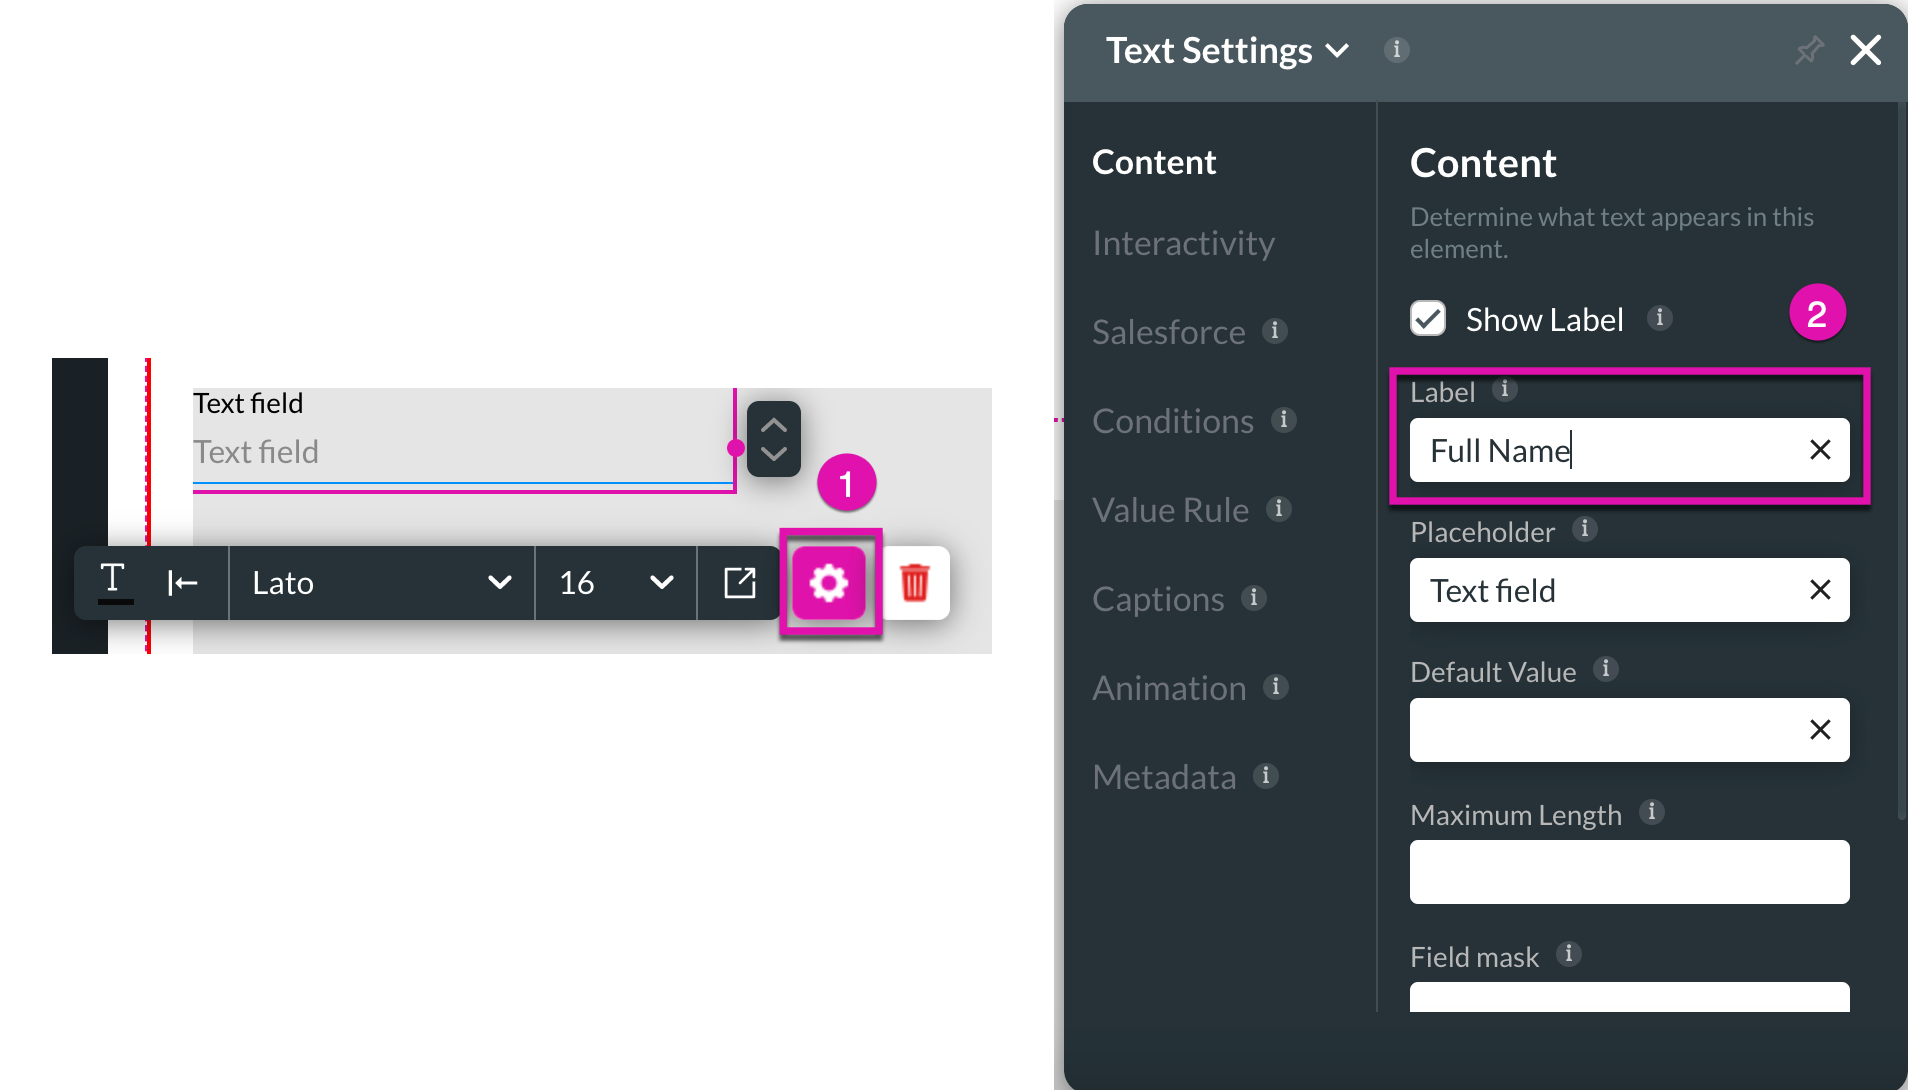
3. Click the Text field gear icon and edit the label under Content settings.
4. Click on your Text field and choose the arrow icon to display your data vertically.

5. Access the Salesforce menu to map your Text Input field and click on the Contact action configured earlier in the tutorial.

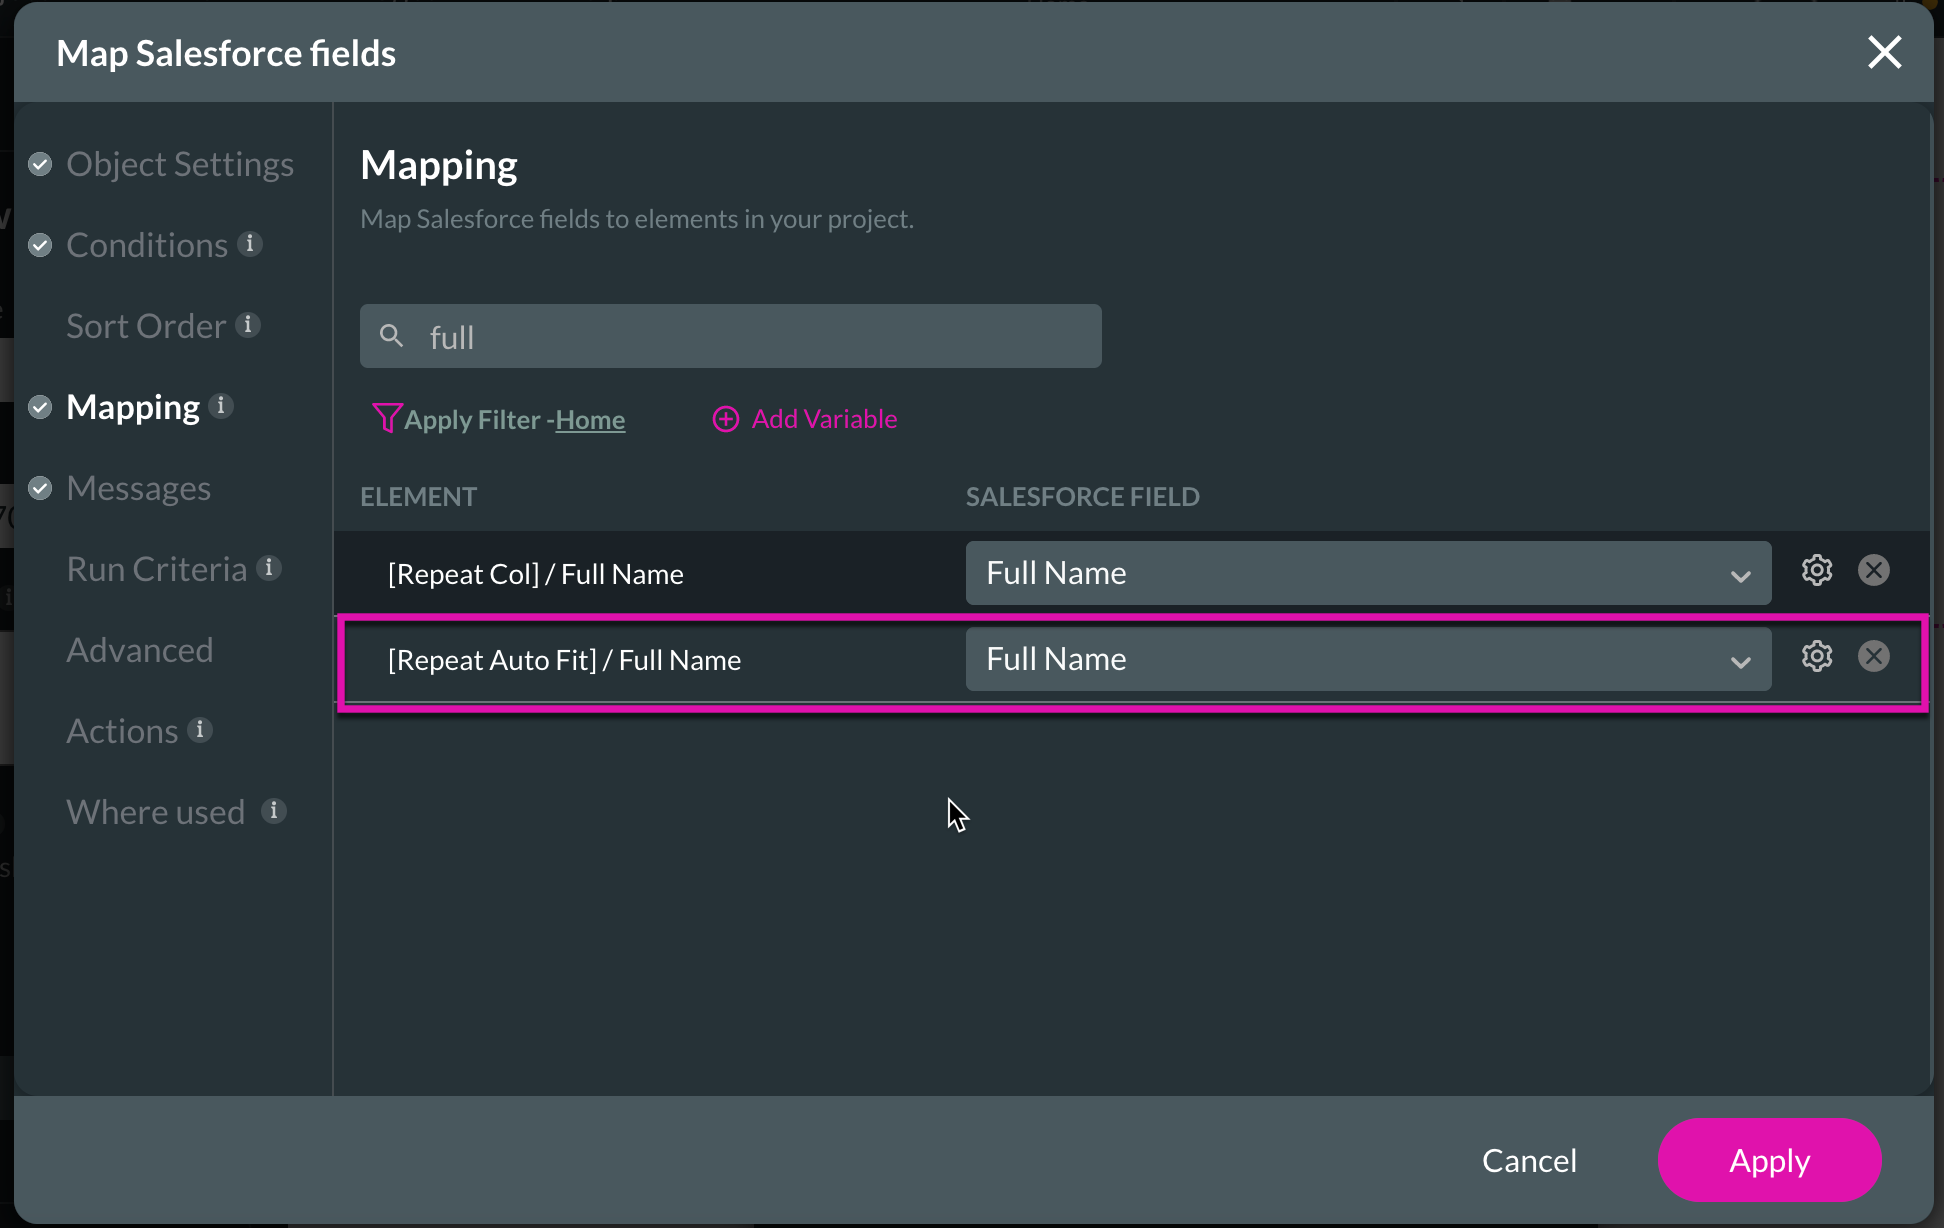
6. Select the Mapping section and add Full Name to the Repeat Auto Fit Container before clicking Apply.
7. Click the Save and Preview buttons to view your data from a Lookup.
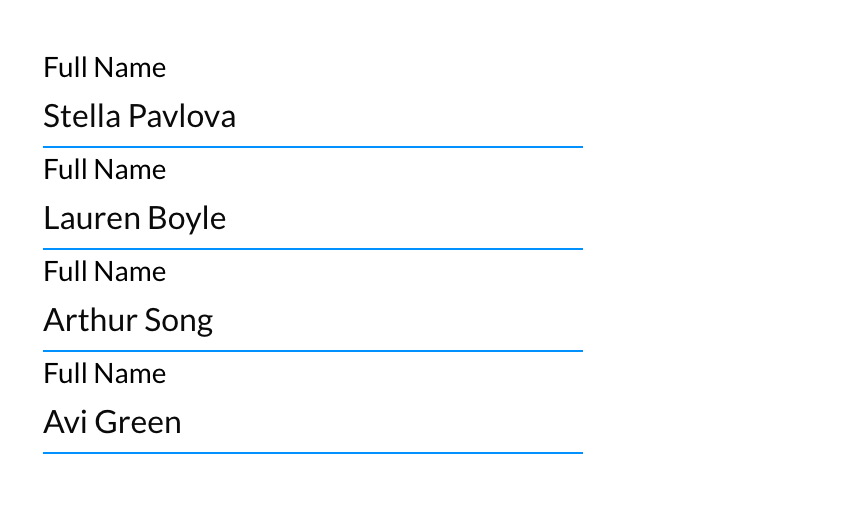
8. When previewing your Lookup data, notice that the data is called to your project automatically in a list format in your Repeat Auto Fit Container based on the number of contacts returned for easy viewing.
1. Click the + button to add a Repeat Auto Fit Container from the Elements list to your web project.
2. Add a Text Input field to the Repeat Auto Fit Container.
3. Click the Text field gear icon and edit the label under Content settings.
4. Click on your Text field and choose the arrow icon to display your data vertically.
5. Access the Salesforce menu to map your Text Input field and click on the Contact action configured earlier in the tutorial.
6. Select the Mapping section and add Full Name to the Repeat Auto Fit Container before clicking Apply.
7. Click the Save and Preview buttons to view your data from a Lookup.
8. When previewing your Lookup data, notice that the data is called to your project automatically in a list format in your Repeat Auto Fit Container based on the number of contacts returned for easy viewing.
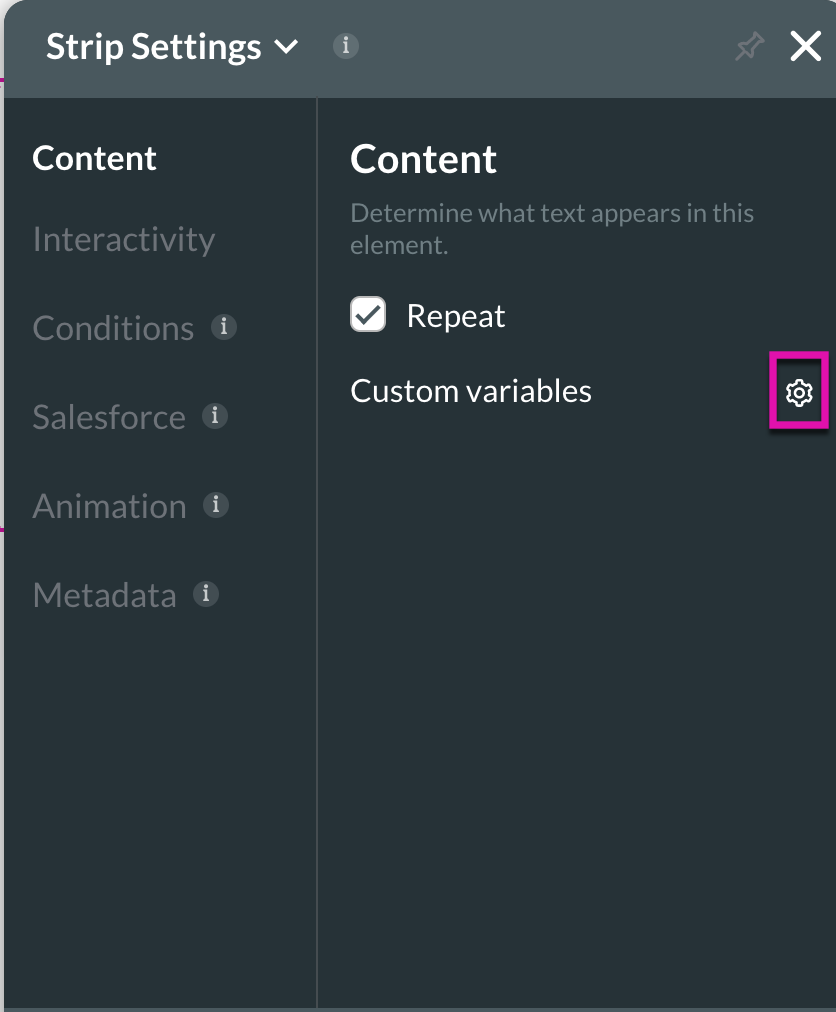
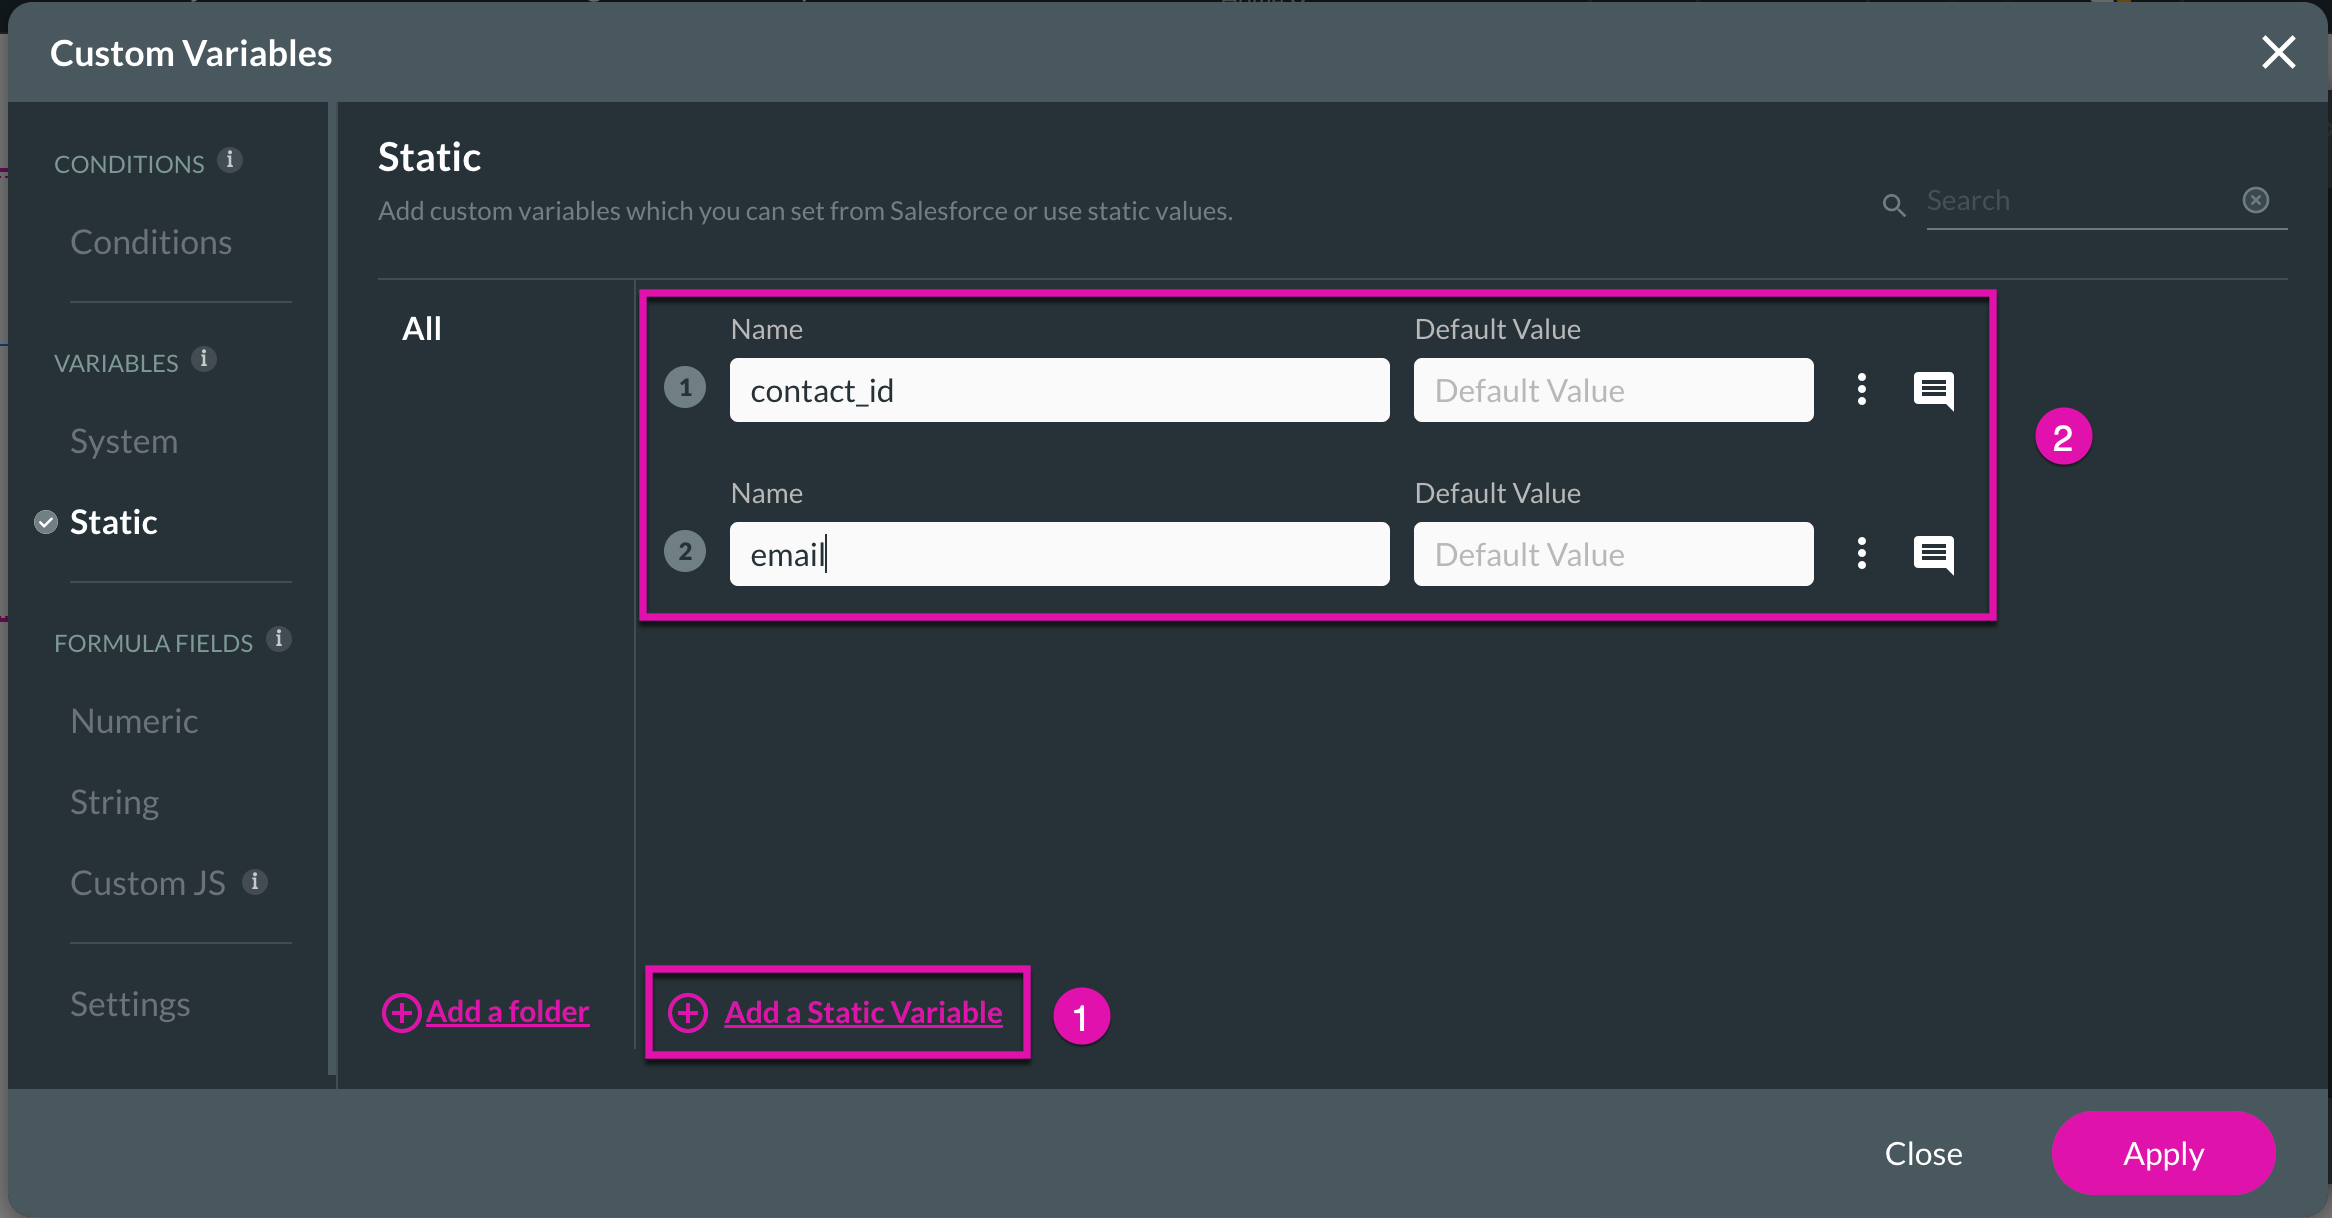
09 Setting Custom Variables
1. Go to Strip Settings and click the gear icon next to Custom Variables.
2. Add variables that will repeat alongside the repeat strip. To do this, click the + Add a Static Variable button and fill out the fields you have left before clicking Apply.
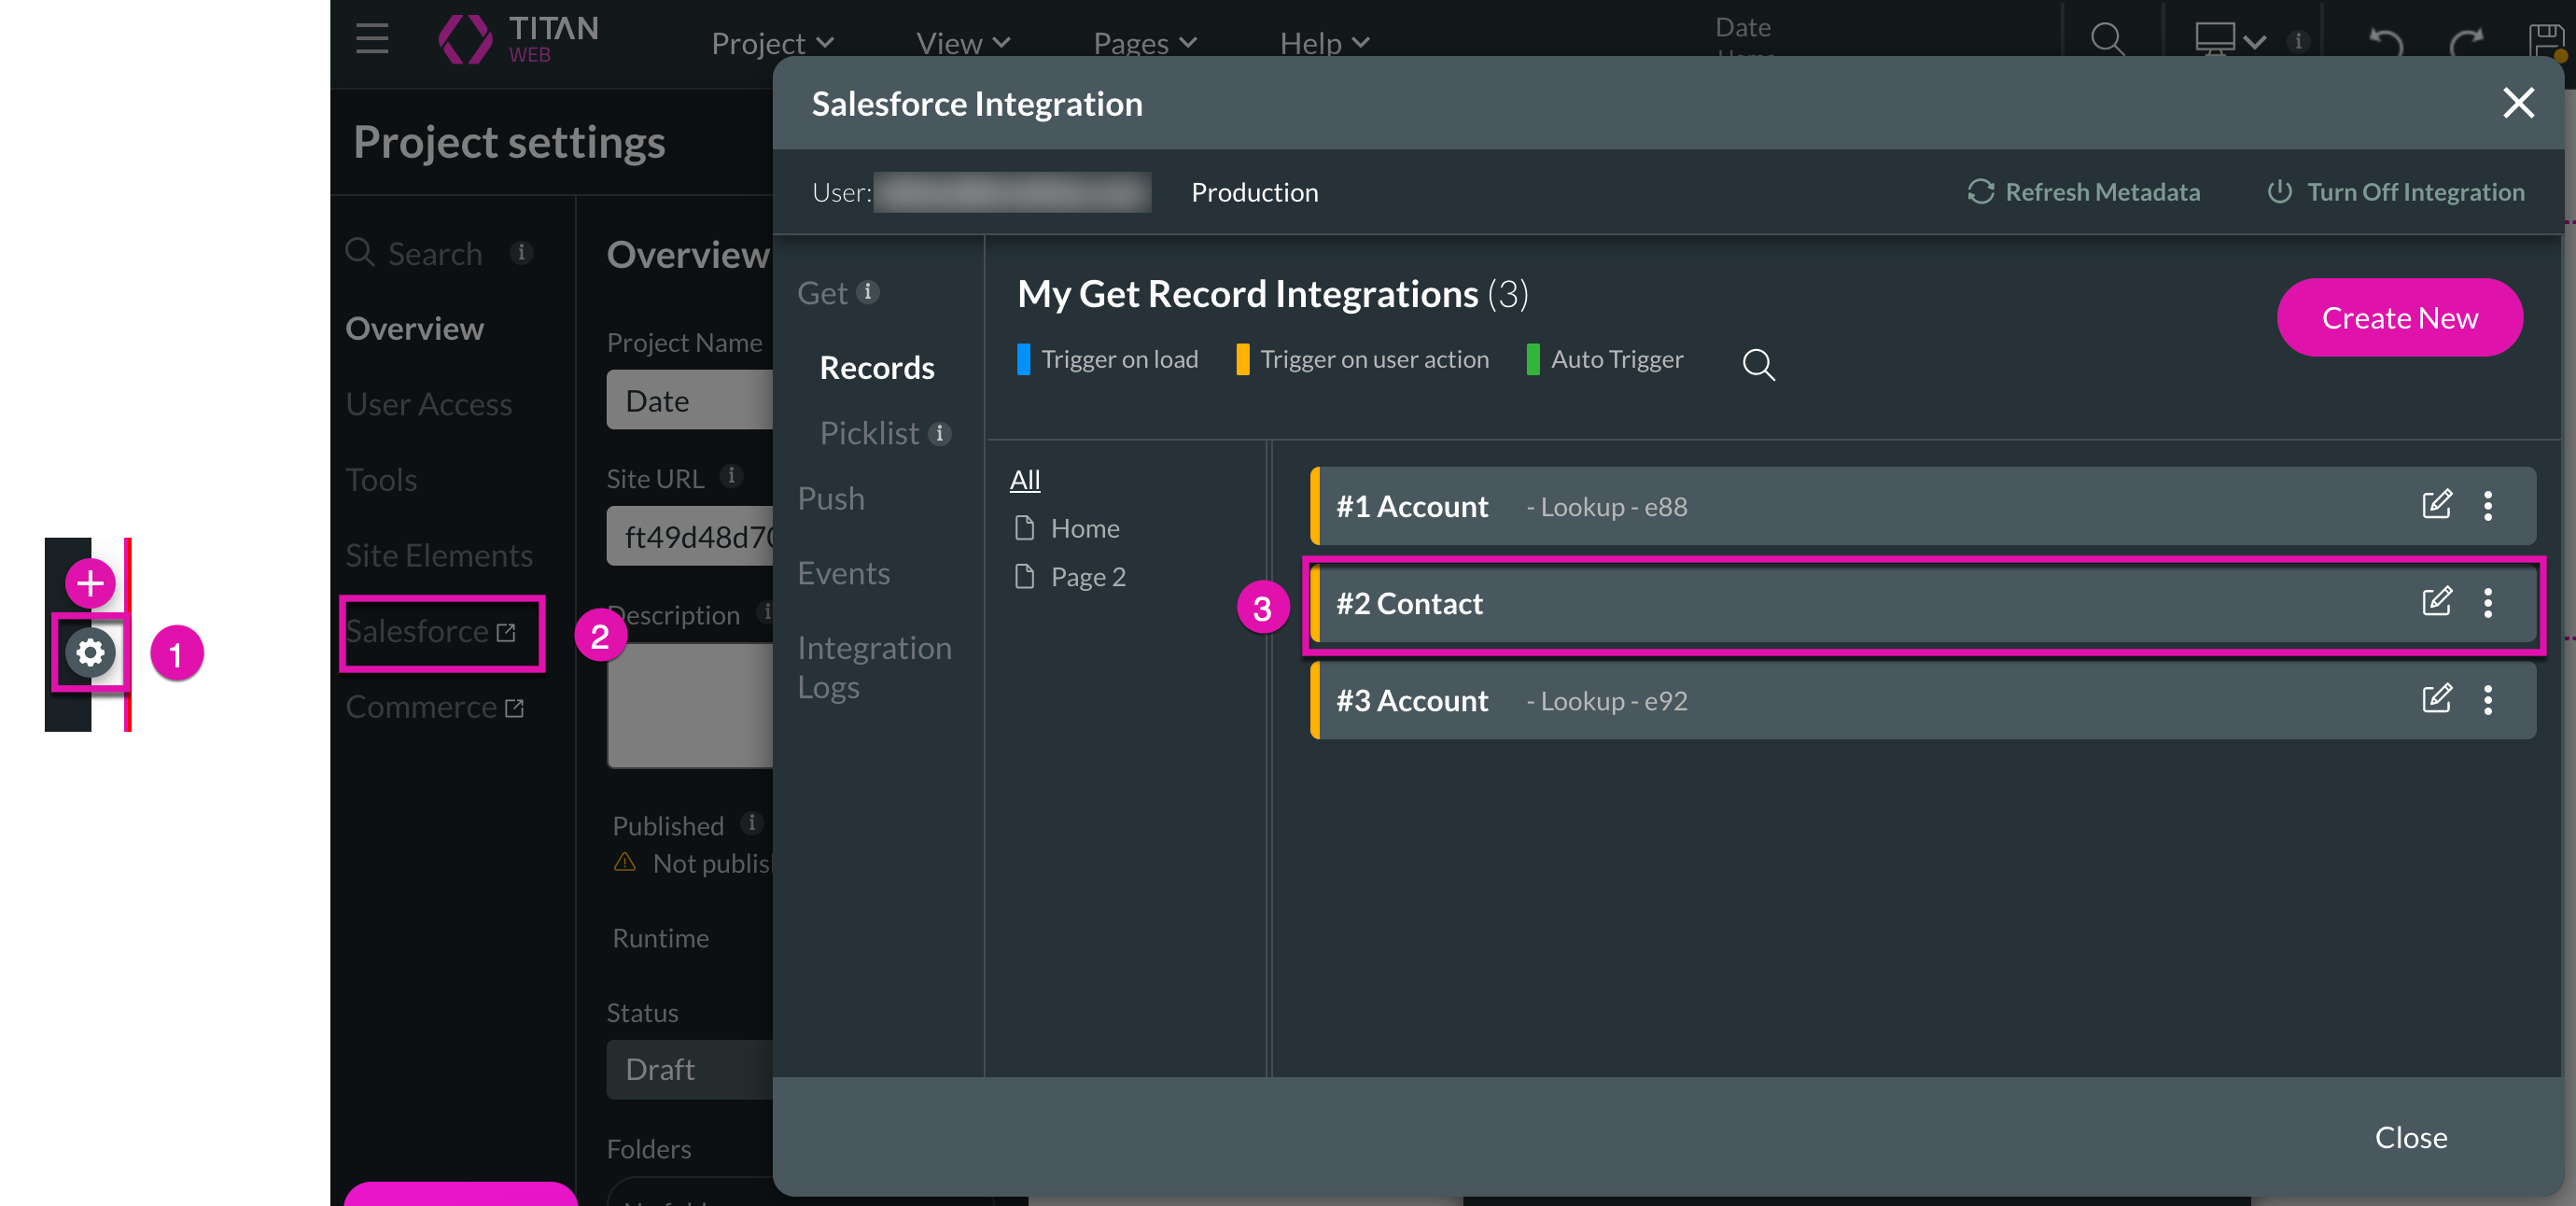
3. Access the Salesforce menu to map your variables and click on the Contact Get configured earlier in the tutorial.
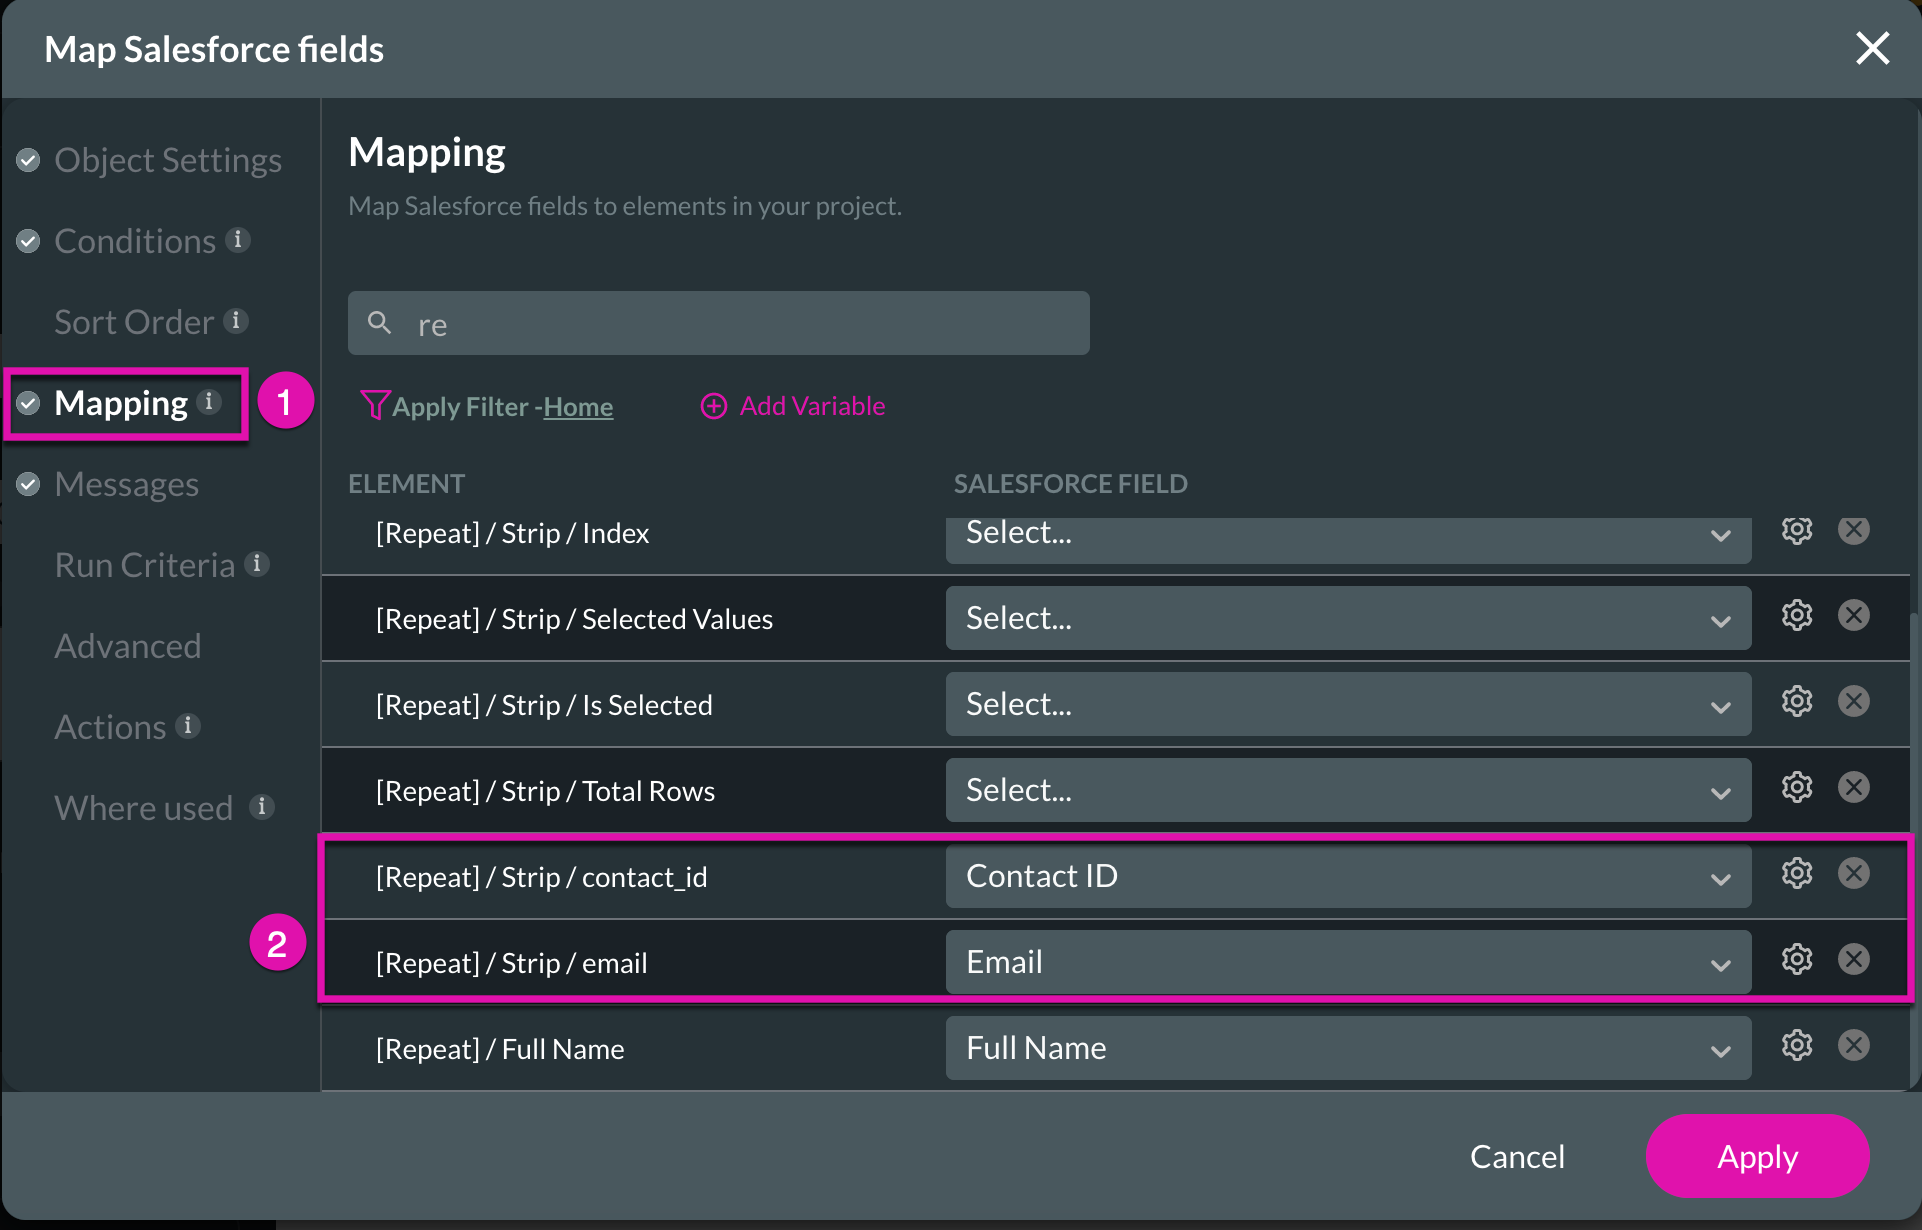
4. Click on the Mapping section and map your variables using the drop-down menus.
5. Click on the Apply button once configured.
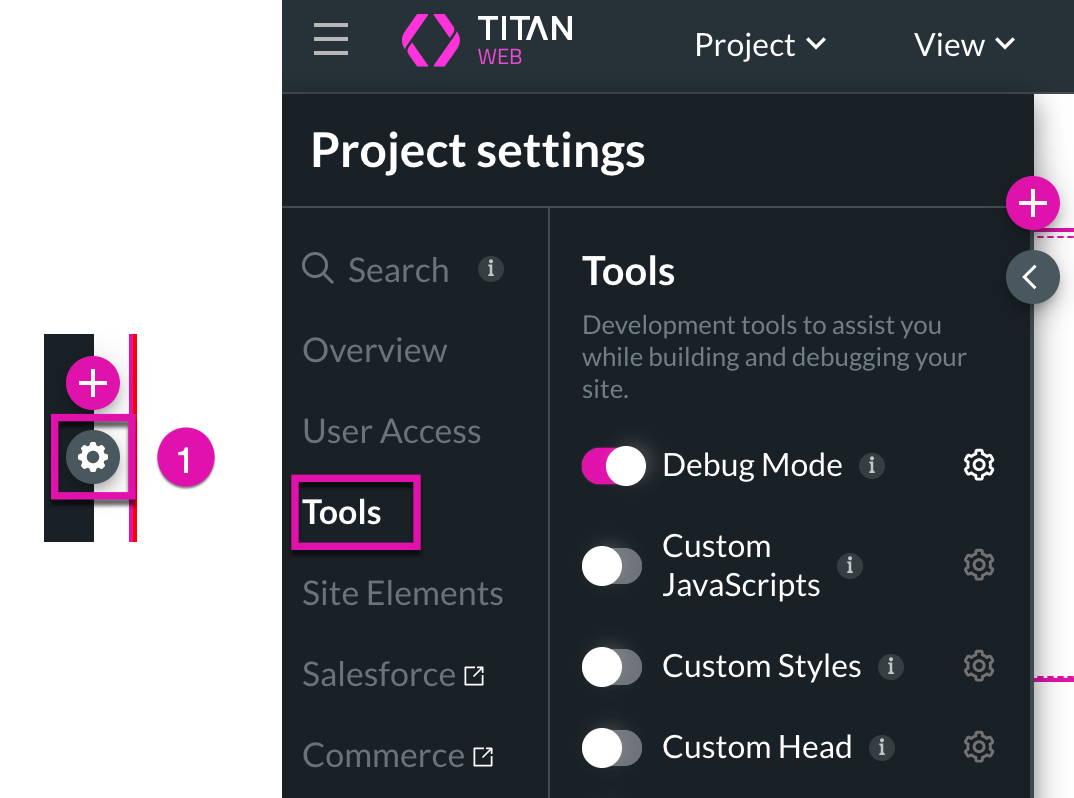
6. Click on the gear icon and select the Tools option from the menu.
7. Continue to turn on Debug mode by flipping the toggle switch to on to see the variables in action.
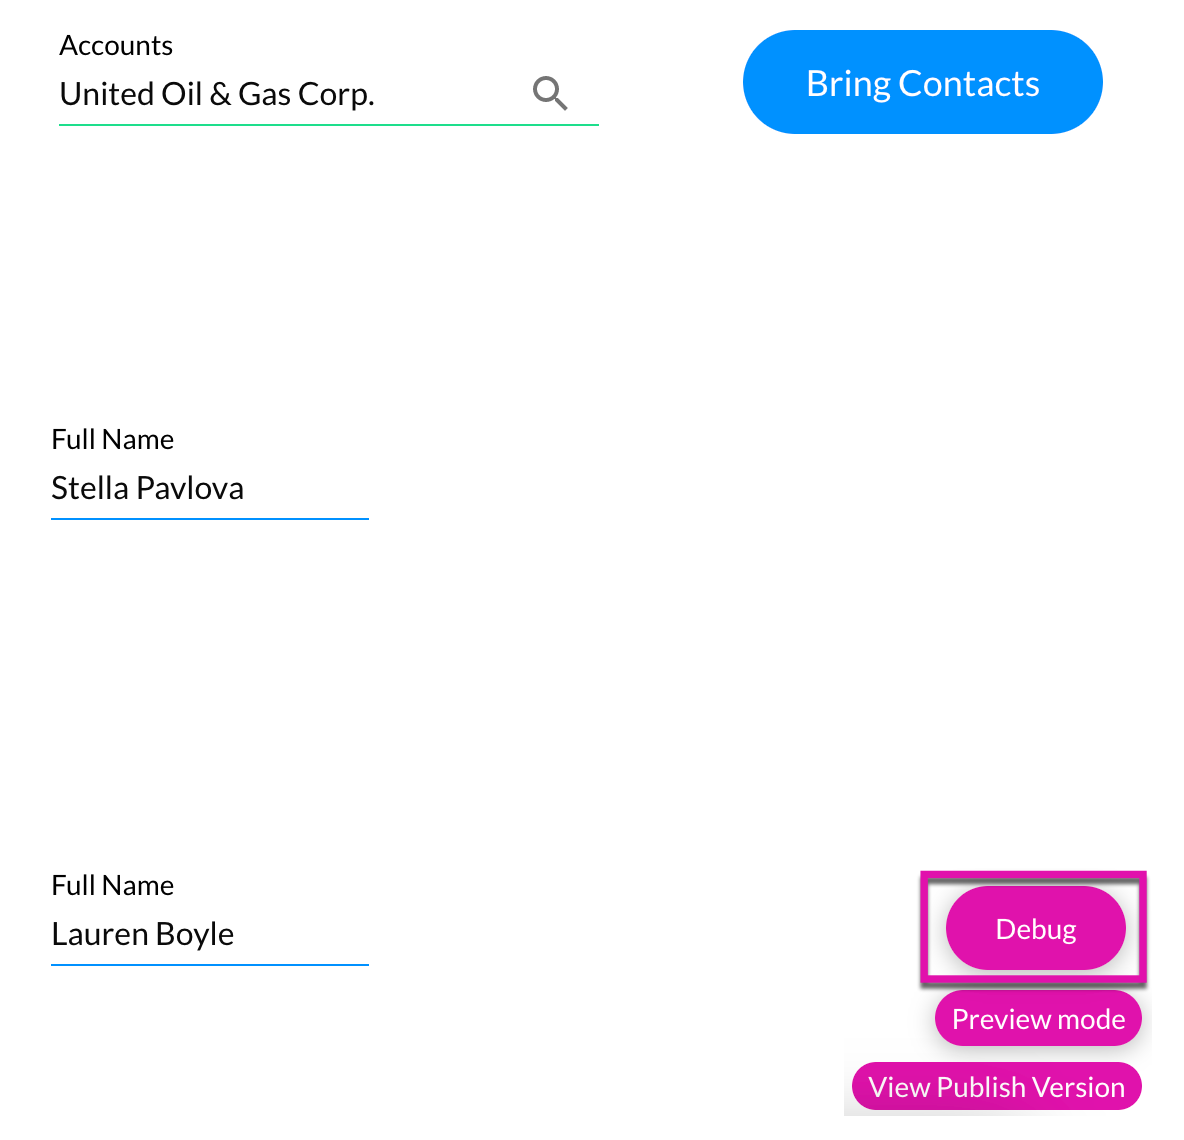
8. Click the Save and Preview buttons to view your data from a Lookup.
9. Test your project in preview mode, and then click the Debug button to view the strip variables.
10. View the full Debug Project details.

2. Add variables that will repeat alongside the repeat strip. To do this, click the + Add a Static Variable button and fill out the fields you have left before clicking Apply.
3. Access the Salesforce menu to map your variables and click on the Contact Get configured earlier in the tutorial.
4. Click on the Mapping section and map your variables using the drop-down menus.
5. Click on the Apply button once configured.
6. Click on the gear icon and select the Tools option from the menu.
7. Continue to turn on Debug mode by flipping the toggle switch to on to see the variables in action.
8. Click the Save and Preview buttons to view your data from a Lookup.
9. Test your project in preview mode, and then click the Debug button to view the strip variables.
10. View the full Debug Project details.
10 Pushing Data Back to Salesforce using a Repeat Strip
This will be split into sections to cover the setup forms and buttons.
11 Initial Set Up - Form
1. Add a form element to your project using the + button.
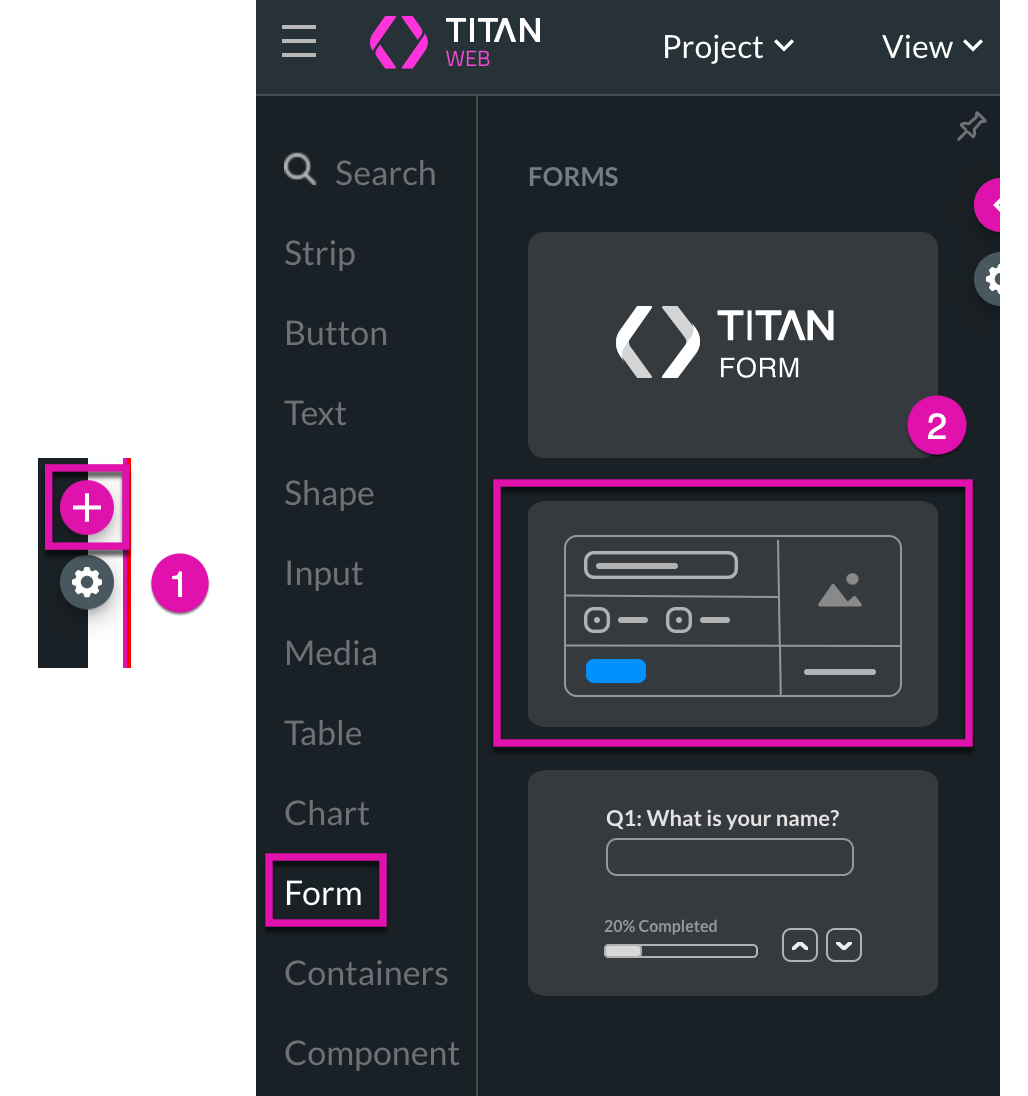
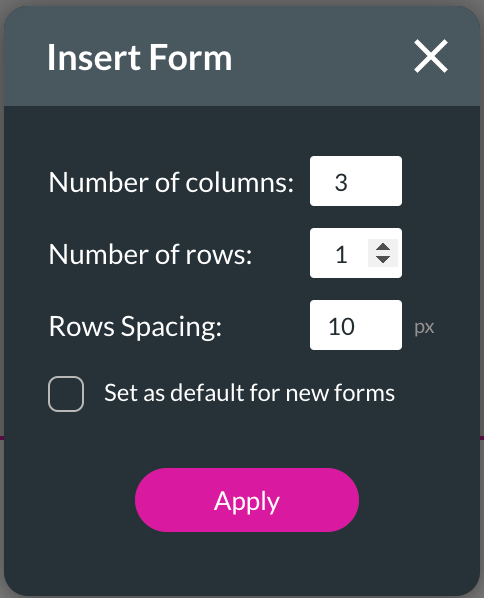
2. Configure the number of columns and rows for your form and click on Apply in the popup notification.
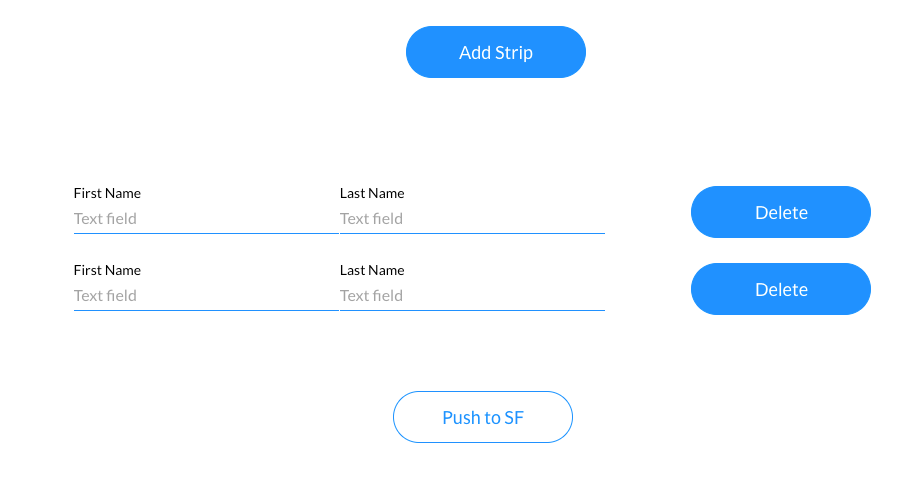
3. Drag and drop a text input field into two cells of the form and a button into the last cell.
It is essential to pay attention to the placement of your buttons.
If the button is placed inside the repeat strip, the action is repeated for that section only.
The action will run across multiple strips when the button is outside the repeat strip.

4. Rename the Text Input fields to First Name and Last Name under Content Settings.
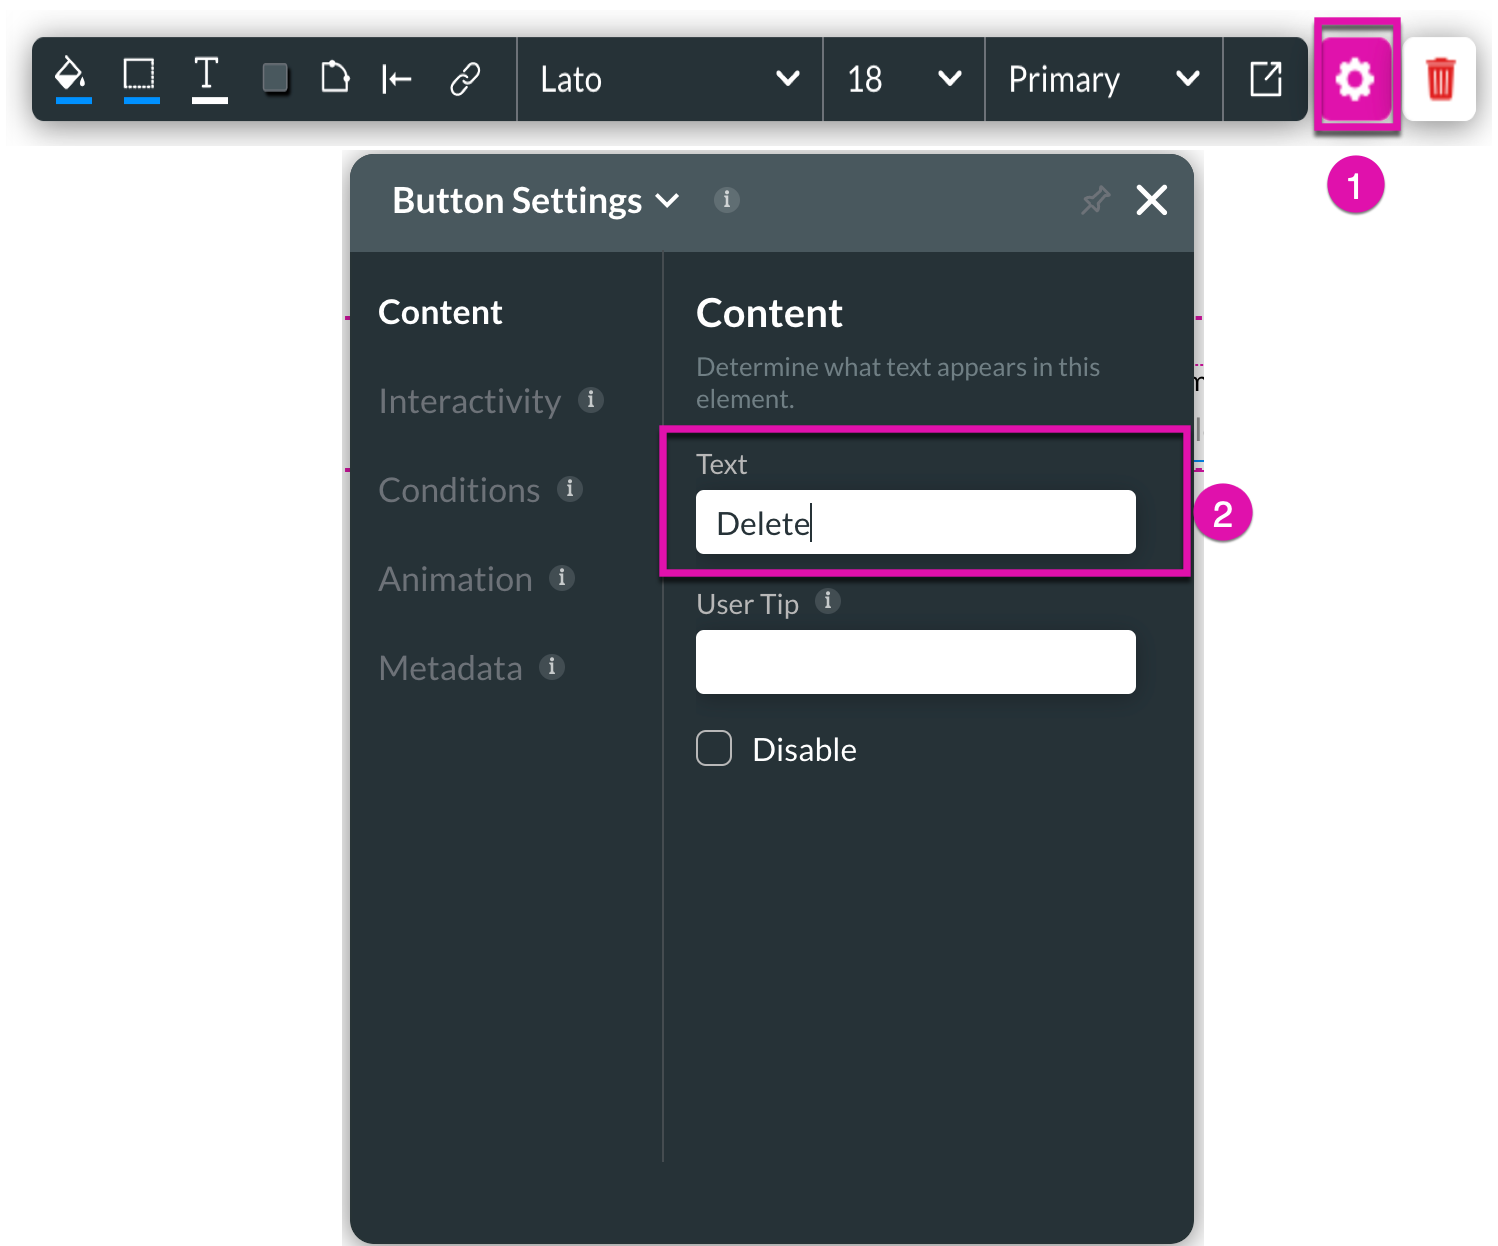
5. Rename the button to Delete under Content Settings.
6. Set up the Delete button by clicking the on-click action button.

7. Choose Strip Interactivity from the Element Activity list.

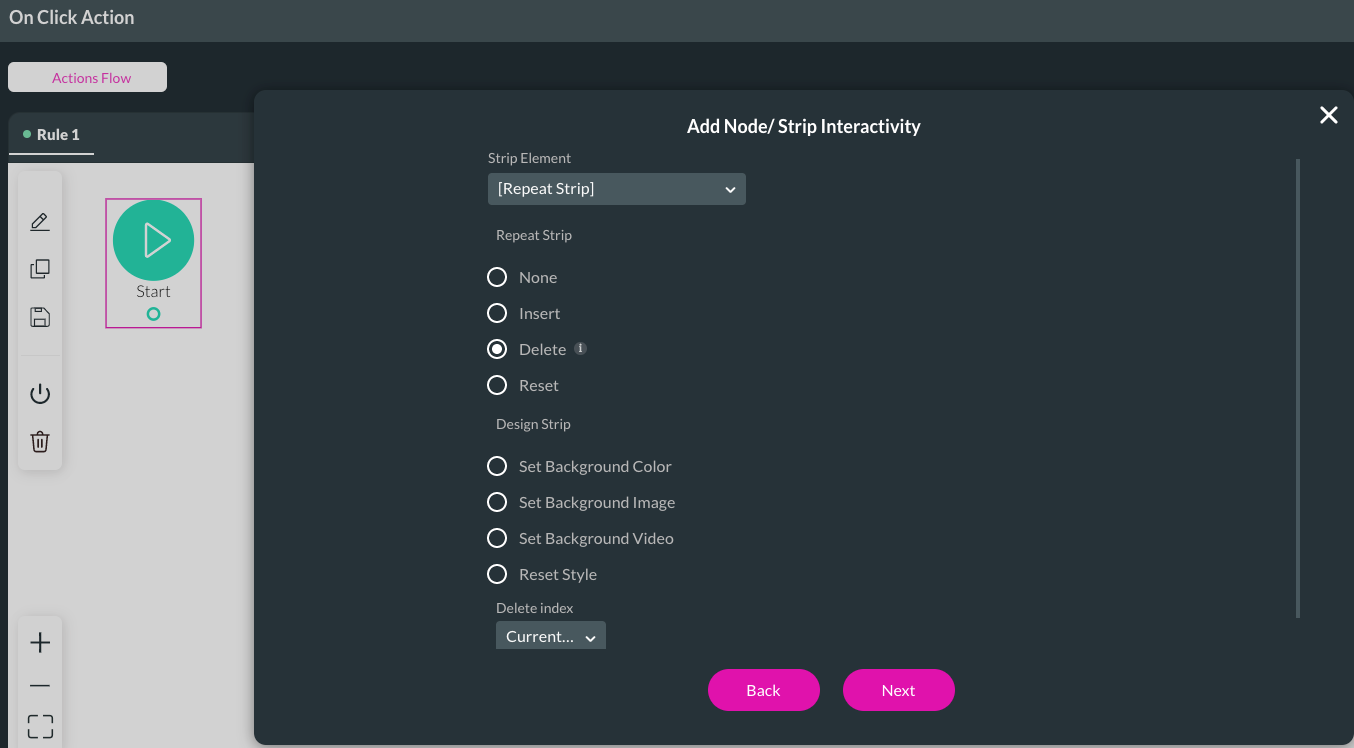
8. Choose Repeat Strip from the Strip Element drop-down menu, the Delete radio button, and the Current Index option before clicking Next.
2. Configure the number of columns and rows for your form and click on Apply in the popup notification.
3. Drag and drop a text input field into two cells of the form and a button into the last cell.
It is essential to pay attention to the placement of your buttons.
If the button is placed inside the repeat strip, the action is repeated for that section only.
The action will run across multiple strips when the button is outside the repeat strip.
4. Rename the Text Input fields to First Name and Last Name under Content Settings.
5. Rename the button to Delete under Content Settings.
6. Set up the Delete button by clicking the on-click action button.
7. Choose Strip Interactivity from the Element Activity list.
8. Choose Repeat Strip from the Strip Element drop-down menu, the Delete radio button, and the Current Index option before clicking Next.
12 Initial Set Up - Button
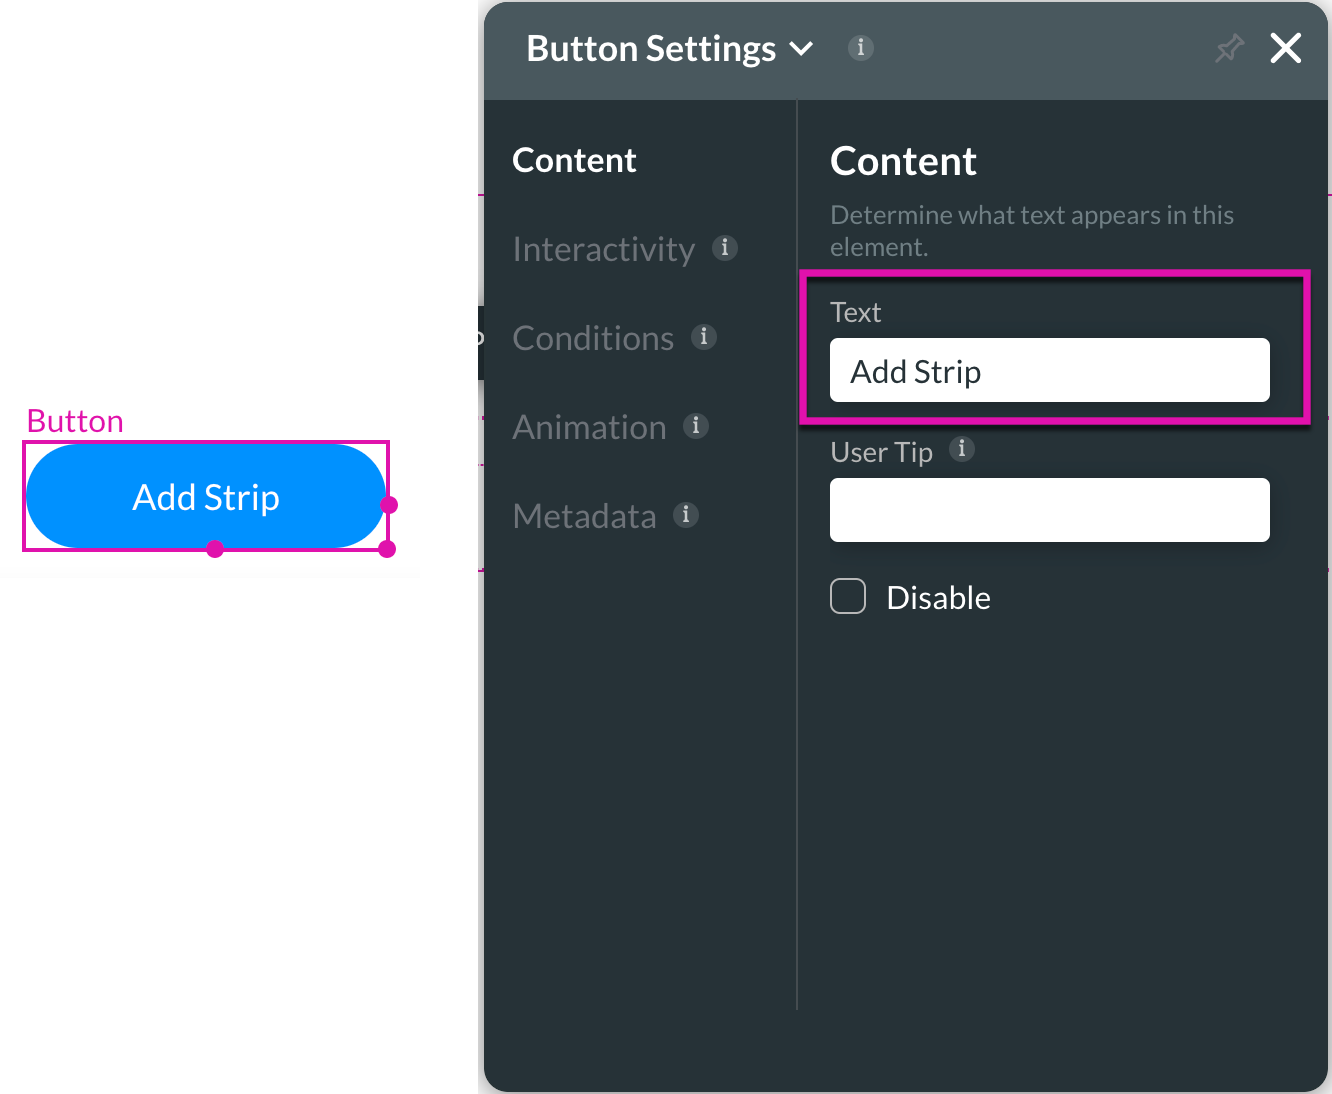
1. Add another button to your project and rename Add Strip under Content Settings.
2. Set up the Add Strip button by clicking the on-click action button.
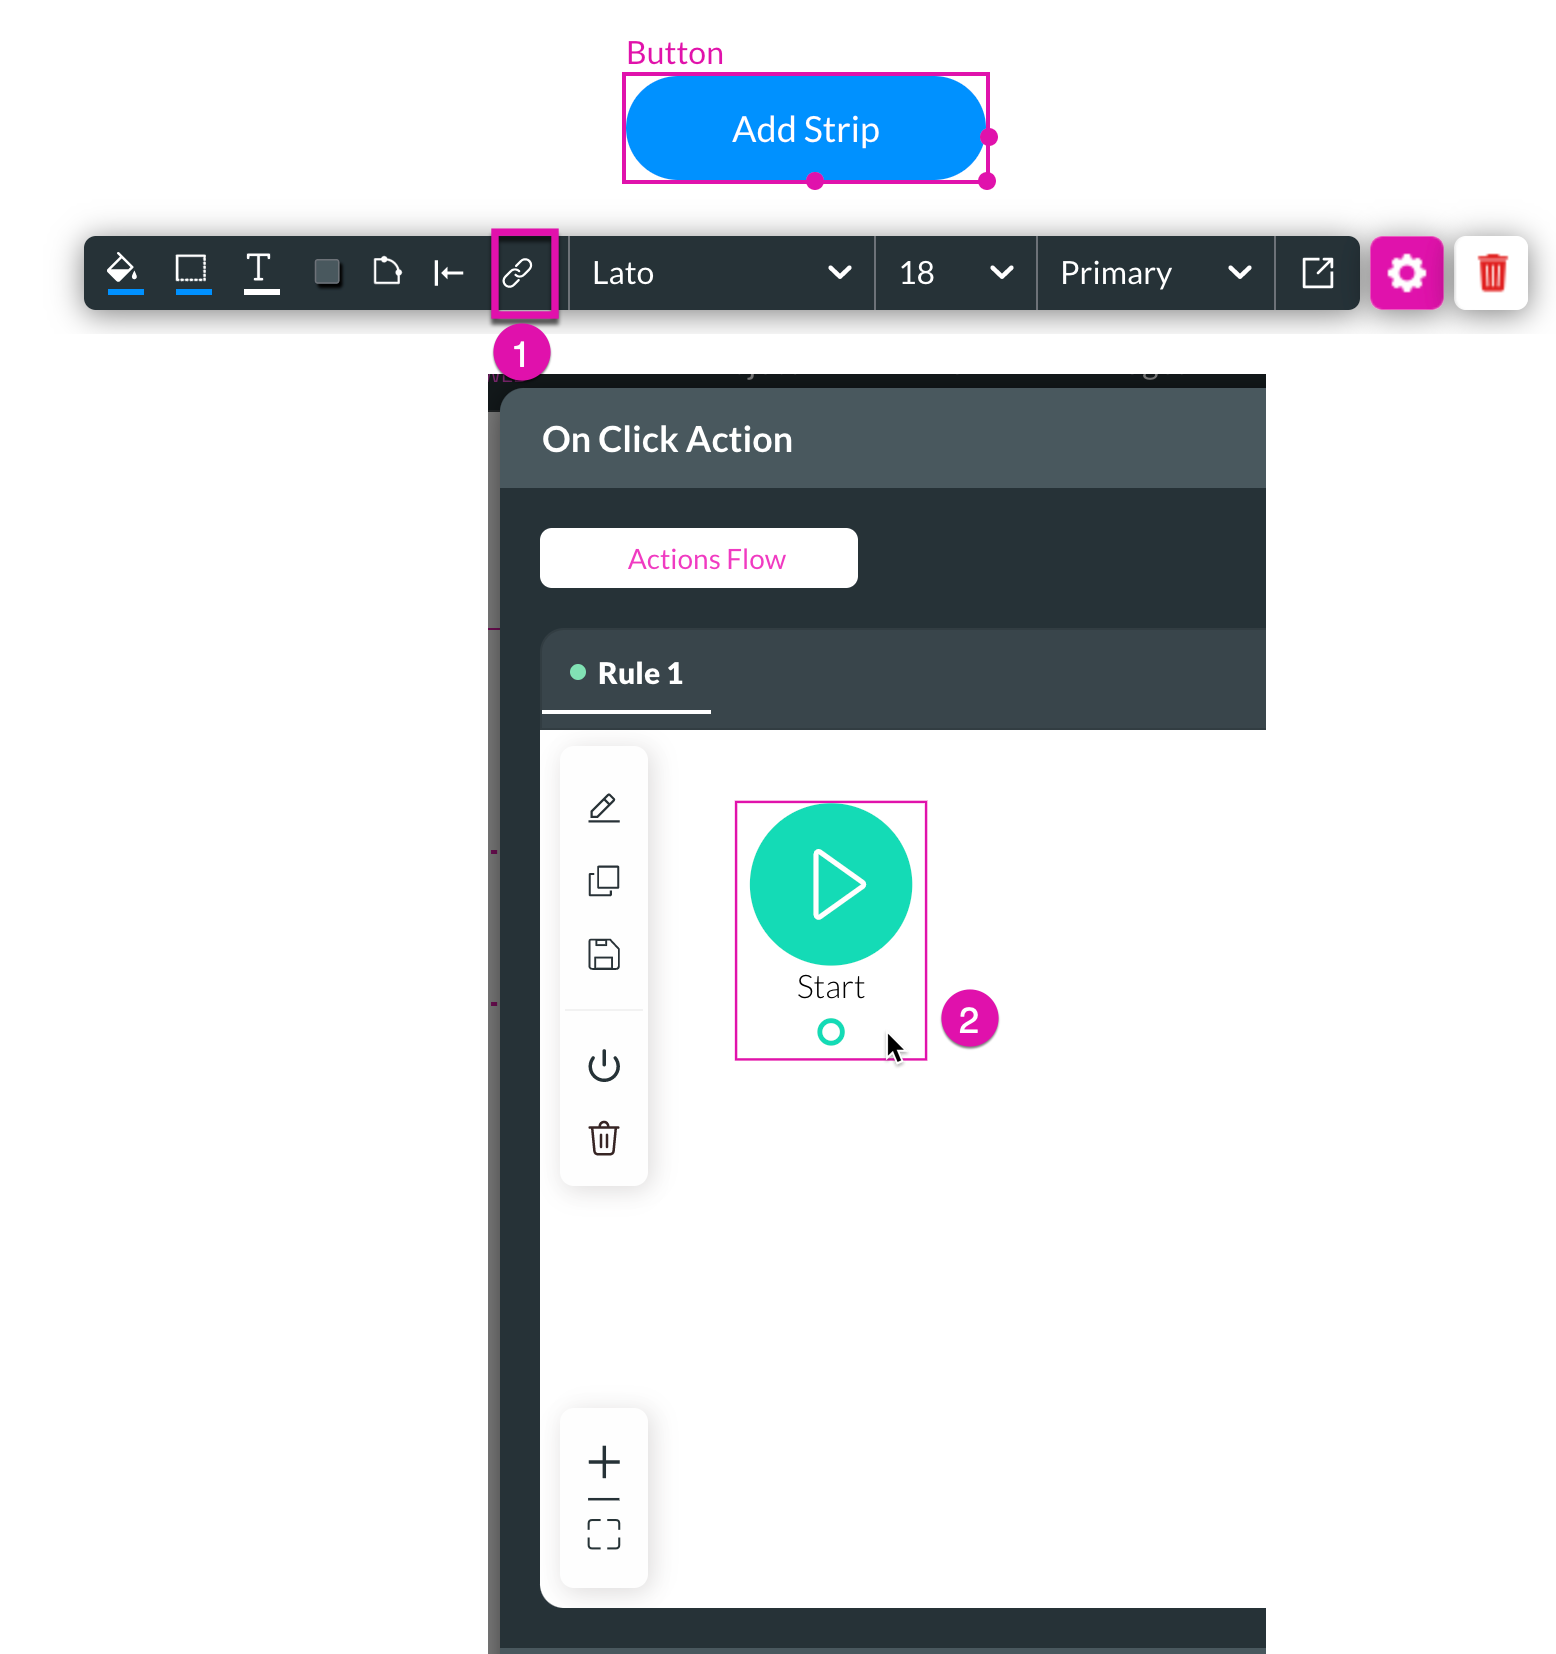
3. Choose Strip Interactivity from the Element Activity list.

4. Choose Repeat Strip from the Strip Element drop-down menu and select the Insert radio button before clicking Next.
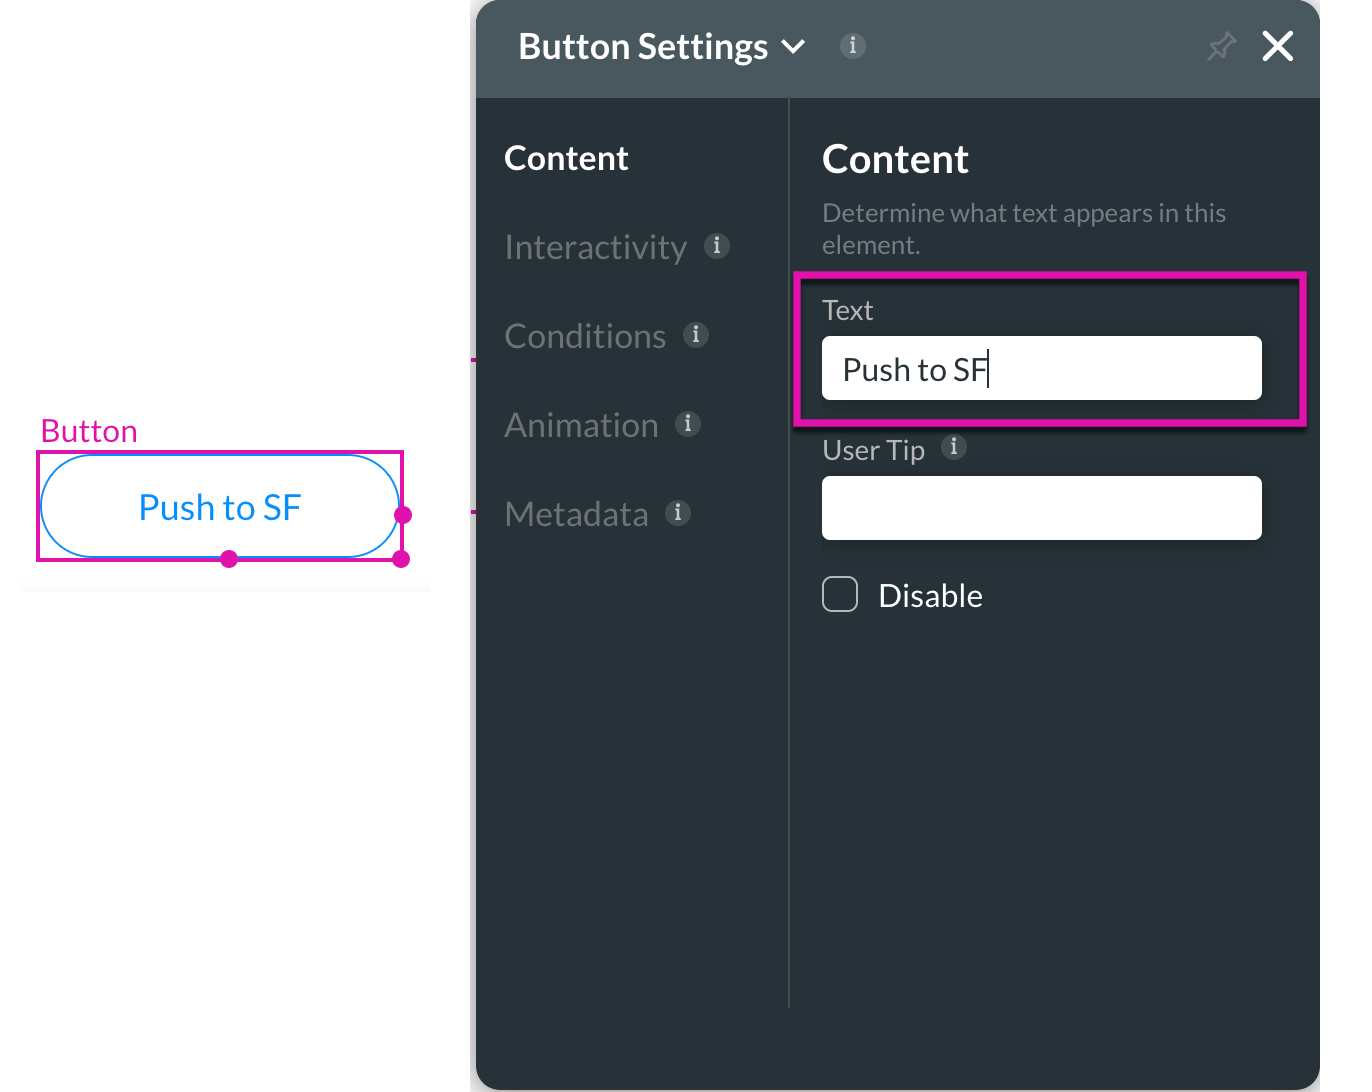
5. Add a third button to your project and rename it as Push to Salesforce under Content Settings.
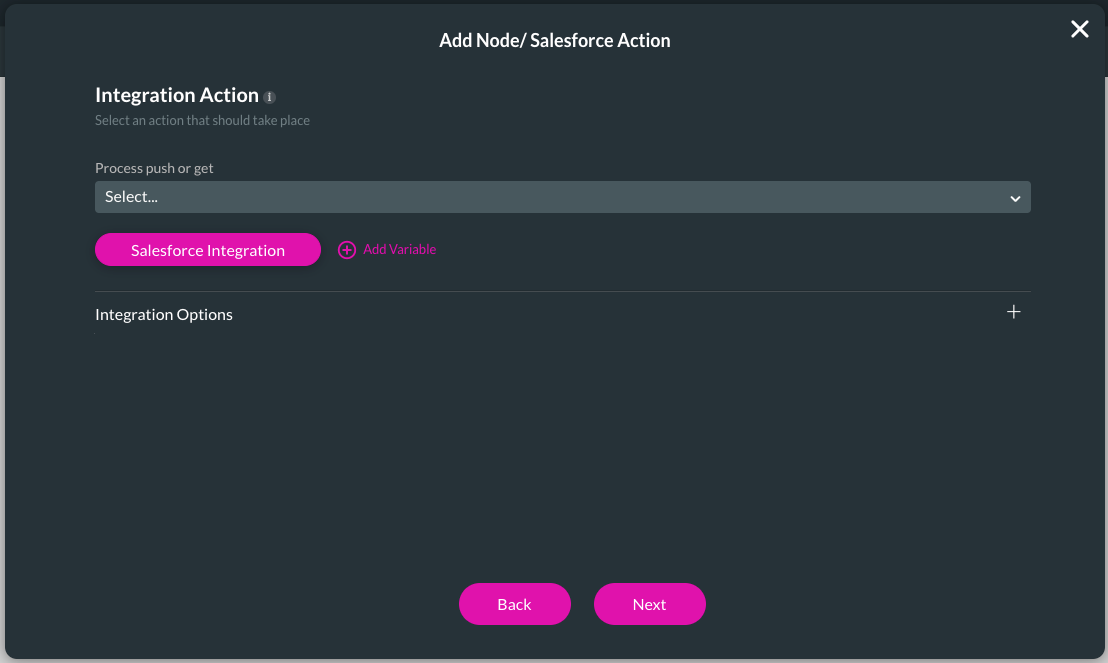
6. Set up the Push to Salesforce button by clicking the on-click action button and selecting a Salesforce action this time.

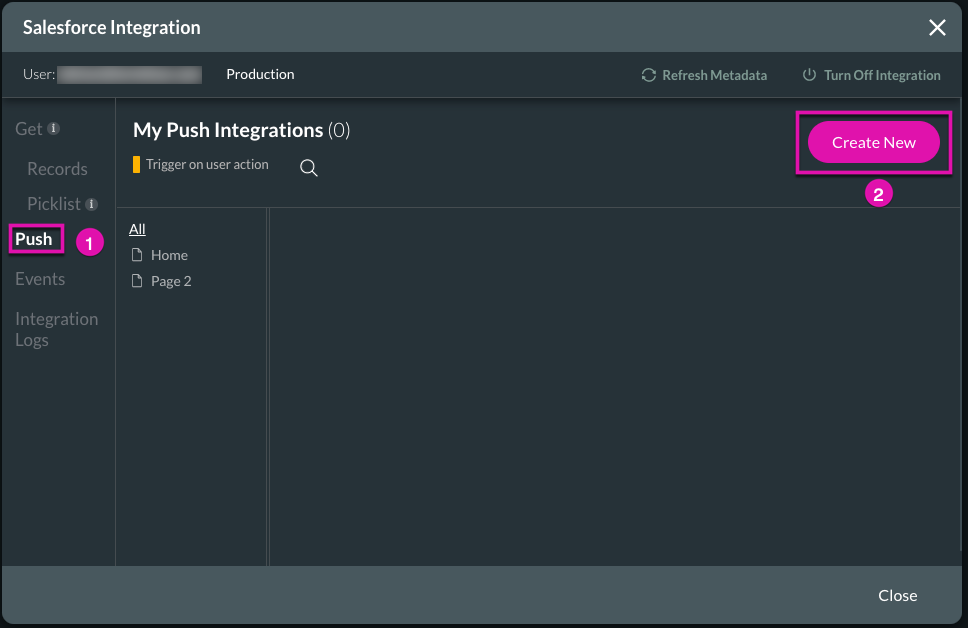
7. Click on the Salesforce Integration button.
8. Select Push in the side menu and click the Create New.
9. Configure your Object Settings.
10. Configure your Mapping and then click on the Apply button.
11. Add your integration action and click on the Next button.
12. Click the Save and Preview buttons to push your data to Salesforce.
13. Test your project: The Add Strip button should add text fields, the Delete button should delete text fields, and the Push to SF button should push your data to Salesforce.
2. Set up the Add Strip button by clicking the on-click action button.
3. Choose Strip Interactivity from the Element Activity list.
4. Choose Repeat Strip from the Strip Element drop-down menu and select the Insert radio button before clicking Next.
5. Add a third button to your project and rename it as Push to Salesforce under Content Settings.
6. Set up the Push to Salesforce button by clicking the on-click action button and selecting a Salesforce action this time.
7. Click on the Salesforce Integration button.
8. Select Push in the side menu and click the Create New.
9. Configure your Object Settings.
10. Configure your Mapping and then click on the Apply button.
11. Add your integration action and click on the Next button.
12. Click the Save and Preview buttons to push your data to Salesforce.
13. Test your project: The Add Strip button should add text fields, the Delete button should delete text fields, and the Push to SF button should push your data to Salesforce.