Nested Push to Update and Create Record and File (24 min)
Completion requirements
01 Getting Started
This tutorial will cover pushing data from your web form to Salesforce.
This includes creating a record, updating a record, and creating a file in Salesforce. This will also cover triggering a Salesforce action for a button.
This includes creating a record, updating a record, and creating a file in Salesforce. This will also cover triggering a Salesforce action for a button.
02 How to Add Rows and Columns to a Form
1. Click on the + icons to add rows and columns.
2. Hover over the row or column and click the kebab menu.
3. Select from the listed menu options to change your form.
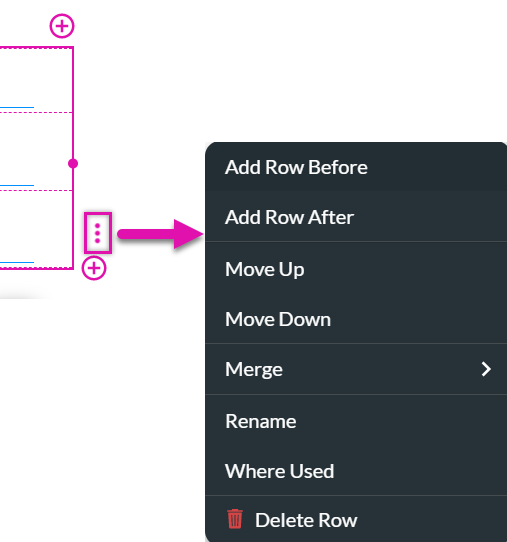
2. Hover over the row or column and click the kebab menu.
3. Select from the listed menu options to change your form.
03 File Upload
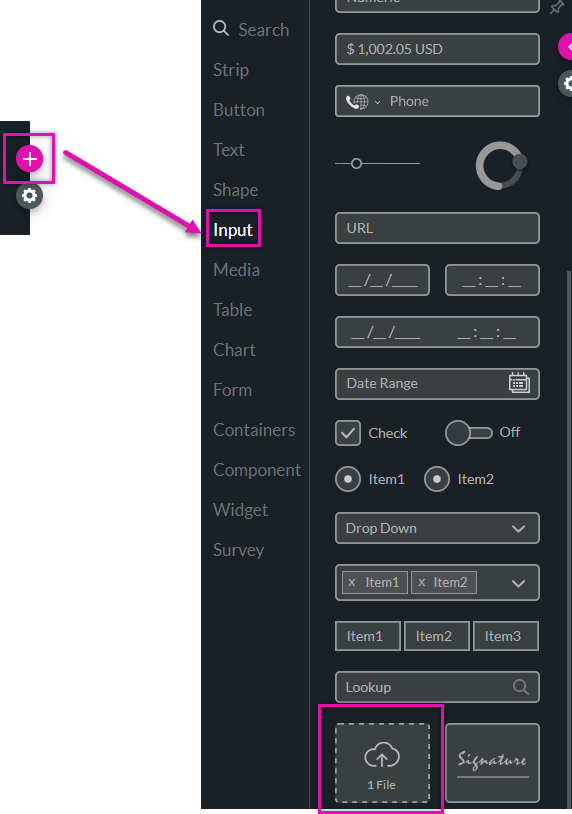
1. Select the + icon, navigate to the Input tab, and drag and drop the file upload element into the form row.
The Content Tab
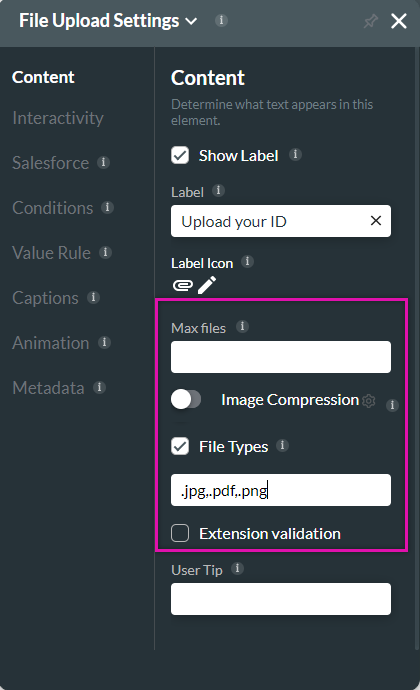
1. Use the Max Files field to set a file upload limit.
2. Enable the Image Compression switch to compress an image upload.
3. Enable the File Types function to choose what file types users must provide.
The Value Rule Tab
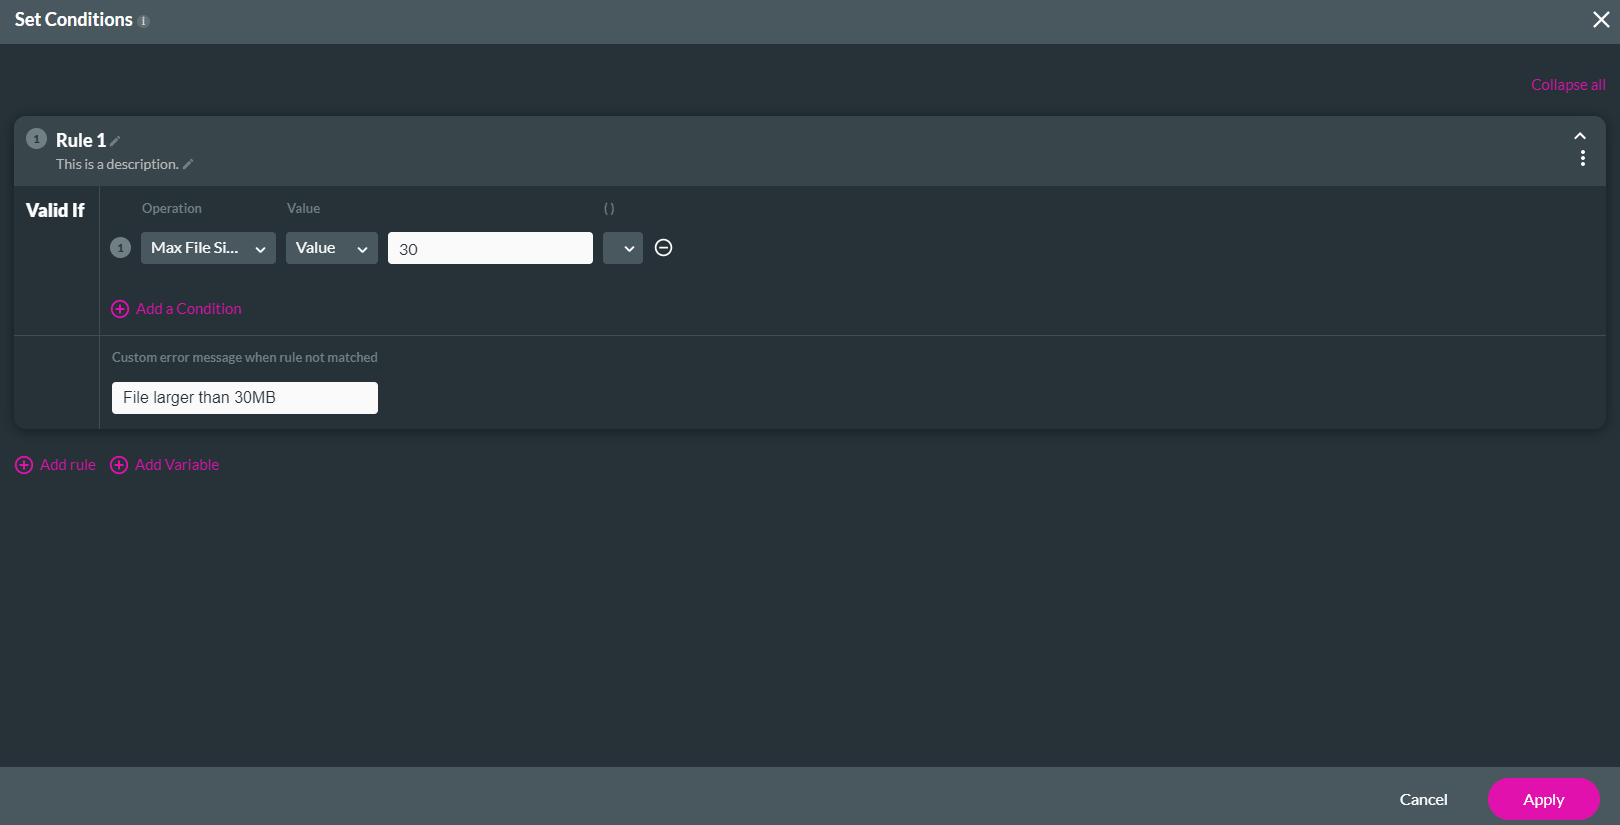
1. Select the Set Value Rules button on the Value Rule Tab. The Set Condition screen opens.
2. Set a condition rule that users cannot upload a file larger than 30MB.
There is a limitation where files larger than 30MB cannot be synced to Salesforce in one push.
3. Add a custom error message to inform users if their file is over the limit. Once your configuration is complete, click Apply.
The Content Tab
1. Use the Max Files field to set a file upload limit.
2. Enable the Image Compression switch to compress an image upload.
3. Enable the File Types function to choose what file types users must provide.

The Value Rule Tab
1. Select the Set Value Rules button on the Value Rule Tab. The Set Condition screen opens.
2. Set a condition rule that users cannot upload a file larger than 30MB.
There is a limitation where files larger than 30MB cannot be synced to Salesforce in one push.
3. Add a custom error message to inform users if their file is over the limit. Once your configuration is complete, click Apply.

04 Set Up a Push
1. Click the + icon to open the Project Settings and click the Salesforce option. The Salesforce Integration screen opens.
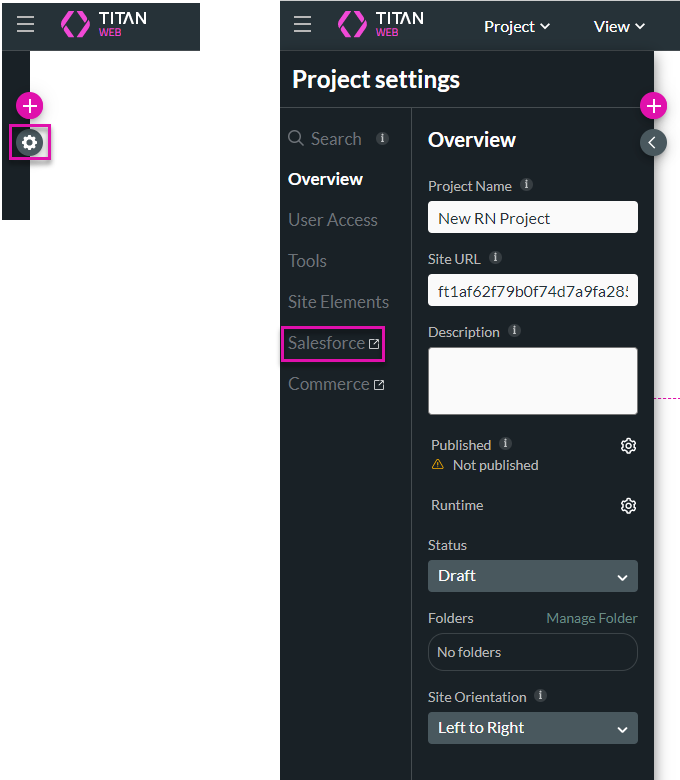
2. Select the Push option and click the Create New button. The Map Salesforce fields screen opens on Object Settings.
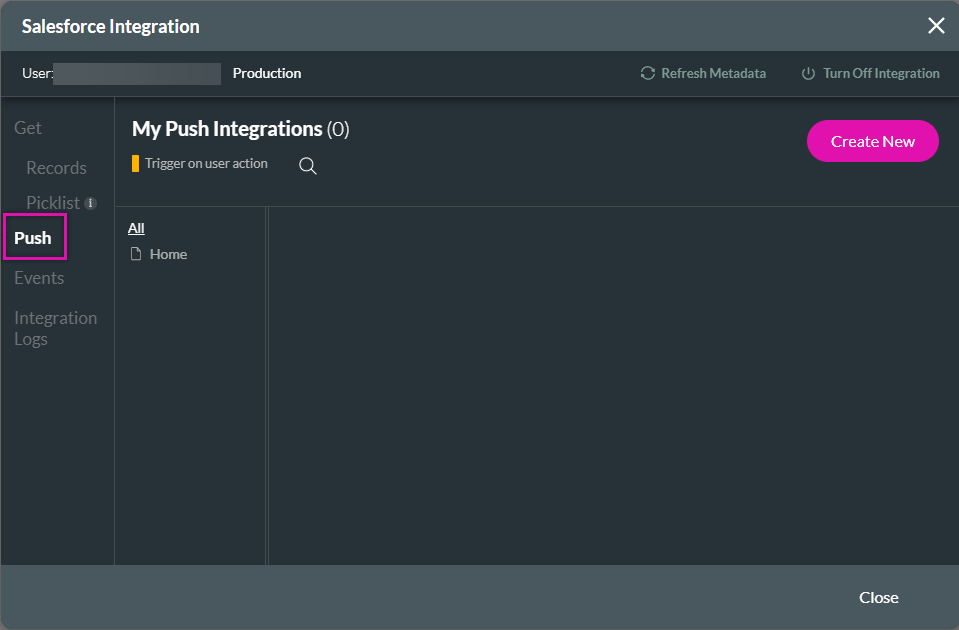

2. Select the Push option and click the Create New button. The Map Salesforce fields screen opens on Object Settings.

05 The Object Settings Tab
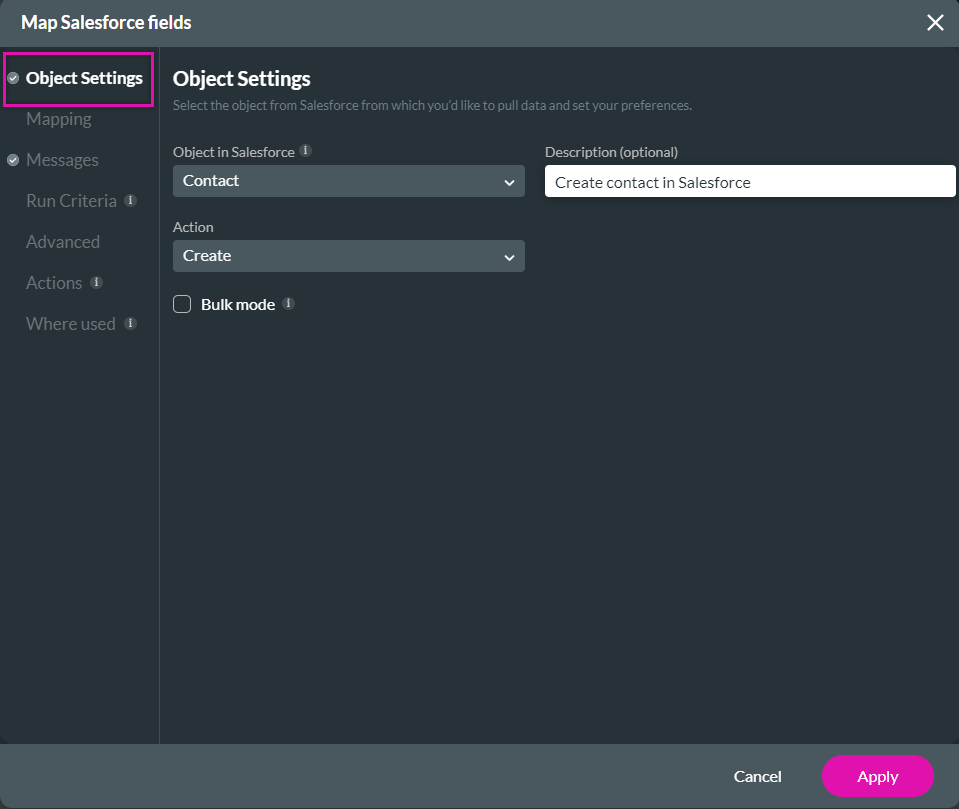
1. Use the Object in Salesforce drop-down list to find the object, for example, Contact.
2. Add a description that defines the purpose of the push.
3. Use the Action drop-down and select Create.
2. Add a description that defines the purpose of the push.
3. Use the Action drop-down and select Create.

06 The Mapping Tab
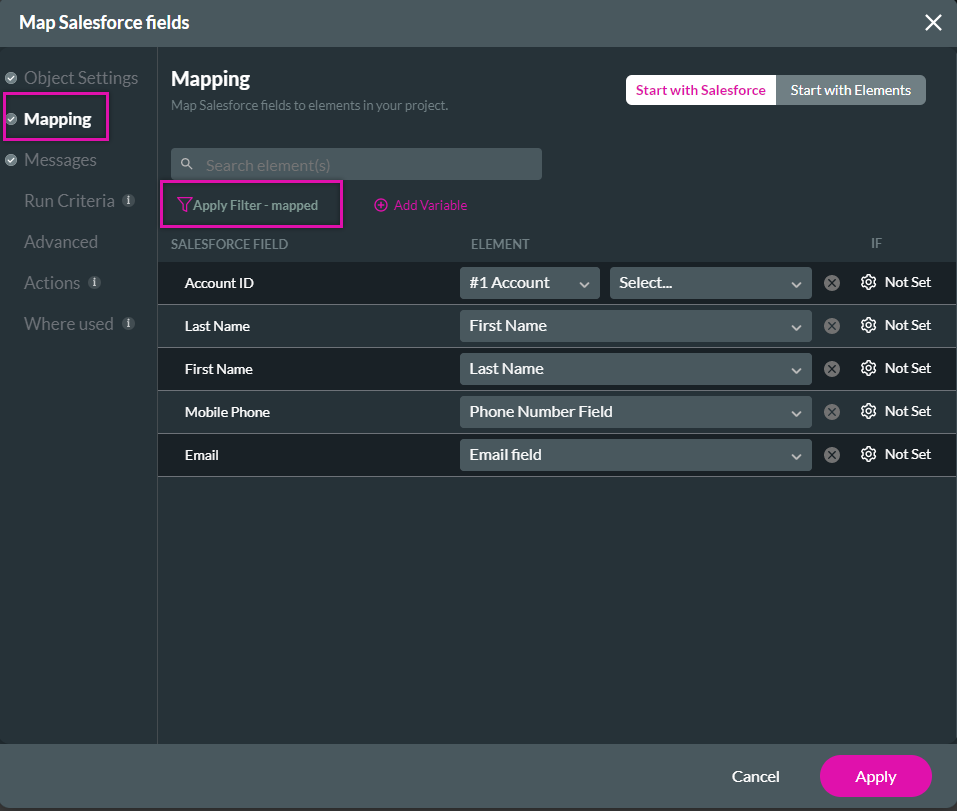
1. Click the Mapping tab to start configuring your mapping.
2. Use the drop-downs to map the Salesforce Fields to the corresponding Elements.
3. Use the filtering options to display what fields you have mapped. Click Apply.
2. Use the drop-downs to map the Salesforce Fields to the corresponding Elements.
3. Use the filtering options to display what fields you have mapped. Click Apply.

07 Creating a Child Push
1. Navigate to the Salesforce Integration screen and select the Push tab.
2. Click on the Kebab icon next to the created get. Select Add Child. The Map Salesforce Screen will open.
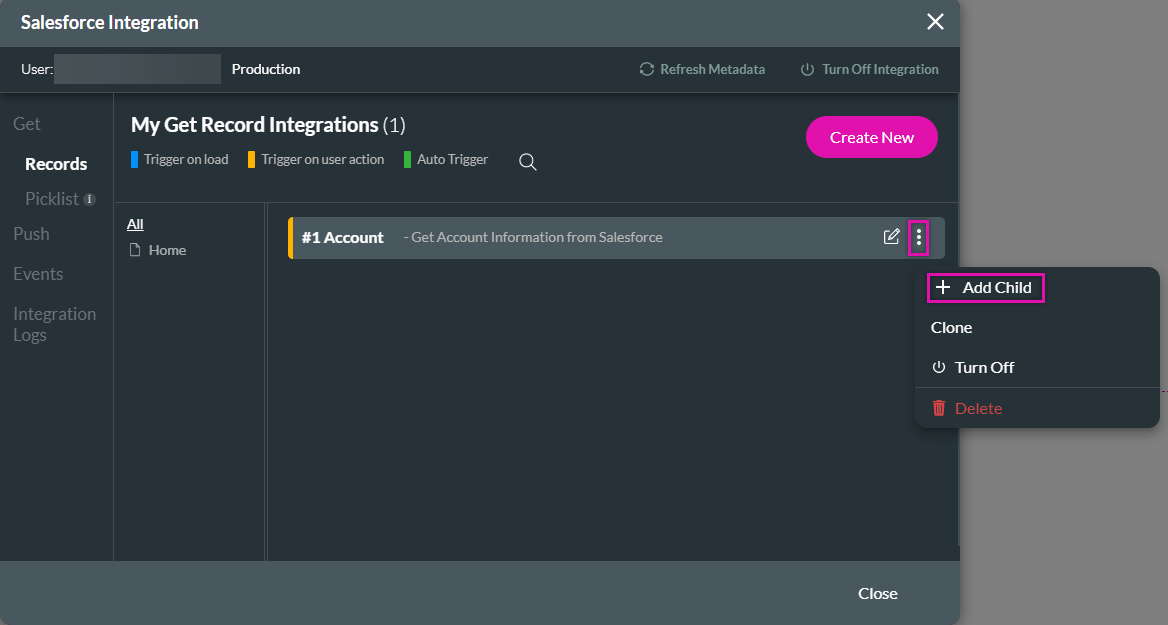
2. Click on the Kebab icon next to the created get. Select Add Child. The Map Salesforce Screen will open.

08 The Object Settings Tab for the Child Push
1. Use the Object in Salesforce to select the Files option. (Content version can also be selected)
2. Add a description that defines the purpose of the child push.
3. Use the action drop-down and select Create.
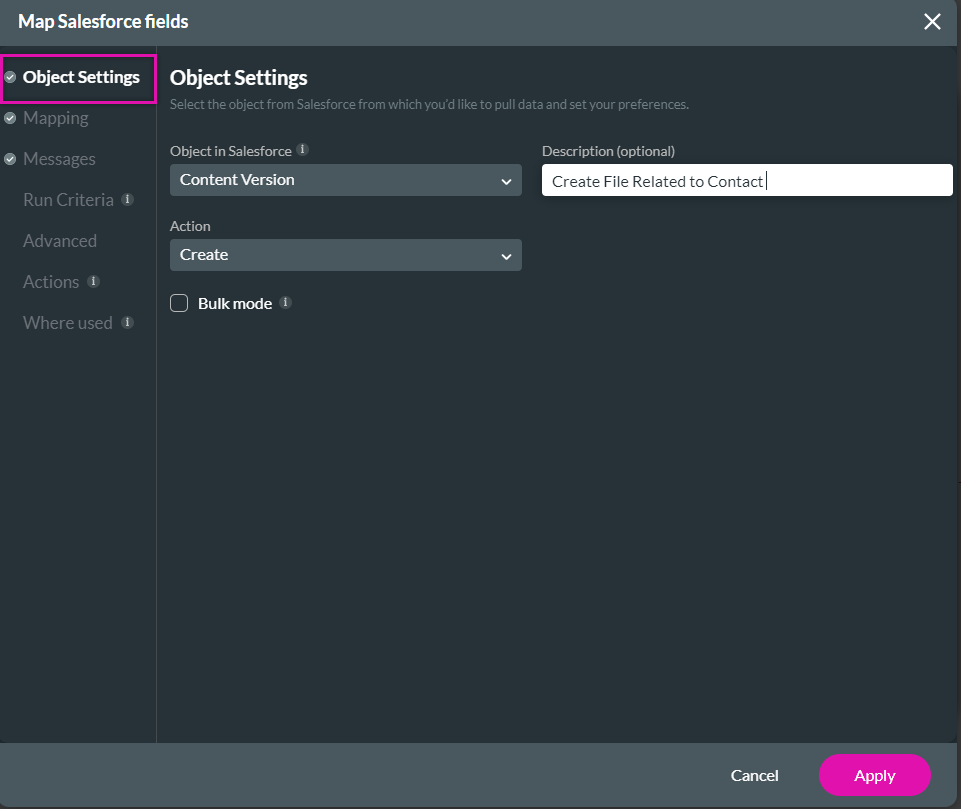
2. Add a description that defines the purpose of the child push.
3. Use the action drop-down and select Create.

09 The Mapping Tab for the Child Push
1. Click on the Mapping Tab. Use the Filters to view the mapped fields.
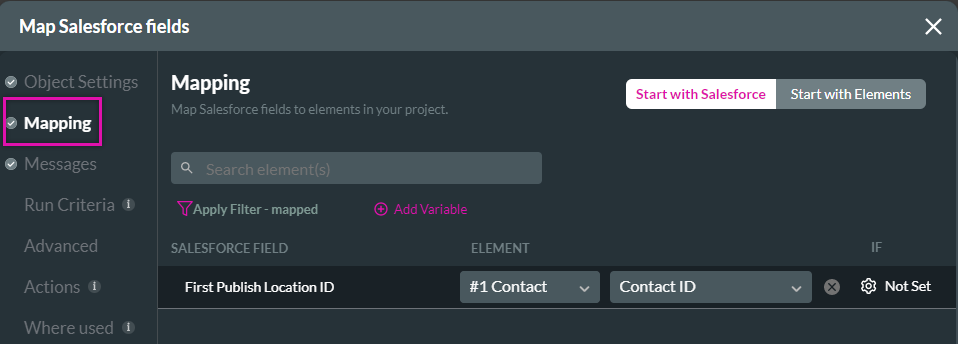
2. The dropdowns map the Version Data field to the file upload element.
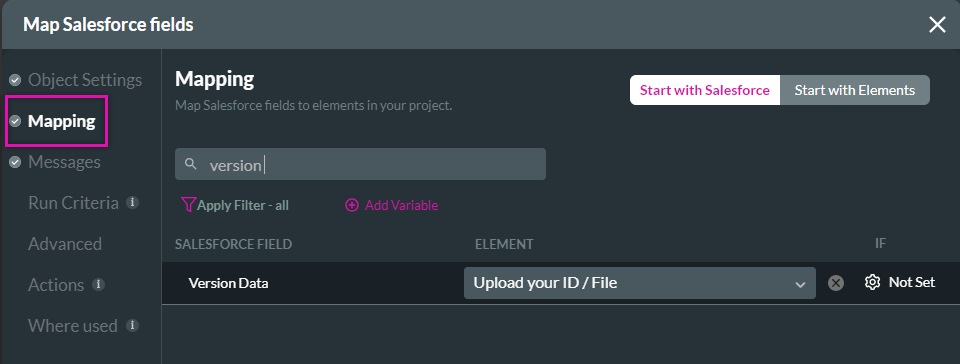
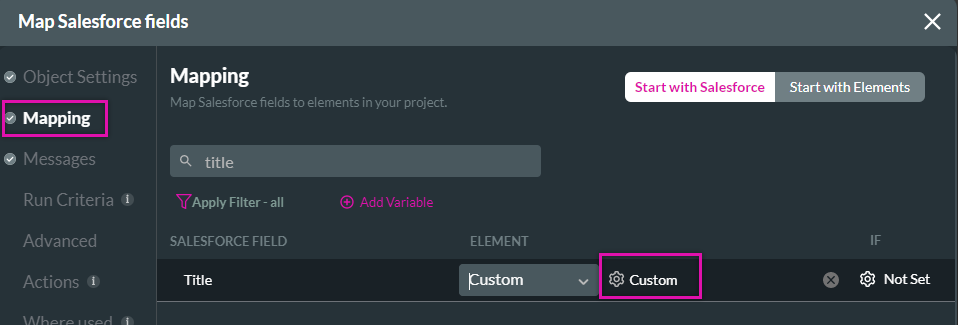
3. We will create a custom message for the Title element. Select custom using the element drop-down and click the Custom Gear icon. The Custom Message window pop-up opens.
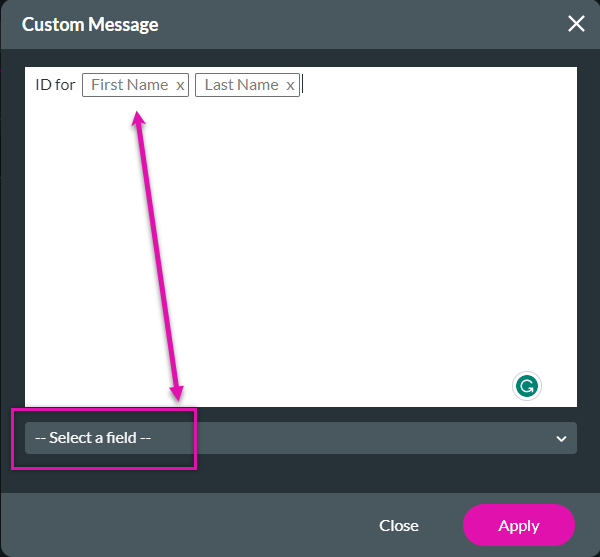
4. Add a custom message and use the drop-downs to select the fields. This will be the title of your document. Click Apply.
Your created child push will be displayed under the parent push. This push will be linked to a button element.

- Titan has automatically mapped the Salesforce Field to the element. This means that the file uploaded will be associated with the contact.

2. The dropdowns map the Version Data field to the file upload element.

3. We will create a custom message for the Title element. Select custom using the element drop-down and click the Custom Gear icon. The Custom Message window pop-up opens.
4. Add a custom message and use the drop-downs to select the fields. This will be the title of your document. Click Apply.

Your created child push will be displayed under the parent push. This push will be linked to a button element.

10 Adding the Push to the Button
1. Click the button element and click the On Click Action icon. The On Click Action screen opens.

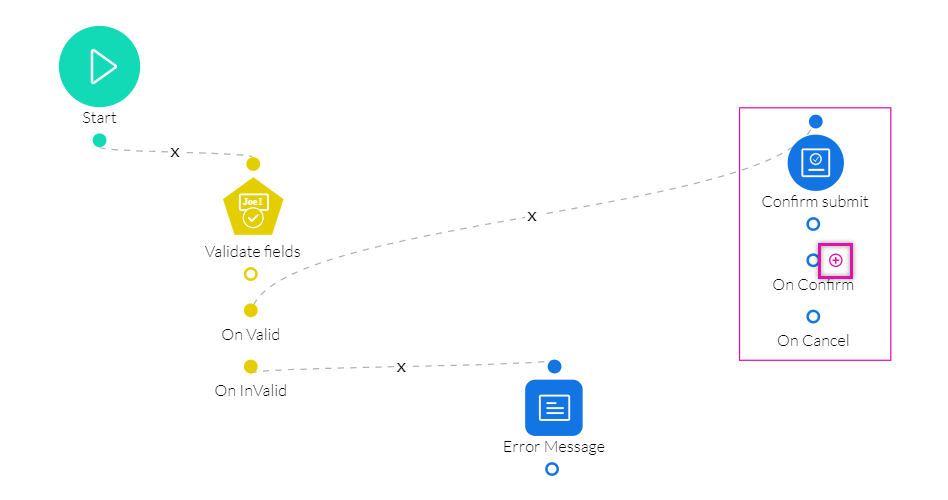
For this tutorial, we will insert the Push to run when the user confirms their submission.
2. Click on the + icon next, and then the add node screen opens.
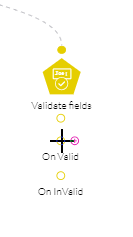
Hover your cursor over the condition to link actions until the + icon displays. Drag the cursor between nodes to create links.
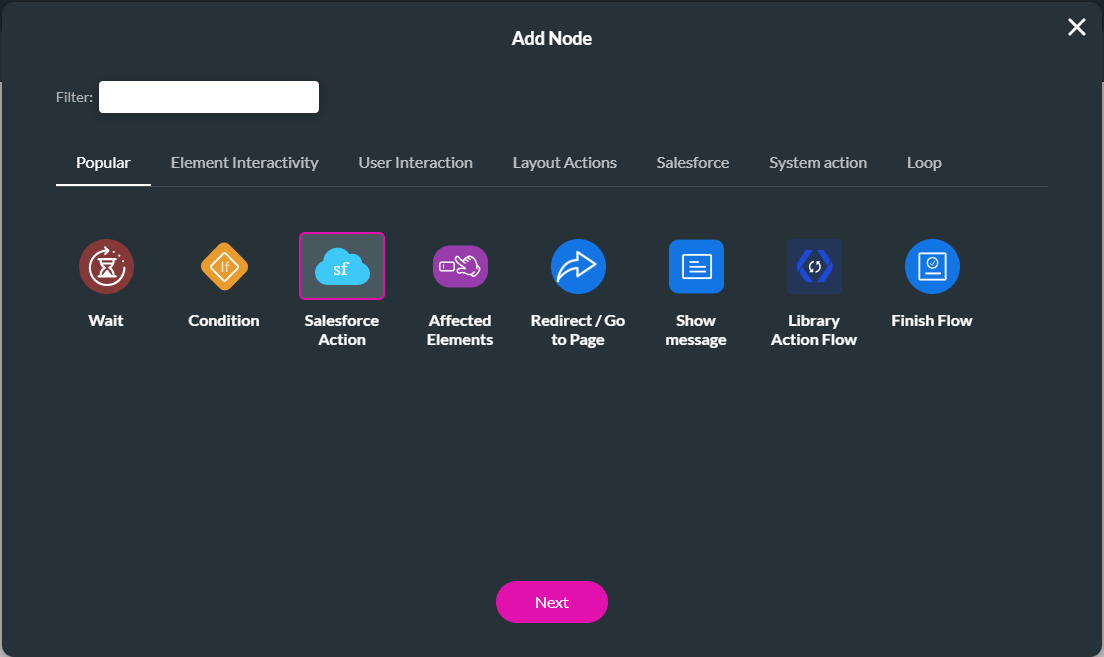
3. Select the Salesforce Action option and click the Next button.
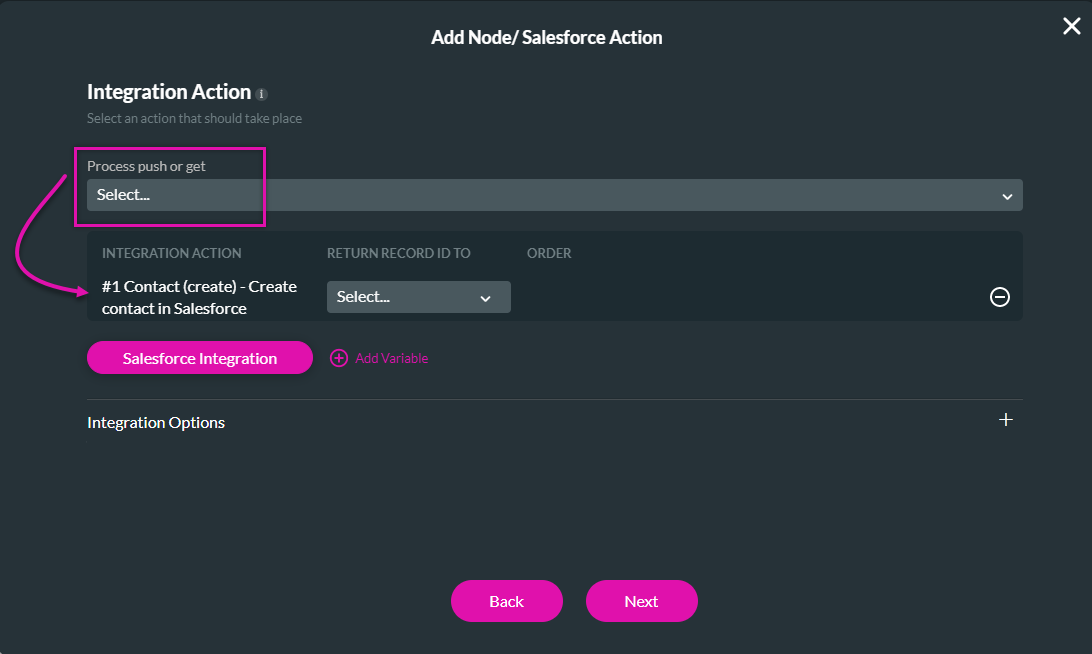
4. Use the Process push or get drop-down list and select the Push you created. Click the Next button.
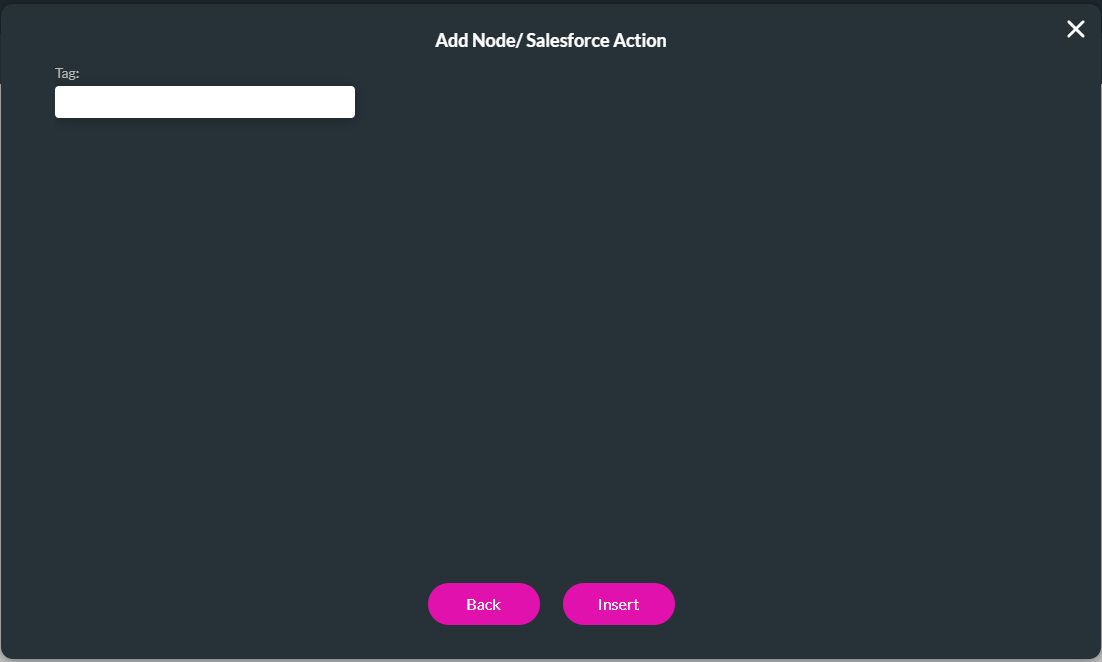
5. Add a tag if necessary and click the Insert button.
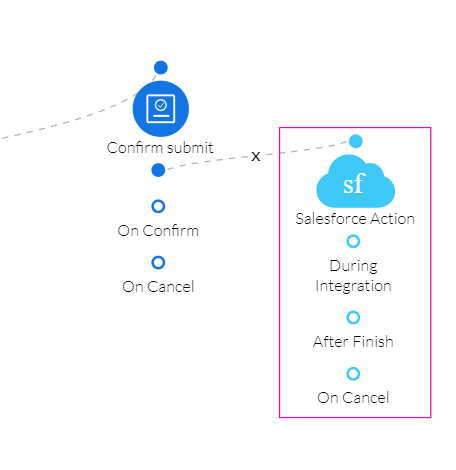
6. The Salesforce action is added to the On Click Action screen. Click the Apply button.

For this tutorial, we will insert the Push to run when the user confirms their submission.
2. Click on the + icon next, and then the add node screen opens.
Hover your cursor over the condition to link actions until the + icon displays. Drag the cursor between nodes to create links.


3. Select the Salesforce Action option and click the Next button.

4. Use the Process push or get drop-down list and select the Push you created. Click the Next button.

5. Add a tag if necessary and click the Insert button.

6. The Salesforce action is added to the On Click Action screen. Click the Apply button.

11 Save and Preview the Project
1. Save and Preview your project.
When a user provides new details, your Salesforce will be updated with their content information, including the captured file.
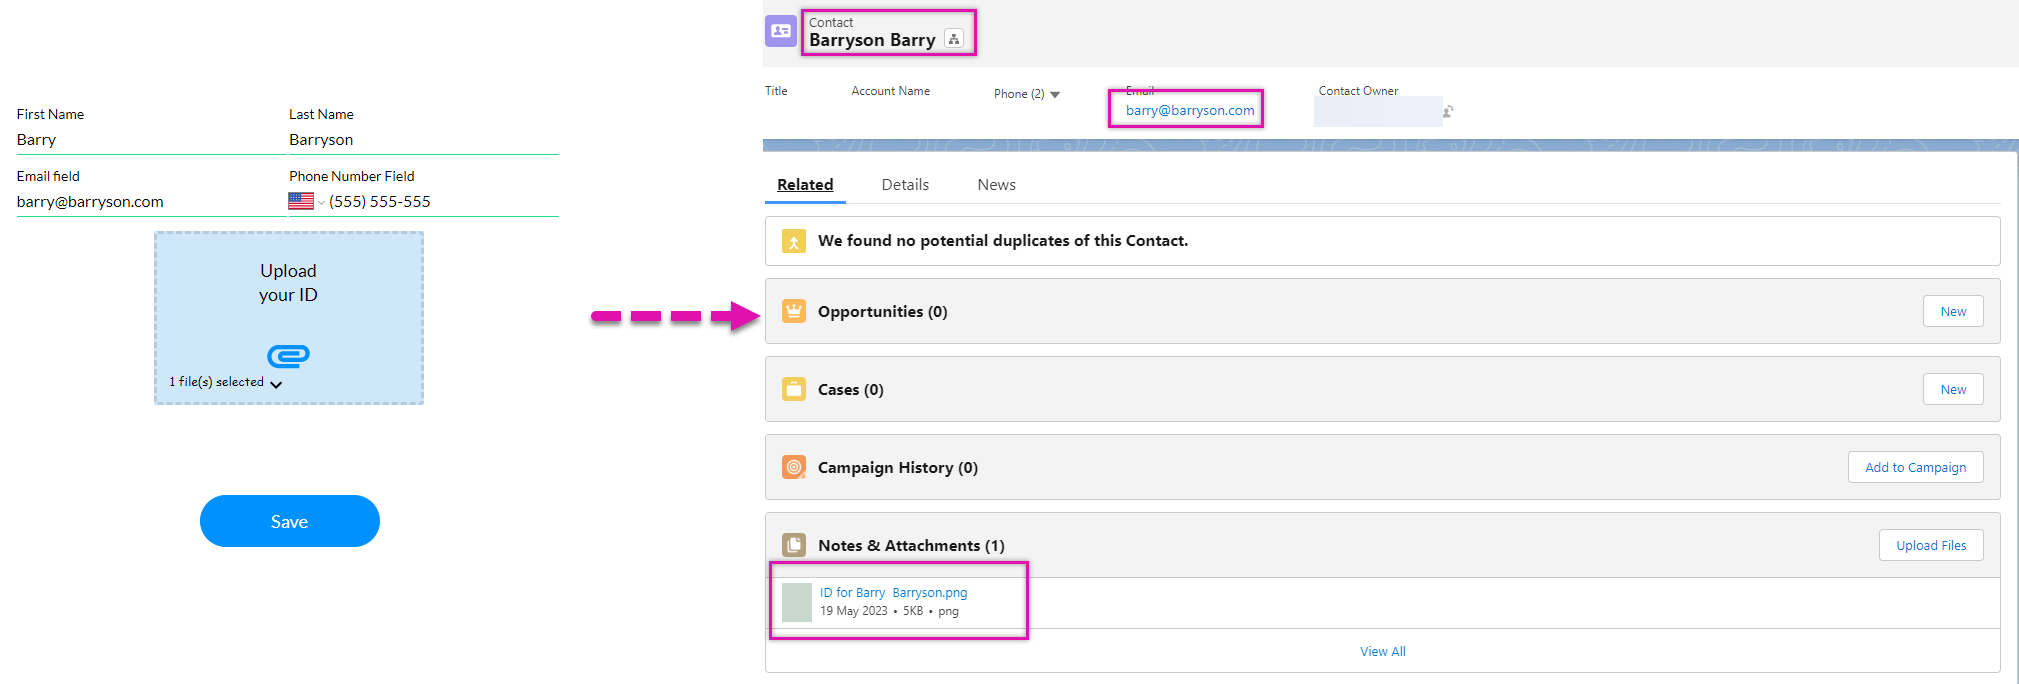
When a user provides new details, your Salesforce will be updated with their content information, including the captured file.

12 Updating a Create Push to an Update Push
1. Go back to your Titan Web project and navigate the Salesforce Integration window.
2. Select the Edit Icon next to your configured Push. The Map Salesforce Screen opens on the Object Settings tab.
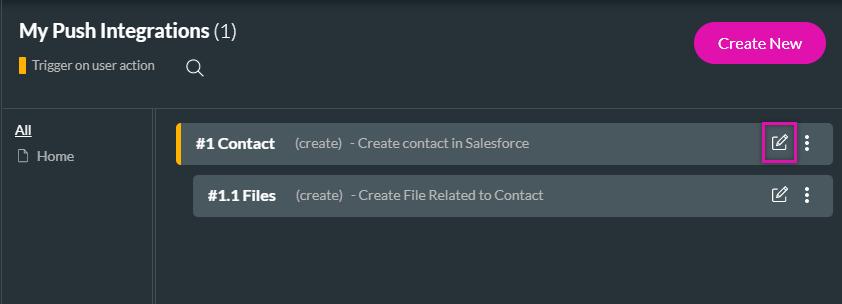
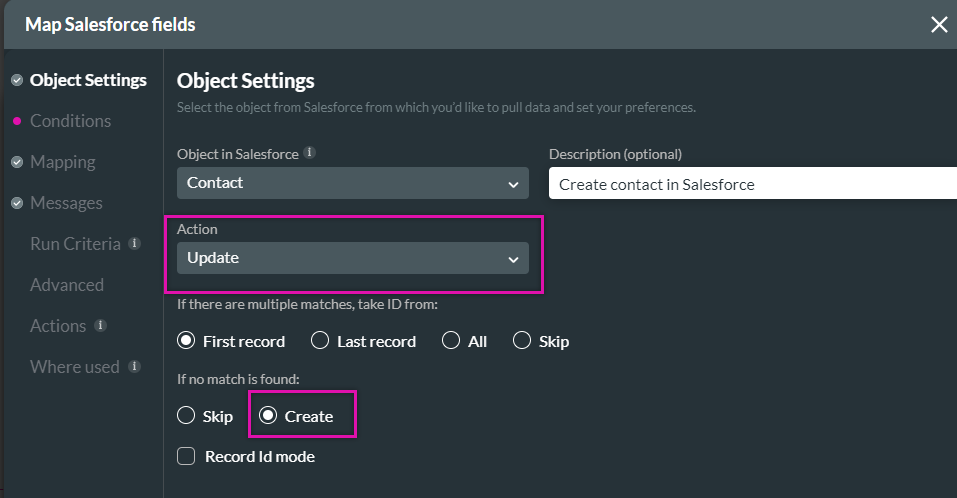
3. Use the Action drop-down to change the action to Update.
4. Click on the Radio button Create under If no match is found. For this use case, we want the Push to create a new contact if no match is found.
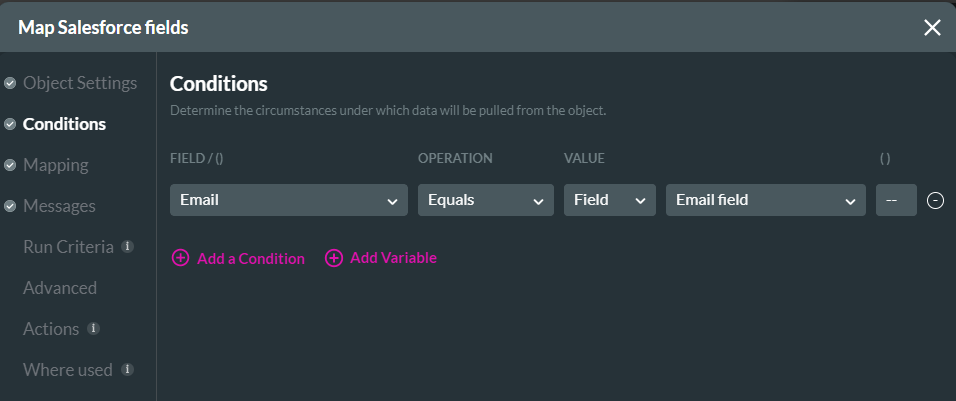
5. Click on the Conditions Tab. Map a condition that if the email address entered by the user matches the data in Salesforce, the contact must be updated. The Push will create a new contact if the email addresses do not match. Click Apply once the configuration is complete.
By updating the existing Push, you do not need to remap the Push to your button element.
2. Select the Edit Icon next to your configured Push. The Map Salesforce Screen opens on the Object Settings tab.
3. Use the Action drop-down to change the action to Update.
4. Click on the Radio button Create under If no match is found. For this use case, we want the Push to create a new contact if no match is found.

5. Click on the Conditions Tab. Map a condition that if the email address entered by the user matches the data in Salesforce, the contact must be updated. The Push will create a new contact if the email addresses do not match. Click Apply once the configuration is complete.

By updating the existing Push, you do not need to remap the Push to your button element.
13 Save and Preview the Project
1. Save and Preview your project.
When the user provides new information associated with an email address, the details will be updated in Salesforce.
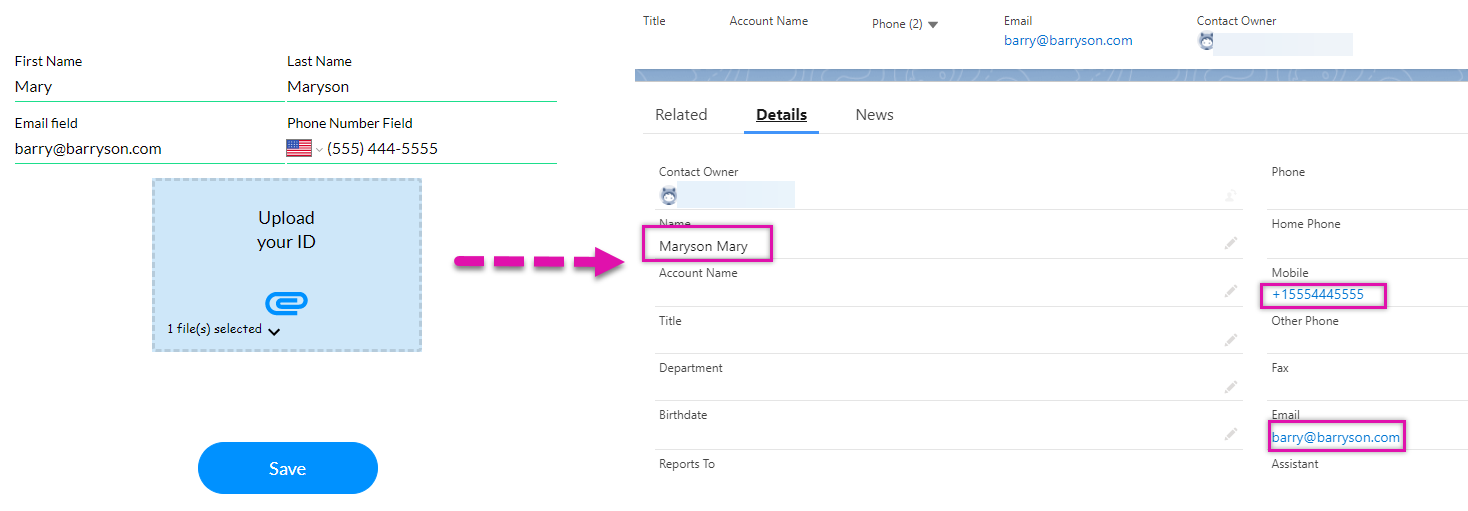
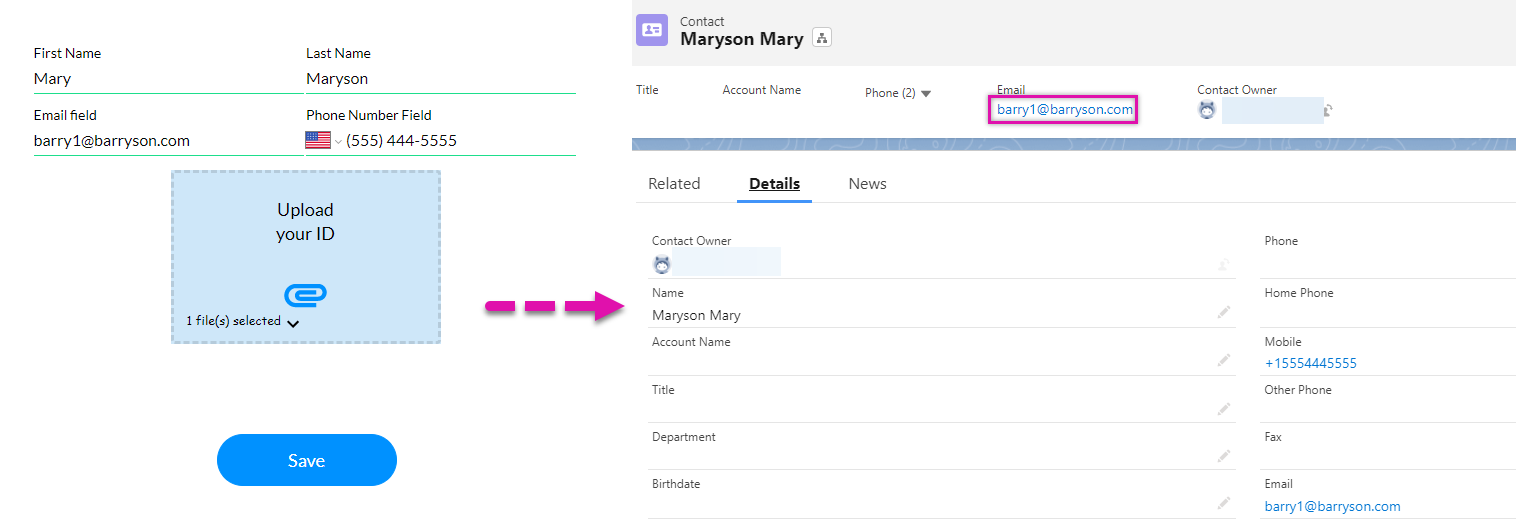
When the user provides new information associated with an email address, the details will be updated in Salesforce.

A new contact will be created if the user provides a different email.
