Prerequisites (12 min)
Completion requirements
01 Getting Started
In this tutorial, we look at the prerequisites.
- Install the Microsoft Titan add-in
- Sign in to the Titan Word Add-in
- Set up Titan and Salesforce
- Make sure that you have the latest version
- Check and configure permission sets
- Open Titan
- Authenticate Salesforce
- Enable API
- Check the Document Generation settings
- Set up collaborators
02 Install the Microsoft Titan add-in
Ensure you have installed the Titan Word Add-in from the Microsoft Store.
1. Open Microsoft Word.
2. Under Insert, click the Get Add-ins option. The Office Add-ins screen opens.

3. In the search field, search for FormTitan or Salesforce and click on the Form Titan—Salesforce composer option.
4. Click the Add button. You must agree to the provider’s license terms and privacy policy.
5. Click the Continue button. The Form Titan tab is added to the standard Word ribbon.

6. Click the Got It button.

7. Click the new Form Titan tab to open it.
1. Open Microsoft Word.
2. Under Insert, click the Get Add-ins option. The Office Add-ins screen opens.

3. In the search field, search for FormTitan or Salesforce and click on the Form Titan—Salesforce composer option.
4. Click the Add button. You must agree to the provider’s license terms and privacy policy.
5. Click the Continue button. The Form Titan tab is added to the standard Word ribbon.

6. Click the Got It button.

7. Click the new Form Titan tab to open it.
03 Sign in to Titan Word Add-in
1. Click the FormTitan logo on the left. The Titan Documents screen opens on the right side of the document.

Note: You must have a Titan username and password or your Titan-associated Salesforce production or sandbox account.
2. Click on Let’s Start. The Sign-in screen opens.

3. Type your email (username) and password in the relevant fields and click the Sign In button. You may have to verify CAPTCHA images.

Note: If your email is associated with a few accounts, please select the account by clicking a radio button and then click the Sign In button.

You are now signed in to the Form Titan Word add-in and can build, preview, and publish the document.

If you have any IT issues related to your company’s security settings, please contact your IT department to have them resolved.

Note: You must have a Titan username and password or your Titan-associated Salesforce production or sandbox account.
2. Click on Let’s Start. The Sign-in screen opens.

3. Type your email (username) and password in the relevant fields and click the Sign In button. You may have to verify CAPTCHA images.

Note: If your email is associated with a few accounts, please select the account by clicking a radio button and then click the Sign In button.

You are now signed in to the Form Titan Word add-in and can build, preview, and publish the document.

If you have any IT issues related to your company’s security settings, please contact your IT department to have them resolved.
04 Set up Titan and Salesforce
Let’s look at the setup in your Titan and Salesforce accounts.
05 Make sure that you have the latest version
1. Go to the Titan Dashboard and click the Settings option.
2. Click the Document Generation option and click on the Settings tab.
3. Please ensure you have installed our latest app by clicking the link. The AppExchange opens.

4. Log in if you haven't already.
5. Click the Get it Now button.

6. Click the applicable button to install the package in Production or Sandbox.

7. On the Confirm Installation Details screen, click the mandatory checkbox that you have read and agree to the terms and conditions.
8. Click the Confirm and Install button. You will be redirected to the Salesforce login screen.

9. Log in to Salesforce. The Install FormTitan screen opens.
10. Select who you want to install the package for by clicking the applicable option:
12. Click the Done button when the installation is complete. The Salesforce Installed Packages screen opens, showing the package installed.
We installed this package for admins only, and certain permission sets apply.

2. Click the Document Generation option and click on the Settings tab.
3. Please ensure you have installed our latest app by clicking the link. The AppExchange opens.

4. Log in if you haven't already.
5. Click the Get it Now button.

6. Click the applicable button to install the package in Production or Sandbox.

7. On the Confirm Installation Details screen, click the mandatory checkbox that you have read and agree to the terms and conditions.
8. Click the Confirm and Install button. You will be redirected to the Salesforce login screen.

9. Log in to Salesforce. The Install FormTitan screen opens.
10. Select who you want to install the package for by clicking the applicable option:
- Install for Admins Only
- This is the option we selected.
- Install for All Users Install for Specific Profiles …
12. Click the Done button when the installation is complete. The Salesforce Installed Packages screen opens, showing the package installed.
We installed this package for admins only, and certain permission sets apply.

06 Check and configure permission sets
1. Search for “permissions” and click the Permission Sets option. Two Titan permission sets have been included in the package.

2. Click the Titan User option.
3. Click the Manage Assignments button.

4. Click the Add Assignment button.

5. Click the checkboxe/s next to name/s to assign permissions to the user/s.
6. Click the Next button.

7. Click the Assign button.

8. Click the Done button.
The package has been installed, and the permissions have been configured. Now, let’s return to your Titan account.
- Titan User: Enable this permission set for regular Salesforce users who need access to Titan.
- Titan User Community: Enable this permission set for any Salesforce community users who need access to Titan.

2. Click the Titan User option.
3. Click the Manage Assignments button.

4. Click the Add Assignment button.

5. Click the checkboxe/s next to name/s to assign permissions to the user/s.
6. Click the Next button.

7. Click the Assign button.

8. Click the Done button.
The package has been installed, and the permissions have been configured. Now, let’s return to your Titan account.
07 Open Titan
You will need to configure the following in your Titan environment:
- Authenticate Salesforce
- Enable API
- Check the Document Generation settings
- Set up collaborators
08 Authenticate Salesforce
1. On the Titan Dashboard, click the Settings option to ensure you are authenticated for Salesforce.
2. On the Integration tab, click the Authenticate button if your Salesforce has not been authenticated.

3. Add your username and password and follow the steps to authenticate.
2. On the Integration tab, click the Authenticate button if your Salesforce has not been authenticated.

3. Add your username and password and follow the steps to authenticate.
09 Enable API
1. Click the API tab and use the toggle switch to allow API access.
2. Make sure that you click the Objects and Submissions checkboxes. These are mandatory. You can also click the other options.

2. Make sure that you click the Objects and Submissions checkboxes. These are mandatory. You can also click the other options.

10 Check the Document Generation settings
1. Now, click the Document Generation tab. Here you will see the custom settings needed in your Salesforce environment for Titan to work.
2. Click the Apply button, and Titan will automatically apply the settings. If there is an error message, you are not logged in as a user who can make the changes, or the package hasn’t been installed.

2. Click the Apply button, and Titan will automatically apply the settings. If there is an error message, you are not logged in as a user who can make the changes, or the package hasn’t been installed.

11 Set up Collaborators
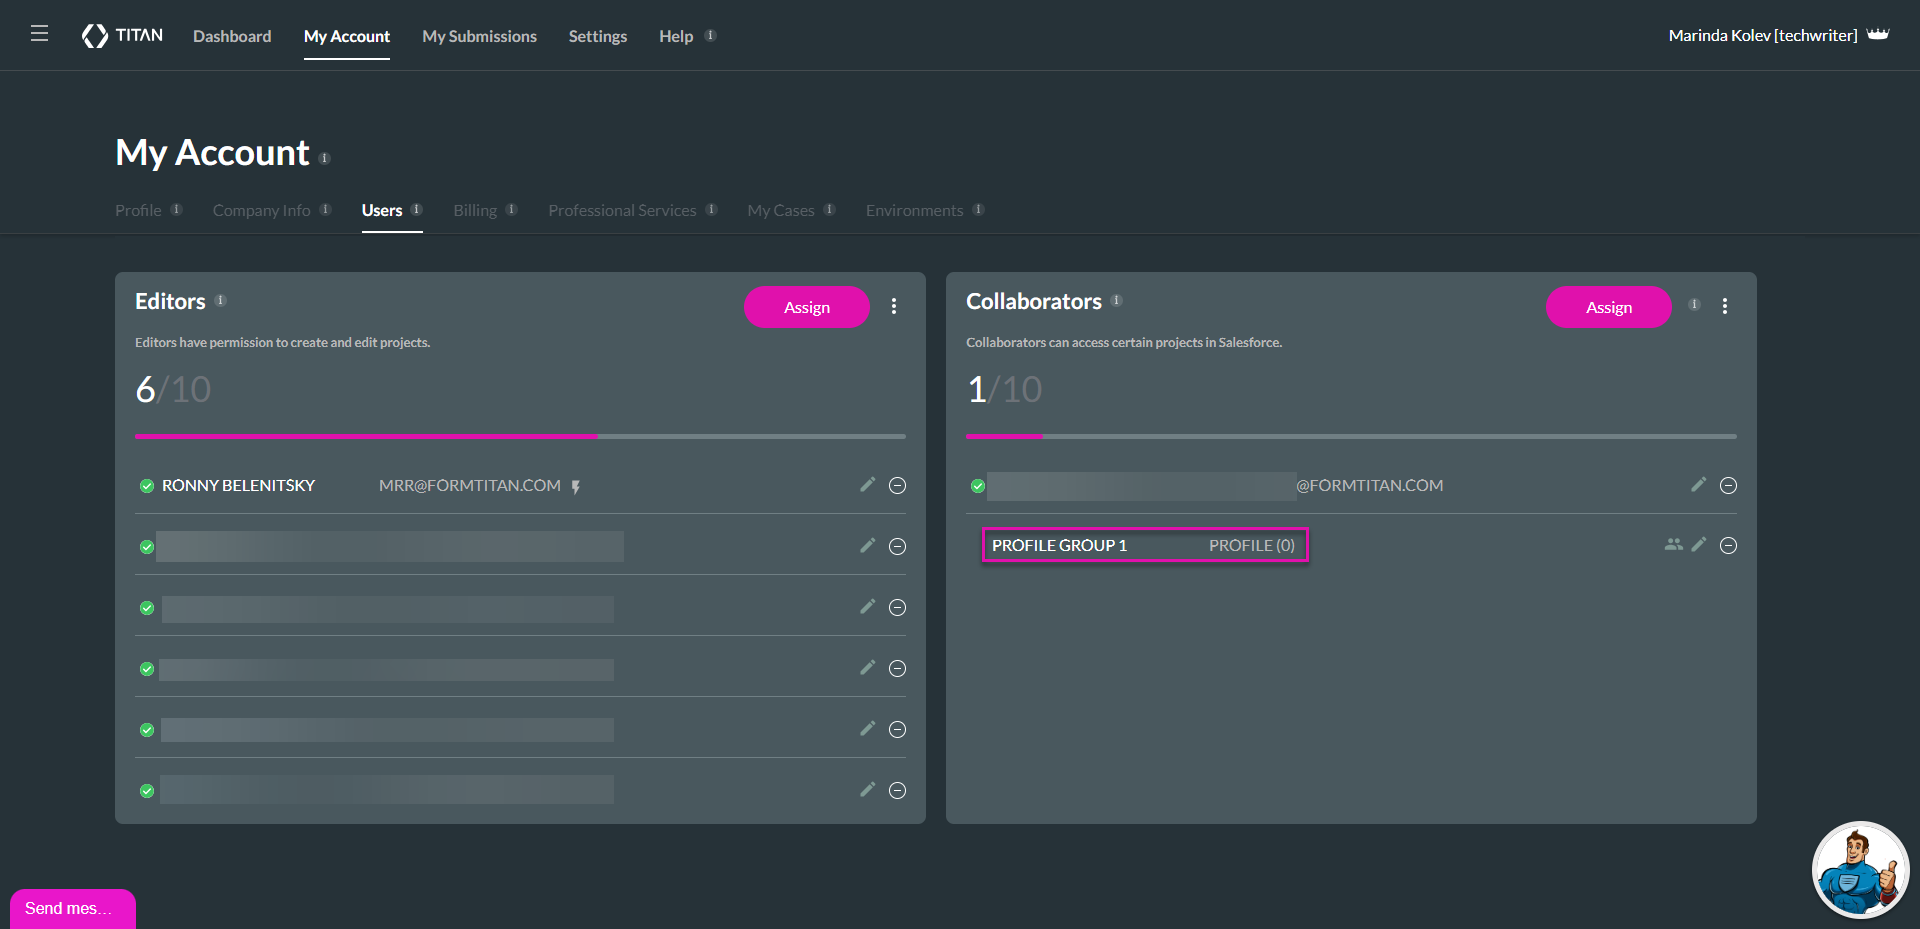
1. On the Dashboard, click the My Account option and then the Users tab. If you have already configured collaborators, they are displayed on the right side of the screen.
2. Click the Assign button to add a collaborator.

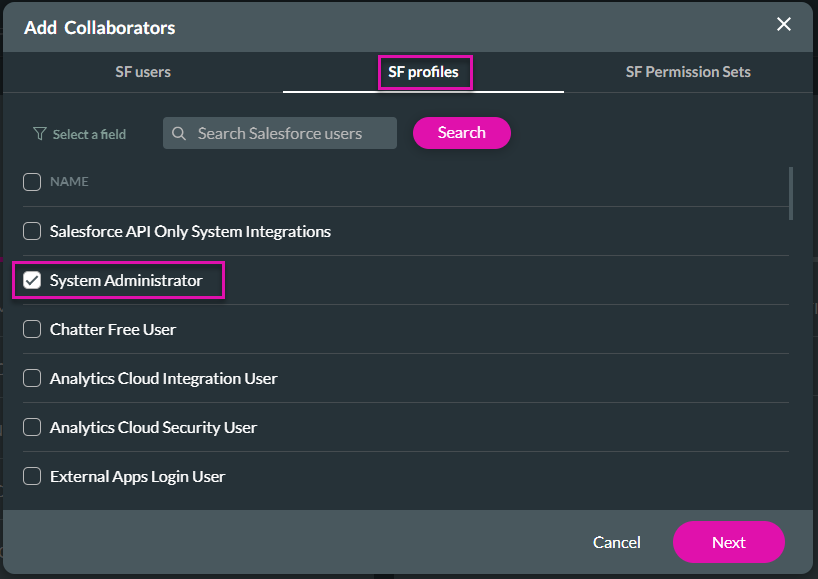
3. Select Salesforce Users, Profiles, or Permission Sets. In this lesson, we selected the System Administrator profile.
4. Click the Next button.

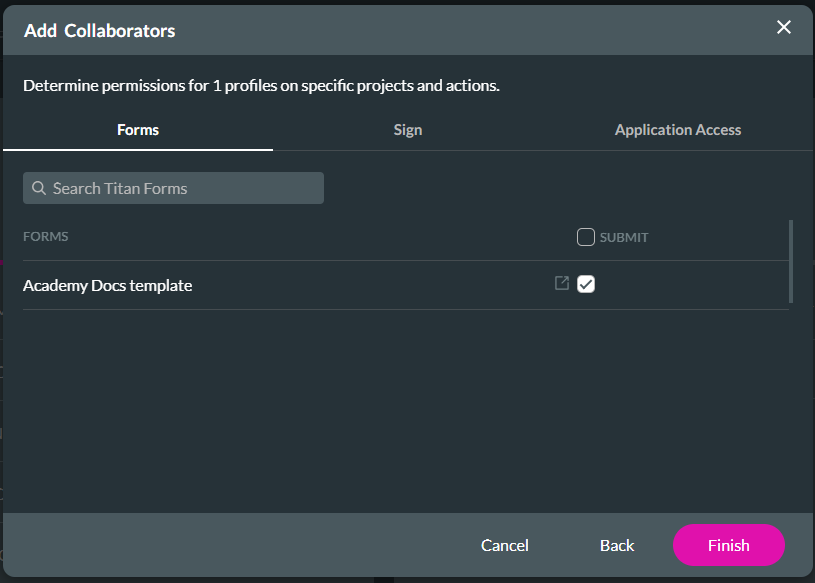
5. Click the checkbox to select the templates to which the collaborator should have access.

The profile group is added to the list, and the system administrator can access the selected document/s.

Thanks for doing the basic prerequisite overview for Titan Docs.
2. Click the Assign button to add a collaborator.

3. Select Salesforce Users, Profiles, or Permission Sets. In this lesson, we selected the System Administrator profile.
4. Click the Next button.

5. Click the checkbox to select the templates to which the collaborator should have access.
- Forms (Titan documents) tab
- This is the option we selected in the lesson.
- Sign projects
- Application Access

The profile group is added to the list, and the system administrator can access the selected document/s.

Thanks for doing the basic prerequisite overview for Titan Docs.